In yesterdays tutorial about how to use the UIPasteboard, I pointed out that UIPasteboard can only store a single item and if you replace a string with a string, the old one gets overwritten, and likewise, if you replace a string with an image, or vice-verse, only the newest is kept.
In this tutorial we are going to create a simple way of storing history of what is in your clipboard/pasteboard.
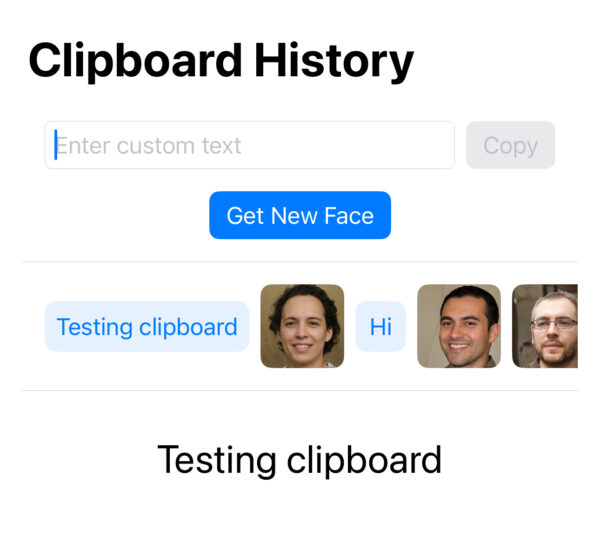
The screenshot above shows what we will be creating. It has a simple text entry field with a copy button, and a Get New Face button that reaches out to thispersondoesntexist.com.
Creating a Custom Pasteboard Item
We begin by creating an enum called PasteboardItem that represents items as text or image. It provides a unique identifier so that it can be used in a list.
enum PasteboardItem: Identifiable {
    case text(String)
    case image(UIImage, String)

    var id: String {
        switch self {
        case .text(let str): return "text-\(str)"
        case .image(_, let identifier): return "img-\(identifier)"
        }
    }
}
We declare the enum as conforming to the Identifiable protocol.
We have two cases in this enum, one is text that takes a String, and the other is an Image that requires a UIImage and String, the string being used for the identifier.
On lines 5 – 10 we implement the id var which is required to conform to Identifiable. In here we have a switch statement that checks the case being created and if text, it gets the String and returns text-somestring. If an image, then it ignores the image, but uses the description to create an id or img-somestring.
ContentView – Creating the UI
struct ContentView: View {
    @State private var pasteboardHistory: [PasteboardItem] = []
    @State private var selectedItem: PasteboardItem? = nil
    @State private var isLoadingFace = false
    @State private var customText: String = ""
We begin by adding some variables using the @State property wrapper. Anytime one of these changes the view will be reloaded.
The first one is an array of PasteboardItem. Next, we have the selectedItem which will be used for if the user taps on something in the pasteboard to show on the view. We then have isLoadingFace that is used to display a spinner, and then a variable to store some custom text.
Before implementing the body of the View, we’ll implement the methods that will be used to support this app.
func copyCustomText() {
    guard !customText.isEmpty else { return }
    UIPasteboard.general.string = customText
    let item = PasteboardItem.text(customText)
    addToHistory(item)
    saveTextItem(customText)
    customText = ""
}
There’s a few things happening in this method. First, we check to make sure we’re not copying something empty. If we are, we return at this point, although the UI also has checks in place to make sure you can only press Copy if there’s something in the field.
Next, we add this item to the UIPasteboard. Because this is the latest item it doesn’t matter that it will overwrite whatever else, if anything, was stored in the UIPasteboard.
On line 4 we create a new item which is a PasteboardItem, and then on the next line we add it to the history. After that we save the text item and then set the customText variable back to an empty string.
Lets take a look at the addToHistory and saveTextItem methods next.
func addToHistory(_ item: PasteboardItem) {
    if let existingIndex = pasteboardHistory.firstIndex(where: { $0.id == item.id }) {
        pasteboardHistory.remove(at: existingIndex)
    }
    pasteboardHistory.insert(item, at: 0)
}

func saveTextItem(_ text: String) {
    let filename = "text_\(Date().timeIntervalSince1970).txt"
    let fileURL = getDocumentsDirectory().appendingPathComponent(filename)
    try? text.write(to: fileURL, atomically: true, encoding: .utf8)
}
The first method, addToHistory, takes a PasteboardItem. We check in the pasteboardHistory array to see if the item exists on line 1, and if so, we remove the item. We then re-add the item at index 0. The reason for this is that we want the latest copies stored at the beginning of our list. By removing the old, we can then put it back at the start without causing a duplicate to happen.
Our saveToFile method takes a String, which in the case of the customText it is the actual text. It then creates a filename with the text and date and then gets the URL and writes the file to disk.
func fetchAndSaveFace() {
    isLoadingFace = true
    let url = URL(string: "https://thispersondoesnotexist.com")!
    let task = URLSession.shared.dataTask(with: url) { data, response, error in
        DispatchQueue.main.async {
            isLoadingFace = false
            guard let data = data, let image = UIImage(data: data), error == nil else {
                print("Error fetching image: \(error?.localizedDescription ?? "Unknown error")")
                return
            }

            let timestamp = Date().timeIntervalSince1970
            let identifier = "face_\(timestamp)"
            let filename = "\(identifier).png"
            let fileURL = getDocumentsDirectory().appendingPathComponent(filename)

            if let pngData = image.pngData() {
                try? pngData.write(to: fileURL)
                UIPasteboard.general.image = image
                addToHistory(.image(image, identifier))
            }
        }
    }
    task.resume()
}
This next method does a few things, which isn’t ideal, but good enough to show how it works.
First, it sets isLoadingFace to true. This is used to start a spinner going to show that something is happening.
Next, we get a URL from a String which is the website where we grab the image. This particular website is used to generate random faces.
On line 4 we create a task, specifically a dataTask from the URLSession class and .shared property. We pass in the URL which will make a network request. We dispatch this to main. It takes a closure that gets called when the request completes. There are three parameters in here which are data, response, and error.
It is dispatched to main so that when it finishes fetching the image the UI can update, although the actual network request will run on a background thread so that it doesn’t hold up the View.
The task is started when task.resume() is called (see line 24).
When the completion handler is called we first check to see if the data is valid and if the image was downloaded correctly. If all is OK, then we get a timestamp, an identifier which is face_timestamp, then a filename which is made from the identifier, and the fileURL. We then save the file, copy it to the UIPasteboard, and add it to history.
Getting the Documents Directory
We have a small helper method:
func getDocumentsDirectory() -> URL {
    FileManager.default.urls(for: .documentDirectory, in: .userDomainMask)[0]
}
We use this in a couple of locations, so its good practice to not rewrite this each time.
Loading the Items
When we close the app, the history array will nolonger exist, this is the reason we have been saving the pasteboardItems to the documents folder. Another option could be to store them in UserDefaults. This next method is responsible for getting the array of PasteboardItem and populating the history.
func loadSavedItems() -> [PasteboardItem] {
    let docURL = getDocumentsDirectory()
    let files = (try? FileManager.default.contentsOfDirectory(at: docURL, includingPropertiesForKeys: nil)) ?? []

    var items: [PasteboardItem] = []

    for url in files {
        if url.pathExtension == "txt",
           let text = try? String(contentsOf: url, encoding: .utf8) {
            let item = PasteboardItem.text(text)
            if let existingIndex = items.firstIndex(where: { $0.id == item.id }) {
                items.remove(at: existingIndex)
            }
            items.insert(item, at: 0)
        } else if url.pathExtension == "png",
                  let image = UIImage(contentsOfFile: url.path) {
            // Image identifier based on file name to ensure consistent ID
            let identifier = url.lastPathComponent
            let item = PasteboardItem.image(image, identifier)
            if let existingIndex = items.firstIndex(where: { $0.id == item.id }) {
                items.remove(at: existingIndex)
            }
            items.insert(item, at: 0)
        }
    }

    return items
}
This method returns an array of PasteboardItem.
We get the documents directory first, and then get the files from that directory.
On line 5 we create an empty array of PasteboardItem and call it items. This will be populated when we iterate over the files we got from the directory and then returned at the end.
Lines 7 – 25 we loop over the files array. If the path extension is txt then we get the contents of the url and create a new PasteboardItem of type text. We check if the item already exists in the items array, which it shouldn’t. If it does, then we remove it, and then on line 14 we insert it at index 0.
If the item extension is a png then we create a UIImage with the contents of the file at the path.
We create an identifier, and then create the item with the image and identifier created.
We run the same checks in that if the item exists already then remove it. We then add it at index 0 which puts it at the beginning.
There is some diplication in here, but for tutorial purposes, you get a grasp of what it is doing.
When complete, it returns the items (array of PasteboardItem) to the caller.
Creating our View
Now that everything is in place, its time to create our view.
var body: some View {
    NavigationView {
        ZStack {
            VStack(spacing: 16) {
                HStack {
                    TextField("Enter custom text", text: $customText)
                        .textFieldStyle(.roundedBorder)
                        .onSubmit {
                            copyCustomText()
                        }

                    Button(action: copyCustomText) {
                        Text("Copy")
                    }
                    .buttonStyle(.bordered)
                    .disabled(customText.isEmpty)
                }
                .padding(.horizontal)

                Button(action: fetchAndSaveFace) {
                    Text("Get New Face")
                }
                .buttonStyle(.borderedProminent)
                .disabled(isLoadingFace)

                Divider()

                ScrollView(.horizontal) {
                    HStack {
                        ForEach(pasteboardHistory) { item in
                            Button(action: {
                                selectedItem = item
                                switch item {
                                case .text(let str):
                                    UIPasteboard.general.string = str
                                case .image(let img, _):
                                    UIPasteboard.general.image = img
                                }
                            }) {
                                VStack {
                                    switch item {
                                    case .text(let str):
                                        Text(str)
                                            .padding(8)
                                            .background(Color.blue.opacity(0.1))
                                            .cornerRadius(8)
                                    case .image(let img, _):
                                        Image(uiImage: img)
                                            .resizable()
                                            .frame(width: 60, height: 60)
                                            .clipShape(RoundedRectangle(cornerRadius: 8))
                                    }
                                }
                            }
                        }
                    }
                    .padding(.horizontal)
                }

                Divider()

                if let selected = selectedItem {
                    Group {
                        switch selected {
                        case .text(let str):
                            Text(str)
                                .font(.title)
                                .padding()
                        case .image(let img, _):
                            Image(uiImage: img)
                                .resizable()
                                .scaledToFit()
                                .frame(maxWidth: 300, maxHeight: 300)
                        }
                    }
                    .transition(.opacity)
                } else {
                    Text("Tap an item to preview")
                        .foregroundStyle(.secondary)
                }

                Spacer()
            }
            .padding()
            .navigationTitle("Pasteboard History")
            .onAppear {
                pasteboardHistory = loadSavedItems()
            }

            if isLoadingFace {
                Color.black.opacity(0.4)
                    .ignoresSafeArea()
                VStack {
                    ProgressView()
                        .progressViewStyle(.circular)
                        .scaleEffect(1.5)
                    Text("Fetching new face...")
                        .foregroundColor(.white)
                        .padding(.top, 8)
                }
                .padding()
                .background(.ultraThinMaterial)
                .cornerRadius(12)
            }
        }
    }
}
I wont go through every line in the view as much of it is self explanatory, but as a brief overview we have a NavigationView that has a title set on line 85 of “Pasteboard History”. Within this navigation view we have ZStacks and HStacks as well as a ScrollView.
The TextField on line 6 is the place where you can write a message. It binds to $customText and when onSubmit is called, it calls the copyCustomText method we looked at earlier.
The button also is added and has an action that calls the same method. The button is disabled/enabled based on the customText being empty.
We have another Button on line 20 that has an action that calls the fetchAndSaveFace method, also discussed earlier. This button disables while isLoadingFace is true.
On line 90, ifLoadingFace is true, we show a ProgressView to let the user know that something is happening. This disapears when isLoadingFace toggles back to false.
Onto our pasteboard contents, these are shown in a ScrollView set to .horizontal. Each item copied is listed in here with the newest being at the start of the view. Each item is a Button that has an action that sets the selectedItem (line 32). The view shows either an image or a string of text each of which can be pushed to show the contents below.
Showing the contents is handled on line 62 where if there is a selectedItem, it shows on the view either as Text on line 66 or as an Image on Line 70.
If you try the app now, you’ll be able to copy text and images to the Pasteboard and retrieve them. Enhancements could include a long-tap gesture that brings up a vertical list of items in the pasteboard that you can tap on to copy into the view where a cursor is.
As mentioned earlier, it would also work in UserDefaults where you might persist the items there.
One thing that might confuse you is why we even need UIPasteboard for this tutorial. The answer is that the storage is handled in documents, but we still use the UIPasteboard to store the latest item. By integrating with the built-in pasteboard, it allows us to tap on an image or text in our history and then go to another device on the same iCloud device and paste that item across. This makes it useful because this is fairly standard behaviour with some enhancements.
Leave a Reply
You must be logged in to post a comment.