The documentation provided with Xcode is extremely helpful. It provides a lot of the information you’ll need to create apps for iOS devices. If you want to know how a particular class works, you look in the documentation to find exactly what is required and what methods are available. Understanding the documentation is one of the keys to being able to successfully start and finish writing an app.
How to Access the Documentation
You can access the documentation in several ways. This includes the web and the Xcode organizer as well as snippets of text that appear when typing in method names. Lets take a quick look at each so that you can get a good understanding of where to find the documentation.
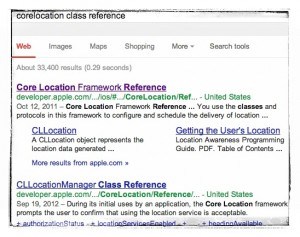
 On the web, you simply need to search for something like “corelocation class reference”. To find the official documentation, look for search results from the developer.apple.com domain name. Typing in the above search term shows the results (image to the left). The first result is the Framework reference which lists the Class References found within that framework. You can select this one, but if you want the corelocation class reference (called CLLocation and CLLocationManager) then you’ll need to select one of them on the next page.
When loading up the actual class reference for CLLocation, you will see the overview and tasks as well as what the class inherits from.
Another way to access to the documentation is through the organizer in Xcode. To get to that, click Window > Organizer (in Xcode) and the organizer will load up. At the top you’ll see several icons. The last one is what you need which is called “Documentation”. This works in a very similar way to the web version. You can search on the left side of the screen and see the results on the right when you select an option.
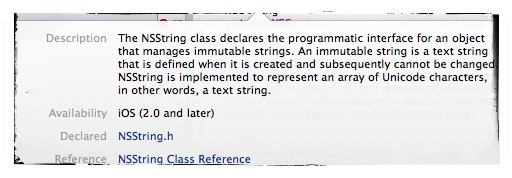
A couple of other ways you can access the documentation include holding ALT on the keyboard and clicking on a method name or class name within your code. When doing that you get a popup box like pictured below which gives a brief description (of NSString in this example). You then can click on the class reference link at the bottom to take you to the rest of the documentation for that class.

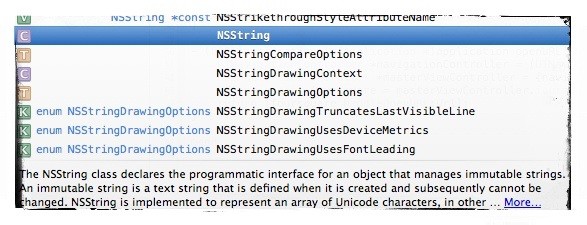
As well as by using ALT click, you can also use the code completion to help you see the documentation. When you begin typing a class such as NSString, the code completion box pops open. When it does, you can see the different options available (NSString is selected in the example below) and again, you can see a small description. Clicking More… takes you to the documentation.

Using the Documentation
Now that you know how to access the documentation, I am now going to explain how to understand the documentation. When I first worked with the documentation I found that I struggled to grasp exactly how to implement what was in there. What had to be explained to me was how to interpret – (NSString *)stringByAppendingString:(NSString *)aString. We’ll get on to that in a few minutes. Lets take a few of the differences you will see when reading the available tasks. For this particular example, we’ll use the CLLocationManager class reference and then later move on to NSString.
Looking through the list you will see that some methods start with a + or a -. Some don’t start with anything and are simply labeled @properties.
Properties
Lets first look at properties. Each property comes with a setter and getter by default (you can override these if needed). The setter is used to set the variable and the getter is used to get the variable. Those that are marked read-only cannot be set from outside the class (publicly they will be readonly which means you can only use the getter publicly). One example of this is the location property. The location property in CLLocationManager is set by the class and uses GPS or other means such as wifi and cell towers, to provide the location. All you can do is read what that value is. I guess you could say you access the setter by moving the iPhone to another location which will trigger an event which will update the property to your new location… but in essence, you cannot access a readonly property with a setter unless from within the class itself (if configured to work that way).
Looking at other properties, the distanceFilter property is not readonly which means you can use the setter to set this property. This particular property is used to specify the minimum distance before an update event is generated. That could be set to None (for constant updates), Best, NearestTenMeters, HundredMeters, KM, 3KM.
How Property Setters and Getters are used
I wont cover how to create your own class and properties here. What I am covering is properties of classes that have already been created.
My personal preference when working with Properties is to use dot notation although you can call the setter and getter as a method if wanted.
Setter with dot notation:
myLocation.isAvailable = YES;
The example line above is setting an @property within the myLocation object. The property is called isAvailable and it is being sent a YES (indicating it is a BOOL). We can safely assume here that we are allowed to do this and that isAvailable is not readonly.
The getter would look like the following:
availability = myLocation.isAvailable;
By shifting the myLocation.isAvailable to the other side of the assignment operator, you are accessing the getter and storing the result in availability. Note that availability needs to be of the correct type to receive the property… in this case, it will have been declared as a BOOL earlier on. Lets move on to methods…
Instance Methods
When using a method, we refer to it as passing a message to an object. Lets take the example I highlighted above:
- (NSString *)stringByAppendingString:(NSString *)aString
In the NSString class reference you will see mention of the above method. I want to break this down so you understand exactly what this means and also I’ll give an actual example of how this can be implemented in code.
Breaking the above line of code down, the beginning starts with a – sign. This indicates the method is an instance method and that it can be called on the object. If there was a + there, it would be referred to as a class method and would be called on the class (I’ll provide an example after this one).
(NSString *) is the return value. When you use this method, you will be given an NSString object as the result. Depending on the method called and what is being returned, you might get a BOOL value, an NSUInteger or perhaps a method will not return a value. In these cases, the word void is between the brackets.
stringByAppeningString is referred to as the selector. The selector is simply the name of the method. Objective-C encourages you to use friendly selectors/method names when creating your own classes so that they make sense when reading them out. One example in NSString is simply length. This indicates you want to know the length of the string.
(NSString *)aString is an argument. Not all methods need to have an argument (length is one example in the NSString class reference that requires no arguments) and in many cases, the method requires more than one argument… sometimes 3 or 4. The (NSString *) portion of the argument tells you what type of object it needs. For this method, it needs an NSString object passing with the message call.
An example of how to use this method:
NSString *myString = @"Hello, ";
myString = [myString stringByAppendingString:@" everybody"];
In the example above, on line 1 we created a new NSString object called myString and stored “Hello, ” in there. On line 2 we used the stringByAppendingString method on the myString object and stored the result back in the myString object.
The method started at the [ and started with the receiver which is myString. The stringByAppendingString selector was then used and the @” everybody” string of text was passed as the argument. The method then appended ” everybody” on to the end of “Hello, ” and stored those results in the myString object (to the left of the = sign). The @” everybody” could have been specified as an NSString which was defined earlier on in the code. The method call finishes with ] and the ; indicates the end of that line of code. In this case, it would look as follows:
NSString *addedString = @" everybody";
NSString *myString = @"Hello, ";
myString = [myString stringByAppendingString:addedString];
Also, we could have stored the result of the method in another string as follows:
NSString *addedString = @" everybody";
NSString *myString = @"Hello, ";
NSString *newString = [myString stringByAppendingString:addedString];
In this last example, we passed myString a message (stringByAppendingString) but instead of assigning that result back in to itself, instead we assigned it back to a newly defined NSString called newString. In English we said “Add the contents of myString and addedString together and return me a string which I will assign to newString”.
What to look out for when Passing Messages
The important things to remember with passing messages are to look for what is returned (if anything), and look for what arguments are required (if any).
I’ll give you another example. In the NSString class there is a method called subStringWithRange:. Lets take a look at what is returned and what is needed.
- (NSString *)substringWithRange:(NSRange)aRange
Here we see that the method returns an NSString. We also see that the argument requires an NSRange. The NSString return value should be familiar now. You simply store the result in an NSString. NSRange is new in this post. To find out what an NSRange is, you can click on the link in the documentation. When opening that up, we see that NSRange is a structure:
typedef struct _NSRange {
      NSUInteger location;
      NSUInteger length;
} NSRange;
What we need to do here is create an NSRange, assign the details needed (location and length) and then pass the NSRange as the argument in that method call. Here’s one way of how to accomplish that:
NSRange myRange;
myRange.location = 8;
myRange.length = 14;
NSString *myString = @"This is my test string";
NSString *newString = [myString substringWithRange:myRange];
Because this method needs an NSRange as an argument, we need to first create the NSRange. This is done on lines 1 to 3. We have called the range myRange on line 1. On lines 2 and 3, we have set the location and length. We can see in the structure that an NSRange has 2 NSUIntegers which is why we simply assign 8 and 14 to it. myRange is then passed as an argument when the method is called on line 5. On line 4 we just provided some sample to work with in an NSString.
If we NSLog newString we will see… “my test string”. We specified that the subsctringWithRange was to start at position 8 and that it was to include the next 14 characters.
Please note that this is very simple code. There is no error checking here and should we have set the length to 18, the program would have crashed. To use the substringWithRange method, you might want to first use the length method from NSString to get the length of the string so that you can error check the values you are passing for the argument… ie, do they fall outside of what is available? If so, do not call the method.
A quick look at Class Methods
In the examples above, we used instance methods. These are messages passed to objects such as myString. They always follow the same syntax of [receiver selector:argument] with receiver being the object. Ie.. if myString contained @”Hello, world!” then an instance method would be doing something with my @”Hello, world!” string.
Class methods are a little bit different. Instead of passing the message to an object (that you have created), you pass the message to the class itself and it returns something that can be assigned to an object.
One example I can share from the NSString class is the stringWithFormat: class method.
+ (id)stringWithFormat:(NSString *)format, ...
First, notice how this method starts with a +. All methods starting with a + are class methods. The return type here is (id) which essentially means “any object” but the documentation points out that this method does return an NSString, so make sure you read the details because it would crash if you tried to assign the result to an NSUInteger as an example. For the argument it mentions (NSString *)format, ….
Lets take a look at what the “format, …” is referring to. Reading the description of this method the parameters section shows that format is a format string. The … part is referring to a comma-separated list that can be substituted in to format.
If you have used NSLog then you might be familiar with how formatting a string works. A typical NSLog line might look like this:
NSLog(@"%@", object1);
The “%@” is a place holder. Object1 is put in its place as a string.
NSLog(@"%i", count);
Here, using %i we are saying that the string should be formatted with an integer. We can assume that count here is an integer.
You can also comma-separate values if you wish:
NSLog(@"%i %i %i", count, count1, count2);
The %i’s are replaced in order with count, count1 and count2 to create a formatted string.
Bringing this back to the stringWithFormat method, this particular class method is used to get some object, convert it to a string and then return a string.
Example code:
NSString *myString = [NSString stringWithFormat:@"%i", count];
What we are doing here is creating a string from an integer. Count is an integer formatted as described with the %i. Note how this message is passed to the NSString class and not myString or other NSString object. [NSString stringWithFo…..];.
If you are unsure why some methods are class methods and others are instance methods, think of it in terms of what needs to be achieved and what is needed to achieve it. If you want to format some object in to a string then do you really need to call this method on an already created object? Not really. You are simply using a class method available which does all the magic behind the scenes. In essence, you are saying… “Hey, NSString… give me a string from this object (an integer in this case) please and store it in the NSString called myString”.
If it were an instance method then you would be saying “Hey, NSString, I have this bit of text here. I want you to read what it is but ignore what it is, because it isn’t important. I then want you to create me another string from an object I am passing as an argument and then store it in the NSString called myString”.
The latter version is just a step too far. The instance of the object isn’t important here. stringWithFormat doesn’t require an already existant NSString to work with. It simply needs to be fed something in some format and then spit out an NSString as the return value… hence, why it is a class method.
Conclusion
I hope this lengthy post has helped you understand the documentation a little more. When breaking down what each part of a method means such as the receiver, selector, argument(s), you can really start to understand what you are getting if you use the method and also what the method requires if you want to run it.
Knowing that a method returns a BOOL will then allow you to create a BOOL to store the return value in. Likewise, if the arguments of a method require a CLLocation * then you can search the documentation and see how to correctly format the CLLocation so that it works as an argument.
Please post any questions below.
mosley says
I would love to see this updated for Xcode 8…
Matthew says
Fair point. I’ll get working on that soon. There have been some big changes since I first wrote this post.