The motion effect applied to the background of your iphone is accomplished using the UIInterpolatingMotionEffect. This is a very subtle effect that simply moves an object, in this case a UIImage, along the X and Y Axis And while it doesnt have to be both the X and Y axis, moving the object along both will produce the wonderful parallax effect.
To begin with create an image which is larger than the view. In this case Ill make my image 704 X 1250 for the @2x version and 352 X 625 for the 1x version. Choose or create an image with some detail so that the movement is noticeable. If you do not have an image to hand, you can find the necessary images in the project which is linked to at the bottom of this post. Your 1x version should be named in the format of image.png and the 2x version should be called image@2x.png.
Create a Single View Application, tutorial on how to do that is found here.
First off open the Image.xcassette folder and create a new image set by right clicking just below AppIcon/LaunchImage in the white space. Name it lrgBG then drag the images you created onto the image landing pads.

Open the Main Storyboard and drag on an ImageView to fill the ViewController.
Open the assistant editor (buttons top right of the top tool bar) and make sure that you are looking at the ViewController.h file.
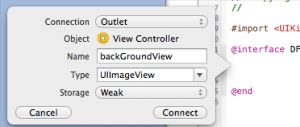
 Now control drag from the image view to the dot h file between the @interface and @end lines and name the outlet backGroundView. This is all that is needed in the .h file but before we move on to the implementation file to set up the motion effect, lets do a little tweaking on the ImageView in our inspector pane!
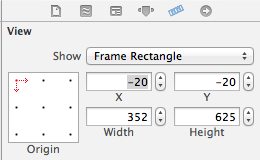
 From the Storyboard select the imageview on the ViewController. In the inspector pane select the size inspector. Make sure the small x and y red lines are in the top left because here were going to tell xcode that the image is larger than what is being shown. The X and Y can be set at -20 and the width should be 352 while the height should be 625.
One final step in the storyboard is that we need to specify the image to use on the UIImageView. To do this, we need to click on the UIImageView on the storyboard and then click on the “attributes inspector” at the top of the right sidebar in Xcode. At the top of the attributes inspector is the Image View. In the drop down for Image, select the image assets which in this case is lrgBG. When selected, you will see your choice of image appear in the storyboard in the UIImageView.
Now on to the implementation file, the ViewController.m.
Create a method in the implementation file and name it backGroundMotion
- (void)backGroundMotion {

}
The motion effect needs to know what its limits of movement are, so well define the minimum and maximum amount of movement along each axis. To do this well use two float values which will be named min and max.
Our first line of code in our method will be the float values¦
- (void)backGroundMotion {
    CGFloat min = -20.0f;
    CGFloat max = 20.0f;
}
So now we have a float named min, and a float named max that we will refer to in a moment. Changing these values changes the amount of movement . You can experiment here and see what looks and feels good to you once the effect is applied.
Now we need to create the X motion axis and we do that by using the UIInterpolatingMotionEffect. Big name, simple action.
- (void)backGroundMotion {
    CGFloat min = -20.0f;
    CGFloat max = 20.0f;

    // create the x axis motion
    UIInterpolatingMotionEffect *xAxis = [[UIInterpolatingMotionEffect alloc]initWithKeyPath:@"center.x" type:UIInterpolatingMotionEffectTypeTiltAlongHorizontalAxis];

    xAxis.minimumRelativeValue = @(min);
    xAxis.maximumRelativeValue = @(max);
}
This simply wants to know what of the object are we effecting and where. In this case it is the tilt of the horizontal access from the center of the image.
We do the same for the Y Axis.
- (void)backGroundMotion {
    CGFloat min = -20.0f;
    CGFloat max = 20.0f;

    // create the x axis motion
    UIInterpolatingMotionEffect *xAxis = [[UIInterpolatingMotionEffect alloc]initWithKeyPath:@"center.x" type:UIInterpolatingMotionEffectTypeTiltAlongHorizontalAxis];

    xAxis.minimumRelativeValue = @(min);
    xAxis.maximumRelativeValue = @(max);

    // create the y axis motion
    UIInterpolatingMotionEffect *yAxis = [[UIInterpolatingMotionEffect alloc]initWithKeyPath:@"center.y" type:UIInterpolatingMotionEffectTypeTiltAlongVerticalAxis];

    yAxis.minimumRelativeValue = @(min);
    yAxis.maximumRelativeValue = @(max);
}
Now the magic happens when we group these together using UIMotionEffectGroup.
All we need to do is tell it what is in our Effect Group. In our case it will be the xAxis and the yAxis we just created.
- (void)backGroundMotion {
    CGFloat min = -20.0f;
    CGFloat max = 20.0f;

    // create the x axis motion
    UIInterpolatingMotionEffect *xAxis = [[UIInterpolatingMotionEffect alloc]initWithKeyPath:@"center.x" type:UIInterpolatingMotionEffectTypeTiltAlongHorizontalAxis];

    xAxis.minimumRelativeValue = @(min);
    xAxis.maximumRelativeValue = @(max);

    // create the y axis motion
    UIInterpolatingMotionEffect *yAxis = [[UIInterpolatingMotionEffect alloc]initWithKeyPath:@"center.y" type:UIInterpolatingMotionEffectTypeTiltAlongVerticalAxis];

    yAxis.minimumRelativeValue = @(min);
    yAxis.maximumRelativeValue = @(max);

    // combine these is a group
    UIMotionEffectGroup *xyGroup = [[UIMotionEffectGroup alloc]init];
    xyGroup.motionEffects = @[xAxis, yAxis];
}
For the final part of this method, we apply our effect group to the image.
- (void)backGroundMotion {
    CGFloat min = -20.0f;
    CGFloat max = 20.0f;

    // create the x axis motion
    UIInterpolatingMotionEffect *xAxis = [[UIInterpolatingMotionEffect alloc]initWithKeyPath:@"center.x" type:UIInterpolatingMotionEffectTypeTiltAlongHorizontalAxis];

    xAxis.minimumRelativeValue = @(min);
    xAxis.maximumRelativeValue = @(max);

    // create the y axis motion
    UIInterpolatingMotionEffect *yAxis = [[UIInterpolatingMotionEffect alloc]initWithKeyPath:@"center.y" type:UIInterpolatingMotionEffectTypeTiltAlongVerticalAxis];

    yAxis.minimumRelativeValue = @(min);
    yAxis.maximumRelativeValue = @(max);

    // combine these is a group
    UIMotionEffectGroup *xyGroup = [[UIMotionEffectGroup alloc]init];
    xyGroup.motionEffects = @[xAxis, yAxis];

    //  apply what was created to the image
    [self.backGroundView addMotionEffect:xyGroup];
}
The final step is to call the method we just created on the view when the view appears and well do this in ¦
- (void)viewWillAppear:(BOOL)animated {
    [self backGroundMotion];
}
Build and run on a device. The simulator does not have motion sensors to activate the effect so unless tested on a device you wont see anything.
Also be aware that this effect will place additional demands on the battery so it should be used sparingly.
Please find the full downloadable tutorial on GitHub.
ViewController.h
#import

@interface DFViewController : UIViewController

@property (weak, nonatomic) IBOutlet UIImageView *backGroundView;

@end
ViewController.m
#import "DFViewController.h"

@interface DFViewController ()

@end

@implementation DFViewController

- (void)viewWillAppear:(BOOL)animated {
    [self backGroundMotion];
}

- (void)viewDidLoad
{
    [super viewDidLoad];
	// Do any additional setup after loading the view, typically from a nib.
}

- (void)backGroundMotion {
    CGFloat min = -20.0f;
    CGFloat max = 20.0f;

    // create the x axis motion
    UIInterpolatingMotionEffect *xAxis = [[UIInterpolatingMotionEffect alloc]initWithKeyPath:@"center.x" type:UIInterpolatingMotionEffectTypeTiltAlongHorizontalAxis];

    xAxis.minimumRelativeValue = @(min);
    xAxis.maximumRelativeValue = @(max);

    // create the y axis motion
    UIInterpolatingMotionEffect *yAxis = [[UIInterpolatingMotionEffect alloc]initWithKeyPath:@"center.y" type:UIInterpolatingMotionEffectTypeTiltAlongVerticalAxis];

    yAxis.minimumRelativeValue = @(min);
    yAxis.maximumRelativeValue = @(max);

    // combine these is a group
    UIMotionEffectGroup *xyGroup = [[UIMotionEffectGroup alloc]init];
    xyGroup.motionEffects = @[xAxis, yAxis];

    //  apply what was created to the image
    [self.backGroundView addMotionEffect:xyGroup];
}

- (void)didReceiveMemoryWarning
{
    [super didReceiveMemoryWarning];
    // Dispose of any resources that can be recreated.
}

@end
Luiz Carrion says
thank you! it was very helpful.