The 5S was the first iPhone that integrated a fingerprint sensor in to the home button. When configuration is complete, it allows quick access to the iPhone by checking if your fingerprint matches one that is stored. If there’s a match, you get in and if not, it denies access.
When Touch ID was introduced in iOS 7 on the iPhone 5S, it was only available for Apple apps. When iOS 8 launched, they allowed 3rd party developers to also access this feature. In todays tutorial, we’ll take a look at how to integrate touch ID in to your iPhone app. Note that since the new iPad air and new iPad mini now include a touch ID sensor, this tutorial is also compatible with those devices although I will be testing with an iPhone 6.
Requirements
This tutorial requires that you have an iPhone 5S or newer or the latest iPad air or latest iPad mini (basically any iOS device with a touch ID sensor). You also need to be running iOS 8 or newer and also be using Xcode 6. Because we will be testing on an actual device rather than a simulator, you will also need to be enrolled in the iOS developer program and have paid the $99 yearly fee.
Creating the Project
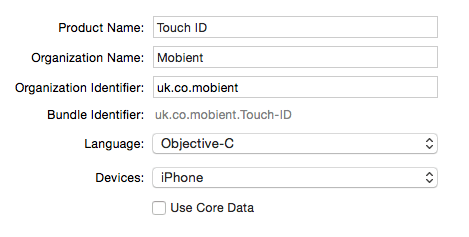
First, load up Xcode 6 and go to create a new project. To save some steps setting up a default view, select the Single View Application (in the iOS section) and click Next. Give the project a name such as Touch ID and fill in the Organisation name, Organisation Identifier and set the other options as below. Note that the general way we select an organization identifier is by spelling out a name in reverse. In the case of our app development business which is mobient.co.uk, we reverse that by putting uk.co.mobient. In the Bundle Identifier line below, the Touch-ID (project name with hyphen automatically added) gets appended to the end.

 When the project is ready to go, load up the storyboard by clicking on Main.storyboard in the navigation pane to the left. When the storyboard loads up, you will see just a single view that is currently empty. We need to add a few objects to it which will include a progress bar and an image view. All this simple app will do is load up a pre-defined URL and as the page loads, it will show the progress of the page load and when done, it will show the item on screen.