In this tutorial we will look at Device Motion which provides various measurements from the sensors on the iPhone. The data is represented by the CMDeviceMotion class which encapsulates measurements taken by the onboard sensors.
Rather than providing raw values from the accelerometer, gyroscope, or magnetometer, the CMDeviceMotion class provides data that has been processed by “Core Motion’s sensor fusion algorithms”. The data is cleaned up, and has bias removed.
In todays tutorial we’re going to look at how to access CMDeviceMotion and create a simple needle that faces down regardless of the direction you rotate the phone around the Z axis.
Lets begin by creating a single view application. Next, import Core Motion at the top of ViewController.swift:
import CoreMotion
Just below the class declaration, create a CMMotionManager:
let motionManager = CMMotionManager()
In viewDidLoad, add the following code:
if motionManager.isDeviceMotionAvailable {
    motionManager.startDeviceMotionUpdates(to: OperationQueue.main) { (motion, error) in
        let radians = atan2((motion?.gravity.x)!, (motion?.gravity.y)!) - .pi
        let degrees = radians * 180.0  / .pi
        self.needleView.rotation = -degrees
        self.needleView.setNeedsDisplay()
    }
}
On line 1 we check the property isDeviceMotionAvailable. Assuming this returns true, we can then call startDeviceMotionUpdates: on the motionManager (see line 2). This contains a handler which called CMDeviceMotionHandler which is called each time device motion is available. The CMDeviceMotionHandler provides a CMDeviceMotion object which is optional, as well as an optional error.
On line 3 we calculate radians based on gravity on the x axis and gravity on the y axis. More details of how this works are found in this SO post. Line 4 converts this to degrees.
Line 5 and 6 I will explain in a few moments, but in short, this project puts a drawing on screen with a needle that faces down. When you rotate the phone the needle is adjusted based on angle in degrees (reversed). You will see errors when you build the app because we haven’t yet created NeedleView. We will get to that in a few moments.
Adding a Drawing
Create a new class called DeviceMotion.swift (you can create it based on any object you want as we will overwrite what is in there by pasting code in). Paste in the following code:
import UIKit

public class DeviceMotion : NSObject {

    //// Drawing Methods

    @objc dynamic public class func drawCanvas1(frame targetFrame: CGRect = CGRect(x: 0, y: 0, width: 480, height: 480), resizing: ResizingBehavior = .aspectFit, rotation: CGFloat = 0) {
        //// General Declarations
        let context = UIGraphicsGetCurrentContext()!

        //// Resize to Target Frame
        context.saveGState()
        let resizedFrame: CGRect = resizing.apply(rect: CGRect(x: 0, y: 0, width: 480, height: 480), target: targetFrame)
        context.translateBy(x: resizedFrame.minX, y: resizedFrame.minY)
        context.scaleBy(x: resizedFrame.width / 480, y: resizedFrame.height / 480)


        //// Oval Drawing
        let ovalPath = UIBezierPath(ovalIn: CGRect(x: 235, y: 235, width: 10, height: 10))
        UIColor.lightGray.setFill()
        ovalPath.fill()


        //// Rectangle Drawing
        context.saveGState()
        context.translateBy(x: 240, y: 239.72)
        context.rotate(by: -rotation * CGFloat.pi/180)

        let rectanglePath = UIBezierPath(rect: CGRect(x: -2, y: -18.72, width: 4, height: 240))
        UIColor.gray.setFill()
        rectanglePath.fill()

        context.restoreGState()

        context.restoreGState()

    }


    @objc(DeviceMotionResizingBehavior)
    public enum ResizingBehavior: Int {
        case aspectFit /// The content is proportionally resized to fit into the target rectangle.
        case aspectFill /// The content is proportionally resized to completely fill the target rectangle.
        case stretch /// The content is stretched to match the entire target rectangle.
        case center /// The content is centered in the target rectangle, but it is NOT resized.

        public func apply(rect: CGRect, target: CGRect) -> CGRect {
            if rect == target || target == CGRect.zero {
                return rect
            }

            var scales = CGSize.zero
            scales.width = abs(target.width / rect.width)
            scales.height = abs(target.height / rect.height)

            switch self {
                case .aspectFit:
                    scales.width = min(scales.width, scales.height)
                    scales.height = scales.width
                case .aspectFill:
                    scales.width = max(scales.width, scales.height)
                    scales.height = scales.width
                case .stretch:
                    break
                case .center:
                    scales.width = 1
                    scales.height = 1
            }

            var result = rect.standardized
            result.size.width *= scales.width
            result.size.height *= scales.height
            result.origin.x = target.minX + (target.width - result.width) / 2
            result.origin.y = target.minY + (target.height - result.height) / 2
            return result
        }
    }
}
I won’t go in to detail of how this code works as it was generated by PaintCode, but in PaintCode I created a needle, set it’s rotation point on the top edge. I then created a variable called rotation and connected that up to the rotation variable for the needle. This class allows us to draw the needle on the view, and then update it as the angle changes.
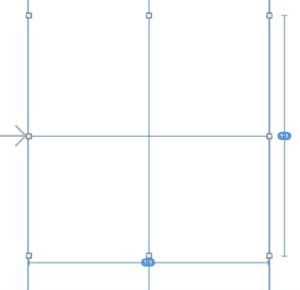
 In Main.storyboard add a UIView to the main view. I made that view square and positioned it in the centre of the view and then locked the aspect so that the left and right edges stay at the edge, and the top and bottom edges will adjust to the correct heights to keep it square.
Next, create another class called NeedleView.swift. Again, base it on any object you wish because we will overwrite it with the code below:
import UIKit

class NeedleView: UIView {

    public var rotation = 0.0

    // Only override draw() if you perform custom drawing.
    // An empty implementation adversely affects performance during animation.
    override func draw(_ rect: CGRect) {
        // Drawing code
        DeviceMotion.drawCanvas1(frame: CGRect(x: 0.0, y: 0.0, width: self.frame.width, height: self.frame.height),
                                 resizing: .aspectFit,
                                 rotation: CGFloat(rotation))
    }


}
The code above allows us to redraw the PaintCode drawing each time rotation is updated. Line 5 contains the rotation which I defaulted to 0.0.
Line 9 we are using the draw rect function that is already present (but commented out) when you create a UIView class (of which class this is).
Line 11 we are calling .drawCanvas1 on the DeviceMotion class that we created earlier. We need to provide a frame. I programatically set this by using CGRect and providing an X and Y set at 0.0 each, and then setting the width and height to to self.frame’s dimensions. I used the .aspectFit for the resize, and passed in the CGFloat conversion of rotation (which was passed in as a double).
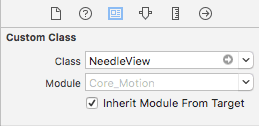
 The next task is to modify the UIView in Main.storyboard to use this new custom class. To do that, open up Main.storyboard and select the new UIView you created earlier. Select the identity selector at the top of the right sidebar (as seen in the screenshot), and then change the class to NeedleView.
NeedleView.swift is now responsible for drawing in UIView.
With all of this in place, any errors found in the code should now be gone, in particular, these two lines below:
self.needleView.rotation = -degrees
self.needleView.setNeedsDisplay()
Line 1 here sets the rotation variable in the NeedleView class.
Line 2 calls setNeedsDisplay on the NeedleView (UIView) which tells it that the entire bounds need to be redrawn.
If you go ahead and run the app now, you’ll see a needle facing down. When you rotate your phone, the angle will be calculated and the needle will be kept facing down.
If we had done this with just accelerometer data; which is possible; the movement would have been a little jittery. The CMDeviceMotion algorithms clean up this data and it provides for a smoother drawing to the screen.
You can download the full project here.
Please note that this will work only with the X and Y axis. The phone rotates around the Z axis, although the accuracy is still acceptable if the device tilts backwards or forwards as long as the device isn’t totally flat on a desk.
Leave a Reply
You must be logged in to post a comment.