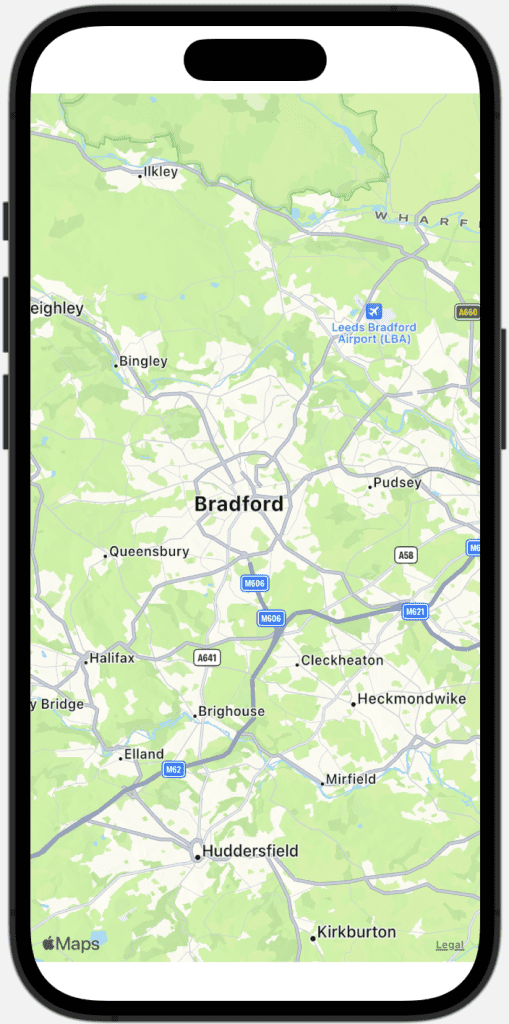
Many iPhone apps use maps to display helpful information to the user, often showing the current location. Uses include maps for navigation, finding nearby places, adding location to notes, reminders, and so on. This short tutorial will teach us two ways to add a map to an app.
Using MapKit
The MapKit framework makes adding a map to your app simple. You can first begin by importing MapKit into your view as follows:
import MapKit

Four init methods can be used to put a map on the screen. Two are region based, and the others are map rectangle based. The reason for two inits for each type is that one of them, for each type, allows for annotations to be added to the map, although we won’t be covering annotations in this tutorial.
We will first look at a region-based map. The first step is to add a property wrapper with @State that declares an MKCoordinateRegion. @State means that SwiftUI manages this variable; briefly, any views that depend on this property will be automatically updated when there is a change.
struct ContentView: View {
    @State private var region = MKCoordinateRegion()
    ...
In the example above, an MKCoordinateRegion is specified. Although it is currently not initialised with any values, it is usable.
Using this particular region for a map would allow the map to load, but the region would be at coordinates 0, 0 on the equator entering the map several hundred miles south of Ghana.
To test what this looks like, go ahead and add a Map to the view as follows:
var body: some View {
        Map(coordinateRegion: $region,
            interactionModes: .all,
            showsUserLocation: false,
            userTrackingMode: .none )
    }
Here we add the Map and provide the region. Note that on line 2, we specify a $ sign before region. This tells us that the region uses a binding which allows the view to modify that variable. This is also called a projectedValue. If we pass in just a region, then the view cannot change it. The initialise expects a binding here, so add the $.
This particular init method also has interactionModes, showsUserLocation, and userTrackingMode.
You can choose between all, pan, or zoom for interaction modes. If left empty, then no interaction is allowed.
showsUserLocation is a bool. If set to true, it can show where the user is located, although if set to true, you also need to seek permission from the user. This will be covered in a separate tutorial.
userTrackingMode can be set to follow or none. If set to follow, then the map will follow the user around.
Rather than the map focussing on the middle of the ocean, let’s correctly initialise MKCoordinateRegion.
@State private var region = MKCoordinateRegion(center: CLLocationCoordinate2D(latitude: 53.79, longitude: -1.75),
                                               latitudinalMeters: 10000,
                                               longitudinalMeters: 10000)
MKCoordinateRegion has a few ways to initialise it. In the example above, I chose the CLLocationCoordinate2D with the lat and lon values. This particular init is relatively easy to understand. We want latitude at 53.79 and longitude at -1.75, which puts the centre of the map, and we want to show 10,000 meters square, although this is adjusted to the screen’s aspect ratio.
If you load the simulator now, you will see the map centred on Bradford in the UK.
Init with MKMapRect
The other option to show a map is to initialise it with an MKMapRect. This can be done as follows:
@State private var rect = MKMapRect(origin: MKMapPoint(CLLocationCoordinate2D(latitude: 53.79, longitude: -1.75)),
                                        size: MKMapSize(width: 10000, height: 10000))
Here we create an MKMapRect by using MKMapPoint and MKMapSize. Although I feed in the same numbers as the coordinate region used in the previous example, you’ll see that the map responds a little differently when the map is added with the following code:
var body: some View {
        Map(mapRect: $rect,
            interactionModes: .all,
            showsUserLocation: false,
            userTrackingMode: .none)
    }
This is almost the same as the first example, except passing in a mapRect binding. Check out the results. We’re still in Bradford but zoomed in a lot closer.
The differences in the example here are that the MKMapSize is based on map points rather than meters. Apple uses a Mercator map to transform from a globe to a flat surface. In some situations, points are better, particularly when overlaying information on a map. If this interests you and you need to figure out the best way to initialise the map, then you likely get away with using the MKCoordinateRegion version. More details are here.
This tutorial was planned to be short and aimed at beginners. I will go into more detail in the following tutorials, such as asking for permission for location, adding annotations, and putting overlays on the map.
Leave a Reply
You must be logged in to post a comment.