When working with Storyboards in Xcode, you’ll quickly find that you end up with varying amounts of different View Controllers (depending on the size of your app). Each of these needs to have a subclass created and then that subclass needs to be set as the View Controllers custom class. I’ll explain how that is done today, along with a way that you can find out exactly which type of View Controller you need to subclass.
Dragging Out the View Controller
For todays post, I’ll concentrate on the iPad as there are more View Controllers available for this device. The same principles apply for the iPhone although you wont be able to work with a SplitView Controller for example as this is an iPad only View Controller.
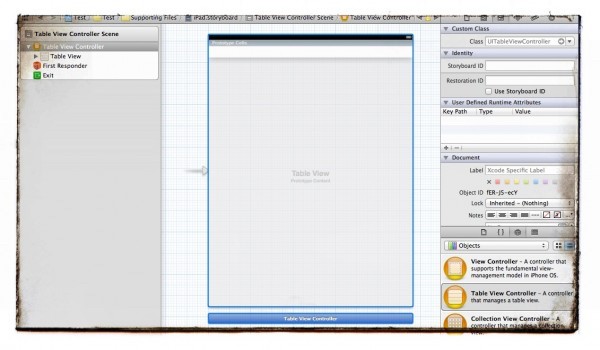
First of all, we need to drag out a View Controller to the storyboard. Lets go for the Table View Controller as pictured below.

A quick look at the image above shows a Table View Controller dragged on to the storyboard. The little arrow on the left of the new View Controller shows that it is the initial View Controller (not important here). On the left, we see the Document Outline (tap the arrow at the bottom left of the storyboard if you don’t see this. It will slide out). On the right, we see the inspector panel is open and right at the top, we see Custom Class along with a greyed out class of UITableViewController. This particular line tells you what class you need to subclass to work with this view.
Creating the Custom Class
At the moment, there isn’t anything we can do with the “Class” drop down, unless we have already done this part I am going to mention now. The order doesn’t matter as you can set the custom class after both are created and they can be done in any order… ie, drag the view out, create the custom class, specify the custom class. Alternatively, create the custom class, drag the view out, specify the custom class. Either way is the same. I just prefer sliding the view on to the storyboard first so that I can quickly look at what type of class I should be subclassing.
Instructions
The Class (top box) is what you want to call the files. I recommend setting the bottom box first as this adds ViewController to the filename. I generally keep that format so that I might call this one “SettingsTableViewController“. The reason I like to keep the format is so that I can distinguish between a business object or a view controller by just glancing at the names. I also order in to groups to help with this.

When adding the new subclass, you will see something similar to the above. Note the Targeted for iPad box. This isn’t mandatory and can be left checked or unchecked. In the past, this used to add a bit of extra code in to specify the rotation of the device, particularly preventing the iPhone from being upside down. But, in Xcode 4.6, I can’t see any differences between having the box checked or unchecked, so perhaps this is being phased out now.
 After creating the files, you’ll then have two created which are SettingsTableViewController.h (the header file) and SettingsTableViewController.m (the implementation file).
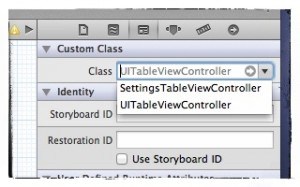
Now move back to the Storyboard and select the Table View Controller. At the top right of the screen you can now select the correct subclass from the list. In this instance “SettingsTableViewController”. If you cannot select it, I recommend navigating away from the storyboard and back again. Alternatively, you could close Xcode and re-open it. Usually, you don’t have a problem though.

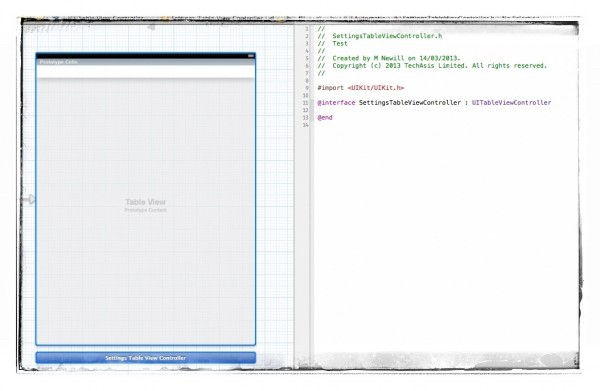
Opening up the assistant editor, you now see that SettingsTableViewController.m (and .h) are now associated with that View Controller and that you can now CTRL+drag from the storyboard to the header and implementation files as needed.
Although you might typically use the suggested subclass for a View Controller, you can in some cases use a UIViewController as other View Controllers inherit from it. When doing this, you need to make sure you set up the delegate correctly and implement the required methods to allow it to function properly, assuming you are setting up a Table View.
Leave a Reply
You must be logged in to post a comment.