Since the launch of the Apple Health app and HealthKit framework in September 2014, iPhone and Apple Watch users have had a simple way of storing all of their health related data. In Apple’s words “HealthKit provides a central repository for health and fitness data on iPhone and Apple Watch”.
Although the Health app has a simple UI and can provide health and fitness data to the user, the real power is made available when app developers interface with the HealthKit framework and build apps that specialise in certain areas.
Todays tutorial will focus on adding HealthKit to your app and preparing your app to be able to write and query data from Apple Health. This is part of a series of HealthKit tutorials that we will make with the next tutorial focusing on querying data. In future posts we will look at the HKSampleQuery, HKStatisticsCollectionQuery, to name a couple.
Setting Up HealthKit
To begin, we need to set up a single view application. There are four steps we need to take to get HealthKit up and running within an app, and when those are complete, we are in a position to start querying the data.
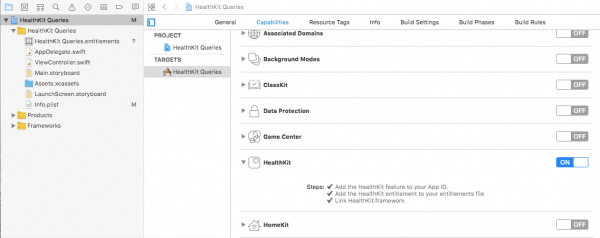
Step 1 is to enable HealthKit. To do this, open your project, click on the project in the project navigator (top of left sidebar), make sure the target is selected (not the project) in the second column, select Capabilities from the menu bar just above, and then switch on HealthKit. If this step was successful you will get 3 checkmarks in the HealthKit section.

Step 2 requires that we check if HealthKit is available on the device. HealthKit requires iOS 8 at a minimum which means that anything prior to that will not be able to utilise HealthKit which would limit the capabilities of your app for those users. Likewise, it is not available on iPad regardless of iOS version.
To check if HealthKit is available on the device you need to call isHealthDataAvailable() on HKHealthStore as follows:
if HKHealthStore.isHealthDataAvailable() {
    // Add code to use HealthKit here.
}
Step 3 requires that we create a HealthKit store. We do this with just a single line of code as follows:
let healthStore = HKHealthStore()
Apple tells us that we only need one health store per app, and that the objects are long-lived. All we need to do is create the health store and then keep a reference to it.
Step 4 is the final step in preparation, after which we will start working within the project to implement these steps. This step is the most complicated to explain, but is actually very simple. It requires that we request from the user permission to access data. This is fine-grained authorisation which requires we seek permission to read and write for specific information. Apple has the permission sheet prepared for us. All we need to do is tell it what data we are interested in reading, and what data we are interested in writing.
The instance method we need for this step is requestAuthorization(toShare:read:completion:).
From the documentation we see that we need to prepare a Set of
HKObjectType is “The abstract superclass for all classes that identify a specific type of data when working with the HealthKit store.” Thankfully, Apple has made it super simple to create a set of HKObjectType’s. The code is fairly boilerplate, and you just need to use what they provide and modify it to suit your needs.
let readDataTypes : Set = [HKObjectType.quantityType(forIdentifier: HKQuantityTypeIdentifier.stepCount)!]
This line of code creates a Set with just one HKObjectType in there. More can be added by comma separating each HKObjectType.
Notice that we are using the quantityType method of HKObjectType. Looking at the documentation again, we see that the only parameter is an identifier which is a HKQuantityTypeIdentifier. We also note that it has a return type of a HKQuantityType which is just what is needed (remember that it is a set of HKObjectType which is the abstract superclass of HKQuantityType, amongst others).
Lets quickly look at the HKQuantityTypeIdentifier to see what exactly that is. The documentation says that it is… “Used to define the identifiers that create quantity type objects”. We also notice in the documentation that this is not a class; it’s a structure. We can access whatever property we want with the following syntax:
HKQuantityTypeIdentifier.stepCount
Likewise, if we wanted to access the users weight, we would use the following:
HKQuantityTypeIdentifier.bodyMass
You can find a full list of quantity types here.
Requesting other types of data, such as characteristic types is very similar. For this we would use HKObjectType.charachteristicType as follows:
let charachteristicDataTypes : Set = [HKObjectType.characteristicType(forIdentifier: HKCharacteristicTypeIdentifier.biologicalSex)!]
Note that we would not create two sets at this point. We would simply add the characteristic type to the same set as the quantity type as both share the same parent. We would do this as follows separating each item with a comma:
let readDataTypes : Set = [HKObjectType.quantityType(forIdentifier: HKQuantityTypeIdentifier.stepCount)!,
                       HKObjectType.characteristicType(forIdentifier: HKCharacteristicTypeIdentifier.biologicalSex)!]
We then need to request authorisation and pass in the set as follows:
healthStore.requestAuthorization(toShare: nil, read: readDataTypes) { (success, error) in
    if !success {
        // Handle the error here.
    } else {
        print("We're good")
    }
}
If we wanted to write data, we would need to create a Set for toShare. In some cases you might use the same set as the one you used for reading data. However, if you are trying to write characteristic data such as biologicalSex then you will get an error because only the Health app can update this information. For this reason, you might consider the following:
let writeDataTypes : Set = [HKObjectType.quantityType(forIdentifier: HKQuantityTypeIdentifier.stepCount)!]

healthStore.requestAuthorization(toShare: writeDataTypes, read: readDataTypes) { (success, error) in...
Implementing HealthKit
Now that the explanation is complete, lets implement the code in ViewController.swift in the viewDidLoad method. Just before doing that, import HealthKit at the top of ViewController.swift (just below import UIKit).
let healthStore = HKHealthStore()

override func viewDidLoad() {
    super.viewDidLoad()
    // Do any additional setup after loading the view, typically from a nib.

    if HKHealthStore.isHealthDataAvailable() {
        let readDataTypes : Set = [HKObjectType.quantityType(forIdentifier: HKQuantityTypeIdentifier.stepCount)!,
                               HKObjectType.characteristicType(forIdentifier: HKCharacteristicTypeIdentifier.biologicalSex)!]

        let writeDataTypes : Set = [HKObjectType.quantityType(forIdentifier: HKQuantityTypeIdentifier.stepCount)!]

        healthStore.requestAuthorization(toShare: writeDataTypes, read: readDataTypes) { (success, error) in
            if !success {
                // Handle the error here.
            } else {
                // Do the work
            }
        }
    }

}
Line 1 we create a healthStore. We put this out of scope for viewDidLoad so that we can use it elsewhere.
Line 7 checks if health data is available (meaning are we on the correct device).
Lines 8 and 9 create the read data types which in this case are the step count and biological sex of the user.
Line 11 sets up a Set for writing data. In this case, it’s similar to readDataTypes, but doesn’t include biologicalSex because we cannot write that data.
Line 13 we request authorisation and pass in the readDataTypes to the read parameter and writeDataTypes to the toShare parameter. Note that this line also declares a completion handler which will either have a success or an error.
We can then act on line 15 however we wish. We would likely inspect any errors presented if this was called.
Line 17 is where we can kick off the process for reading data (which we will look at in the next tutorial).
 One final step before testing the code is to add an entry to info.plist. The documentation tells us that we need to create some custom text to inform the user why we want to read data. Likewise, with writing data, we also need some custom text to show the user.
The key for reading is NSHealthShareUsageDescription and can be added to info.plist by opening info.plist, right clicking on “Information Property List” at the top of the page and then selecting “Add Row”. We can then paste in NSHealthShareUsageDescription for the key, make sure the type is set to String, and then in value you need to provide details of why you want to read data. In this example I just entered the text: Reading data just for a test.
You can repeat the above but change the key name to NSHealthUpdateUsageDescription. The data for this key is the string that will be presented to the user for writing data.
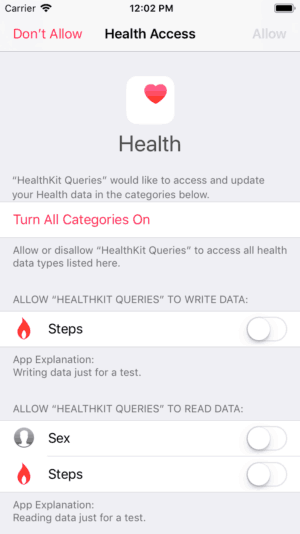
When you run the app (either in the simulator, or on your device) you will see a permissions sheet load up. You’ll see that you can enable or disable each item we requested. You might also notice that at the bottom of the sheet is the description you entered in info.plist.
What to Watch out for
Apple protects the user by allowing them to decline your app to read data. Remember that even if the user agrees to share data with the app, the user might go to the settings at a later date and change their privacy settings for the app. Please be aware of this so your app can act accordingly with or without data being returned from a query.
To help protect the user’s privacy, your app does not know whether the user granted or denied permission to read data from HealthKit. If the user denied permission, attempts to query data from HealthKit return only samples that your app successfully saved to the HealthKit store.
Now that you have imported HealthKit in to your app, and pasted the sample code above, entered the plist entries, and enabled the HealthKit capability, you are now in a position to start querying and writing data to HealthKit. In the next tutorial we will look at querying data.
The sample project for this app can be found here.
Leave a Reply
You must be logged in to post a comment.