The iPhone is able to detect if you are walking, running, stationary, in a vehicle, or on a bike by using the motion sensors in the device. Back in 2018 I wrote about this in the tutorial called How to Use the CMMotionActivityManager. Today, we’ll update this for SwiftUI.
Since the iPhone 5s, iPhone has been able ot automatically track your activity, that being if you are stationary, in a vehicle, on a bike, and so on. iPhone keeps this data for seven days. You may have noticed when you were in a vehicle that the phone detects if you are driving and so on.
Core Motion provides a way for you to access this seven-day historical data as well as receive live updates on your current activity.
In this tutorial we’ll look at how to access this information to give an overview of your current day and what you have been doing.
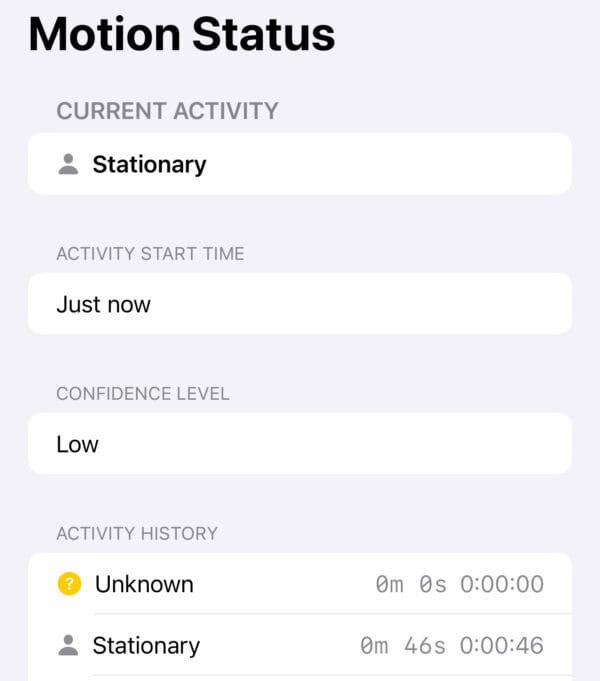
It is important to note that the information provided by Core Motion has a confidence level. In the screenshot above you can see that I am stationary, but its confidence level is low. Now I was stationary when taking the screenshot, but the movement of the phone probably lowered that confidence level to low.
Lets take a look at how we can access this information and view the information in a SwiftUI app.
We will begin by adding in the extras such as an extension, enum, structs to support the new code:
extension CMMotionActivity {
    func value(for activity: ActivityType) -> Bool {
        switch activity {
        case .stationary: return stationary
        case .walking: return walking
        case .running: return running
        case .automotive: return automotive
        case .cycling: return cycling
        case .unknown: return unknown
        }
    }
}
A CMMotionActivity contains the data we need, such as if the user if walking. It contains several properties each being true or false to show what the user is doing. By adding this extension we can just grab the detected activities.
It is used as follows:
let detectedActivities = ActivityType.allCases.filter { activity.value(for: $0) }
As the user might be part of one or more activities, this is filtered to get anything that is true. An example could be that you are classed as automotive, but are stationary at the lights.
To show our activity history, we can use the following:
struct ActivityHistoryEntry {
    let type: ActivityType
    let duration: TimeInterval
    let timestamp: Date

    var durationFormatted: String {
        let hours = Int(duration) / 3600
        let minutes = (Int(duration) % 3600) / 60
        let seconds = Int(duration) % 60

        if hours > 0 {
            return "\(hours)h \(minutes)m \(seconds)s"
        } else {
            return "\(minutes)m \(seconds)s"
        }
    }


    var timestampFormatted: String {
        let formatter = DateFormatter()
        formatter.dateFormat = "H:mm:ss"
        return formatter.string(from: timestamp)
    }
}
Here we have three properties, and two computed properties. type, duration, and timestamp show the raw data while durationFormatted and timestampFormatted are computed properties that return the duration or timestamp in a more userfriendly way. This is great for times when you want something already formatted, or just the raw data.
The code is fairly self-explanatory here, so take a read and ask questions if there is something you are not sure of.
Next up we have an enum to show the activity type.
enum ActivityType: String, CaseIterable {
    case stationary = "Stationary"
    case walking = "Walking"
    case running = "Running"
    case automotive = "Automotive"
    case cycling = "Cycling"
    case unknown = "Unknown"

    var iconName: String {
        switch self {
        case .stationary: return "person.fill"
        case .walking: return "figure.walk"
        case .running: return "figure.run"
        case .automotive: return "car.fill"
        case .cycling: return "bicycle"
        case .unknown: return "questionmark.circle.fill"
        }
    }

    var iconColor: Color {
        switch self {
        case .stationary: return .gray
        case .walking: return .blue
        case .running: return .green
        case .automotive: return .red
        case .cycling: return .orange
        case .unknown: return .yellow
        }
    }
}
This enum allows you to get the necessary icon and colour for a particular activity. For the icons, it uses SF Symbols. Here is an example of how you can use this enum:
let activity = ActivityType.walking
let icon = activity.iconName // "figure.walk"
let color = activity.iconColor // .blue
We create an actvity of type .walking. From that activity we can get its icon name and icon colour.
Using this across many places in an app simplifies the colour schemes and icons because a change in the enum would be reflected anywhere that it is used.
With the enum, struct, and extension in place, we can now look at adding the ViewModel which handles the interaction with Core Motion in the app.
class MotionActivityViewModel: ObservableObject {
    private let motionActivityManager = CMMotionActivityManager()
    @Published var currentActivity: CMMotionActivity?
    @Published var activityHistory: [ActivityHistoryEntry] = []

    init() {
        if CMMotionActivityManager.isActivityAvailable() {
            motionActivityManager.startActivityUpdates(to: OperationQueue.main) { activity in
                self.currentActivity = activity
            }

            motionActivityManager.queryActivityStarting(from: Calendar.current.startOfDay(for: Date()), to: Date(), to: OperationQueue.main) { activities, error in
                if let error = error {
                    print("Error querying motion activity: \(error.localizedDescription)")
                } else if let activities = activities {
                    self.processActivityHistory(for: activities)
                } else {
                    print("No activities found.")
                }
            }
        }
    }

    func processActivityHistory(for activities: [CMMotionActivity]) {
        activityHistory.removeAll()

        var lastTimestamp: Date?

        for activity in activities {
            let detectedActivities = ActivityType.allCases.filter { activity.value(for: $0) }
            let type = detectedActivities.first ?? .unknown

            let duration: TimeInterval
            if let last = lastTimestamp {
                duration = activity.startDate.timeIntervalSince(last)
            } else {
                duration = 0
            }

            lastTimestamp = activity.startDate

            let entry = ActivityHistoryEntry(type: type, duration: duration, timestamp: activity.startDate)
            activityHistory.append(entry)
        }
    }

}
We declare this as a class that conforms to ObservableObject. ObservableObject means that its properties wrapped in the @Published property wrapper can be observed.
We declare the currentActivity and activityHistory with @Publish as these are updated and need to be visible to the views.
We also have, on line 2, a private constant which is a CMMotionActivityManager. It is initialised with this.
In the init method on line 6, we first check (line 7) that the device hs motion data available, meaning that it is compatible.
Next, we start the activity updates by calling startActivityUpdates. We put this on the main queue, which is important as the result will need to go to the view.
We then have a closure which is called each time there is a change in activity. In this closure we receive a CMMotionActivity object which we use to set the @Published property so that the frontend receives the change.
This handles all the information we need to show your current activity.
The next part of code provides a way for you to see historical data. Although there’s about seven days of motion data stored on a device, we’ll just look at the data from midnight to now. Feel free to adjust the dates.
To start, you will see on line 12 that we call the queryActivityStarting methid on the motion activity manager. It needs a from and to date as well as setting to the main queue. It then has a closure that receives an array of CMMotionActivity.
When we receive this array in the closure, we run through some checks online 13 onwards. If all is good and normal, line 16 runs and we call processActivityHistory on self, and pass in the activities that were provided in the closure.
Lines 24 to 45 contain the logic on how to process the data in a way that has been decided.
We first clear out all items in our @Published activityHistor array.
We then declare a Date to temporarily store the last timestamp (used to calculate duration).
On line 29 we begin to loop over all of the activities.
Line 30 we use the filter that was explained earlier to get the detected activities. For our purposes today we are not interested in showing if one item in history contained two activities, so on line 31 we just grab the first one stored in the array.
We then do some logic on lines 33 – 38 where we calculate the duration between each item, and after that, on line 40, we store the lastTimeStamp ready to be used in the next loop iteration.
Line 42 we initialise an ActivityHistoryEntry with the data from the activity, and then we append it to the activityHistory published property.
When this completes we have all of the history stored for the dates we chose.
Using this in a SwiftUI View
This next section of code is used to represent the information we made in the view model. Although quite lengthy, I’ll take you through each part.
struct ContentView: View {
    @StateObject private var viewModel = MotionActivityViewModel()

    var body: some View {
        NavigationStack {
            Form {
                // Current Activity Section
                Section(header: Text("Current Activity").font(.headline)) {
                    if let motion = viewModel.currentActivity {
                        let detectedActivities = ActivityType.allCases.filter { motion.value(for: $0) }

                        if detectedActivities.isEmpty {
                            Text("No activity detected")
                                .foregroundColor(.gray)
                        } else {
                            ForEach(detectedActivities, id: \.self) { activity in
                                HStack {
                                    Image(systemName: activity.iconName)
                                        .foregroundColor(activity.iconColor)
                                    Text(activity.rawValue)
                                        .font(.headline)
                                }
                            }
                        }
                    } else {
                        Text("Waiting for activity data...")
                            .foregroundColor(.gray)
                    }
                }

                // Activity Start Time Section
                Section(header: Text("Activity Start Time")) {
                    if let motion = viewModel.currentActivity {
                        Text(formatDate(motion.startDate))
                    } else {
                        Text("--")
                    }
                }

                // Confidence Level Section
                Section(header: Text("Confidence Level")) {
                    if let motion = viewModel.currentActivity {
                        Text(confidenceText(motion.confidence))
                    } else {
                        Text("--")
                    }
                }

                // Activity History Section
                Section(header: Text("Activity History")) {
                    if viewModel.activityHistory.isEmpty {
                        Text("No recent activity")
                            .foregroundColor(.gray)
                    } else {
                        ForEach(viewModel.activityHistory, id: \.timestamp) { entry in
                            HStack {
                                Image(systemName: entry.type.iconName)
                                    .foregroundColor(entry.type.iconColor)
                                Text(entry.type.rawValue)
                                    .font(.body)

                                Spacer()

                                Text(entry.durationFormatted)
                                    .foregroundColor(.secondary)
                                    .font(.system(.body, design: .monospaced))
                                    .frame(minWidth: 60, alignment: .trailing)

                                Text(entry.timestampFormatted)
                                    .foregroundColor(.secondary)
                            }
                        }
                    }
                }
            }
            .navigationTitle("Motion Status")
        }
    }

    // Helper function to format dates
    private func formatDate(_ date: Date) -> String {
        let now = Date()
        let timeInterval = now.timeIntervalSince(date)

        let formatter = DateFormatter()
        formatter.dateFormat = "yyyy-MM-dd HH:mm:ss"

        if timeInterval < 60 {
            return "Just now"
        } else if timeInterval < 3600 {
            let minutes = Int(timeInterval / 60)
            return "\(minutes) min\(minutes == 1 ? "" : "s") ago"
        } else if Calendar.current.isDate(date, inSameDayAs: now) {
            formatter.dateFormat = "HH:mm"
            return "Today at \(formatter.string(from: date))"
        } else {
            formatter.dateFormat = "MMM d, yyyy HH:mm"
            return formatter.string(from: date)
        }
    }

    // Helper function to format confidence levels
    private func confidenceText(_ confidence: CMMotionActivityConfidence) -> String {
        switch confidence {
        case .low: return "Low"
        case .medium: return "Good"
        case .high: return "High"
        @unknown default: return "Unknown"
        }
    }
}
We begin by creating an @StateObject of the MotionActivityView model that we just finished creating. By using the @StateObject property wrapper, the view observes the observable @Published properties in the code we just wrote. In short, if your activity changes the view will be made aware and can redraw as needed.
In the body, starting line 4, we create a NavigationStack and nest within a Form which is ideal for representing this type of data.
In the first section on line 8 we show the current activity of the user. We use that same filter we saw earlier in the view model and set the detected activities. Instead of grabbing just the first one, the app goes through a ForEach loop and will list one or more activities when applicable.
Notice on line 18 we have the activity, so we can just call activity.iconName and it will show the correct icon, thanks the the enum that was created.
In the next section starting line 32 we check to see if we have current activity, and if so, we get the startDate from that activity. We call formatDate which is declared later in the view, which provides a nicer looking date format.
Line 41 is the section that shows the confidence level. Similar to how the start time works, this grabs the confidence from the confidenceText method that is declared later on in the code.
Line 50 sees us move on to the activity history section. In this part of the view we check if the viewModel has any activity history. If not, we show a default message. If it does, we loop around each of the activities and in a similar way to how we showed the current activity, we show the historical activity data in a HStack of views, each with the necessary calls to get the correct image, colour as well as duration and so on.
Line 76 – We just give the navigation stack a title to make it look nicer.
On line 81 we declare the formatDate method that was used further up in the code. This method uses a passed in date and runs some checks on the time interval to return the formatted date we want. Feel free to make adjustments here to familiarise yourself with the code.
Line 103 is our confidence text. We pass in the confidence and it returns a string that describes the confidence of the current activity.
Core Motion Permissions
Because Core Motion data is private, you cannot just access the Motion data of a user who has installed your app. You need to seek permission. If you try run the app as it is now, you’ll see an error in the console about a key missing in info.plist. Lets fix that now so you can begin testing the app.
Click on the project at the top of the left sidebar. You will be presented with the project settings. Select the Info tab on the table and you’ll see a list call “Custom iOS Target Properties”. Click on one of them and hit enter and a new row will be added. In the Key column, paste in “NSMotionUsageDescription”, and on the Value side enter some text such as a short description of why you want to access this information.
Now when you run the app, you will first be presented with the choice to allow or decline the app from accessing this information. Assuming you allow it, you’ll almost immediately see todays historical activity data as well as the current activity.
In Closing
Although a good amount of code here, the code is quite simple and reusable to show how you can query data from Core Motion activity and then make it useful by creating a view for it. If you run this on a compatible device you will see your days motion so far, as the iPhone sees and thinks it is.
Leave a Reply
You must be logged in to post a comment.