Since iOS 2, the Core Location framework has provided the way to find a devices geographical location. In this tutorial you’ll learn how to request location permission, retrieve your devices currently location, and display these real-time updates in a SwiftUI app.

Given its age, the Core Location framework has an extensive set of tools that go beyond just finding the users current location. We will look at some of these features today, but also in future tutorials so that you can work with your users location in a way that is suitable for your app.
Creating the LocationManager Class
import CoreLocation

class LocationManager: NSObject, ObservableObject, CLLocationManagerDelegate {
    private var manager = CLLocationManager()

    @Published var userLocation: CLLocation?
    @Published var authorizationStatus: CLAuthorizationStatus?

    override init() {
        super.init()
        manager.delegate = self
        manager.desiredAccuracy = kCLLocationAccuracyBest
        manager.requestWhenInUseAuthorization()
        manager.startUpdatingLocation()
    }

    func locationManager(_ manager: CLLocationManager, didUpdateLocations locations: [CLLocation]) {
        userLocation = locations.last
    }

    func locationManager(_ manager: CLLocationManager, didChangeAuthorization status: CLAuthorizationStatus) {
        authorizationStatus = status
        if status == .authorizedWhenInUse || status == .authorizedAlways {
            manager.startUpdatingLocation()
        }
    }
}
Begin by creating a class to handle getting updates from the device. Call it LocationManager and make it conform to NSObject, ObservableObject, and CLLocationManagerDelegate.
NSObject is required when using the CLLocationManagerDelegate due to the protocol being implemented in Objective-C.
ObservableObject allows us to use the @Published property wrapper which we use on two properties to make them available to the view.
CLLocationManagerDelegate provides the delegate methods that handle location-related events on the device. These will be explained in a moment.
Declare two variables on lines 6 and 7, one being an optional CLLocation, and the second being an option CLAuthorizationStatus. Add the @Published property wrapper to these as they are used in the View.
CLLocation is a class that contains various information about your geographical location.
CLAuthorizationStatus reports on the users chosen authorisation status and has the options of not determined, restricted, denied, authorizedAlways, and authorizedWhenInUse. There is a delegate method available so that if the user has prevented access and then goes to the Settings app to now give approval, the delegate will be called so that you can adjust your app as needed.
Implement the init method as seen on lines 9 through 15. In there, set the delegate to self, meaning that this class will implement the delegate methods as needed. Set the accuracy to kCLLocationAccuracyBest, then request authorisation from the user. Finally, start updating the location.
When this class is instantiated from the view, the init will be called and will set up everything needed. If authorisation hasn’t been requested, then the user will be prompted to give permission. Assuming all OK, the startUpdatingLocation call means that the delegate method, didUpdateLocations, will start being called any time a new location is detected.
Implement the didUpdateLocations method as seen on line 17 – 19. This delegate method provides an array of CLLocation, and because of that, we opt to choose the last item in the array, meaning the latest location update.
Implement the locationManager didChangeAuthorizationStatus as seen in lines 21-26. Here, we tell the manager to start updating location if permission is granted.
Just a note on the use of startUpdatingLocation, we use it in init and in the delegate, but we don’t actually call .stopUpdatingLocation which would be used if the user goes to settings and switches from approved to denied.
It wont break anything for the purpose of the demo, but its something to be mindful of because the Settings app on iPhone is the place where a user can change their mind (after the initial setting in app) and either grant or deny access.
This completes the LocationManager class. We have two @Published properties, an init method, and two delegate methods that automatically keep the @Published properties up to date.
Implementing the View to see Location Data
struct LocationDetailsView: View {
    let location: CLLocation

    var body: some View {
        List {
            Section(header: Text("Location Information")) {
                Text("Latitude: \(location.coordinate.latitude)")
                Text("Longitude: \(location.coordinate.longitude)")
                Text("Altitude: \(location.altitude) meters")
                Text("Ellipsoidal Altitude: \(location.ellipsoidalAltitude) meters")
                Text("Horizontal Accuracy: \(location.horizontalAccuracy) meters")
                Text("Vertical Accuracy: \(location.verticalAccuracy) meters")
                Text("Heading: \(location.course)°")
                if let floor = location.floor {
                    Text("Floor: \(floor.level)")
                }
            }
        }
    }
}
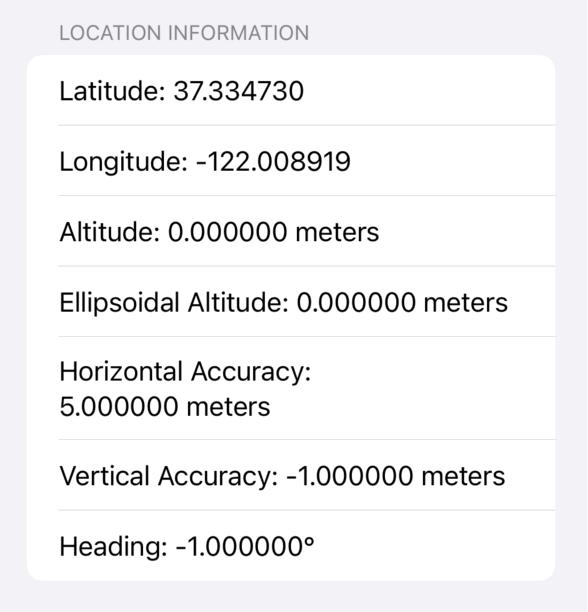
Implement the View as demonstrated above. It has a CLLocation property and in the View, a List with Text views showing the various available properties of the CLLocation class.
struct ContentView: View {
    @StateObject private var locationManager = LocationManager()

    var body: some View {
        VStack {
            if let location = locationManager.userLocation {
                LocationDetailsView(location: location)
            } else {
                Text("Fetching location...")
                    .padding()
            }
        }
        .padding()
    }
}
Implement the ContentView as seen above. Create the @StateObject of the LocationManager. This initialises it and if it hasn’t requested permission, it will ask you for it now, or at least when a specific key/value is added to info.plist which you can add in a moment.
The View uses an if let on line 6 to see if the locationManager has a userLocation. If it does, it uses that location to pass to the LocationDetailsView that was implemented earlier.
Seeking Authorisation
The final part is to add a new key/value to info.plist. Add the following:
<key>NSLocationWhenInUseUsageDescription</key>
<string>We need your location to provide personalized services.</string>
This provides the needed string to show to the user when seeking permission from them.
When running the app, assuming you grant access to your location, you will see the Form populated with your current location. Any time there is new information, the locationManager delegate will fire, and userLocation @Published property will be updated. This will be observed by the view and the view will refresh as needed.
Any questions, please post in the comments below.
Leave a Reply
You must be logged in to post a comment.