New version for iOS 18+ available here.
Using the various sensors on your device, Apple is able to predict if you are walking, running, in a vehicle, or stationary. This is all done quietly in the background by way of the motion coprocessor that is found in all iPhones since the 5s.
In this tutorial we will look at how your app can read that information, either live, or historically from the last 7 days. The CMMotionActivityManager has both the live updates using the startActivityUpdates: method, or the historical data with queryActivityStarting: both of which we will use.
CMMotionActivityManager Tutorial

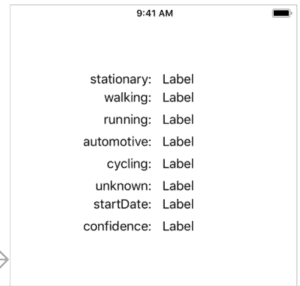
Lets begin by creating a single view application. Open up Main.storyboard and drag out 16 UILables and name them as seen in the screenshot. The reason that I opted to use a different label for each type of activity is that in some cases you can be doing 2 activities at the same time. Apple indicates that you might be classed as driving, but also stationary at the same time, particularly when you are stuck in traffic.
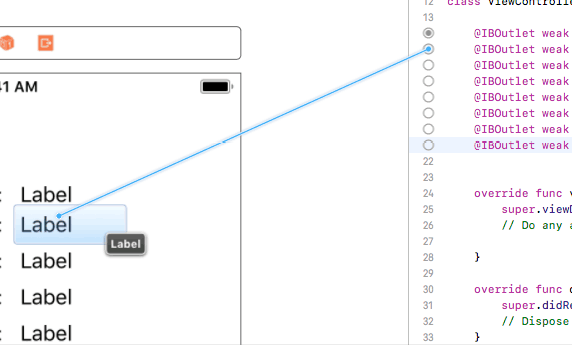
Our next task is to connect all of the right hand side UILabels up to the view controller each as IBOutlets.
Rather than CTRL-drag and type in the name of each IBOutlet manually, you can save time by copying and pasting the IBOutlets below in to your ViewController.swift above the viewDidLoad() function, but below the class declaration:
@IBOutlet weak var stationaryLabel: UILabel!
@IBOutlet weak var walkingLabel: UILabel!
@IBOutlet weak var runningLabel: UILabel!
@IBOutlet weak var automotiveLabel: UILabel!
@IBOutlet weak var cyclingLabel: UILabel!
@IBOutlet weak var unknownLabel: UILabel!
@IBOutlet weak var startDateLabel: UILabel!
@IBOutlet weak var confidenceLabel: UILabel!
Your only task then is to open up a split view in Xcode and click and hold on the small circle and then drag to the appropriate label:

With our IBOutlets connected, we now have a way to update the view when our information changes.
Setting up the CMMotionActivityManager
In viewDidLoad add the following:
let motionActivityManager = CMMotionActivityManager()
if CMMotionActivityManager.isActivityAvailable() { {
    motionActivityManager.startActivityUpdates(to: OperationQueue.main) { (motion) in

    }
}
Line 1 we create our motionActivityManager.
Line 2 we check the isActivityAvailable() to determine if we should proceed. This is a class method, and thus, it is called on CMMotionActivityManager instead of our motionActivityManager that we created. You should also check the authorisation status at some point as well, although I’ll leave that to you to implement. That method is also a class method and returns one of four values which are not determined, restricted, denied, or authorised.
Line 3 we call startActivityUpdates: and put it on the main queue. We then implement the handler which a read of the documentation for the CMMotionActivityHandler, it just has CMMotionActivity as an optional. I named this “motion” in the tutorial.
Now that we have the basics in place, it’s time to put this information on the view:
override func viewDidLoad() {
    super.viewDidLoad()
    // Do any additional setup after loading the view, typically from a nib.

    let motionActivityManager = CMMotionActivityManager()
    let dateFormatter = DateFormatter()
    dateFormatter.dateFormat = "yyyy-MM-dd HH:mm:ss"
    if CMMotionActivityManager.isActivityAvailable() {
        motionActivityManager.startActivityUpdates(to: OperationQueue.main) { (motion) in
            self.stationaryLabel.text = (motion?.stationary)! ? "True" : "False"
            self.walkingLabel.text = (motion?.walking)! ? "True" : "False"
            self.runningLabel.text = (motion?.running)! ? "True" : "False"
            self.automotiveLabel.text = (motion?.automotive)! ? "True" : "False"
            self.cyclingLabel.text = (motion?.cycling)! ? "True" : "False"
            self.unknownLabel.text = (motion?.unknown)! ? "True" : "False"

            self.startDateLabel.text = dateFormatter.string(from: (motion?.startDate)!)

            if motion?.confidence == CMMotionActivityConfidence.low {
                self.confidenceLabel.text = "Low"
            } else if motion?.confidence == CMMotionActivityConfidence.medium {
                self.confidenceLabel.text = "Good"
            } else if motion?.confidence == CMMotionActivityConfidence.high {
                self.confidenceLabel.text = "High"
            }
        }
    }
}
Comparing to the previous code you added to the view, line 6 and 7 is new. Here we create a dateFormatter and then write out what format we want our date to be converted to when getting a string for the startDate.
Lines 10 – 15 are where we check the status of each activity. I opted to use a ternary conditional operator here because we are working with bools, and the code is more succinct this way. Here we are checking each item if it is true or false, and depending on what it is, a string is generated which is either saying “True” or “False”. This string is then used to set the text label of each label.
Line 17 is where we set the date label. We use the dateFormatter, and then call the string method which requires a date to be passed in. We know that motion.startDate is a Date, and thus, we get a date put on the view in the format we created on line 7. I suggest that you make the date label wider, and also allow the text to shrink (set in the storyboard) as the regular label you created will likely not fit the formatted date/time stamp on it without getting the … at the end.
Lines 19 – 25 are where we check the confidence. There is probably a more succinct way to write this, but what we are doing is checking each confidence level as provided by CMMotionActivityConfidence. If it’s .low, we set the text to “Low”. If it’s .medium, we set the text to “Good” (the documentation describes .medium as “Good”, so that is what I used), and then .high, we set it as “High”.
Upon running the app you will now notice that all the labels update as the device changes state, but before you run the app, you need to ensure that you have added a key to info.plist so that the app can request authorisation from the user. This is important because without it, your app will crash if you try run it now.
The key to add is called NSMotionUsageDescription and you need to set a description (as a string) that will inform the user, briefly, why you want to access the users motion data. When you have added the key, you should see something similar to the image below (I have highlighted the new line).

Sometimes you might see 2 returning true. You might also notice that confidence changes after an event happens. If you are walking and then become stationary, the confidence level might switch to low for a few moments while the device watches if you are briefly stopped… it then might change that confidence to high when it is sure that you have stopped. You can try this by picking up your phone off of the desk and then watching what happens to stationary and confidence.
When you have finished being interested in the motion activity of the device, you should call “stopActivityUpdates()” to stop the delivery of updates. Remember that even if you do stop updates, the device will still be saving them for you to request for up to 7 days. This is what we will cover next in the queryActivityStarting: method.
The queryActivityStarting(from:to:to:withHandler:) Instance Method
Lets begin by calling the queryActivityStarting: method and creating the handler. We will also create a calendar of which I will explain what that is for in a moment:
let calendar = Calendar.current
motionActivityManager.queryActivityStarting(from: calendar.startOfDay(for: Date()),
                                            to: Date(),
                                            to: OperationQueue.main) { (motionActivities, error) in

}
Line 1 we get the current Calendar from Calendar.current. This is because of a handy method called startOfDay: which allows us to get a date from the first moment of today.
Line 2 we call the queryActivityStarting instance method and pass it the start of day for Date() which means because Date() is now, it will find the beginning of the day, and use that as a date. We then set to: as Date(). This means that we are querying ALL data from today. We then put it on the main queue, and then supply names in our handler of motionActivities which we learn is an optional array of CMMotionActivity objects. We also have an optional error.
With these few lines in place, we are now ready to run our query, although we will want to loop through the array and look at each object. If you just use print(motionActivities) then you will get a long list of difficult to read results that have no line breaks.
let calendar = Calendar.current
motionActivityManager.queryActivityStarting(from: calendar.startOfDay(for: Date()),
                                            to: Date(),
                                            to: OperationQueue.main) { (motionActivities, error) in
                                                for motionActivity in motionActivities! {
                                                    print(motionActivity)
                                                }
}
We use a for-in to print out each CMMotionActivity object within the array.
If we wanted to see what times we were walking today then you could change line 5-7 to the following:
for motionActivity in motionActivities! {
    if motionActivity.walking {
        print(motionActivity)
    }
}
This would check if walking was true for every motionActivity, and for those times it was true, it would log to the console.
If you wanted to know what times you were driving or on some form of transport, you would change .walking to .automotive. If you haven’t been in a vehicle and none of the results are .automotive, then nothing will be printed to the console. If you have been in a vehicle, you should see the times that you were moving.
You can download the project here.
Leave a Reply
You must be logged in to post a comment.