iOS devices have several sensors built in that you can make use of in your app. One of them is the digital compass which is also known as a magnetometer. In todays tutorial I want to show you how how you can access the data so that you can use it in your app. The app will be very simple and will just use 8 UILabels with 4 of them being updated with various values.
 To begin with, create a new project in Xcode and choose a Single View Application. If you are not sure how to do this, take a look at my post called Setting up your First iOS Xcode Project which will get you to a fresh start and ready to create the app.
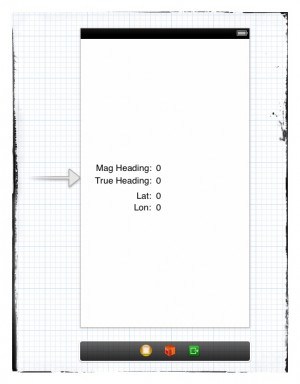
The next step is to drag our 8 UILabels. Put four of them down the left side of the screen and the other four down the right side as pictured here (aligning the text on the right hand labels to the left). Change the names to something like seen in the screen shot. You do not have to set the right hand set at zeros… anything will do, including blank UILabels.
Next, click on the middle Editor button (top right) to create a split to allow two files to be opened. On the left, click the Storyboard. The ViewController header file should then appear on the right.
At the top of the header file, import CoreLocation and also add the CLLocationManagerDelegate as follows:
#import

@interface ViewController : UIViewController
The first of these two lines indicates that we will be using some of the CoreLocation framework. The
Next, click on the Project at the top of the left sidebar and add the CoreLocation Framework to the project. That is found under the “Linked Frameworks and Libraries” section which is just under the iPad/iPhone deployment section.
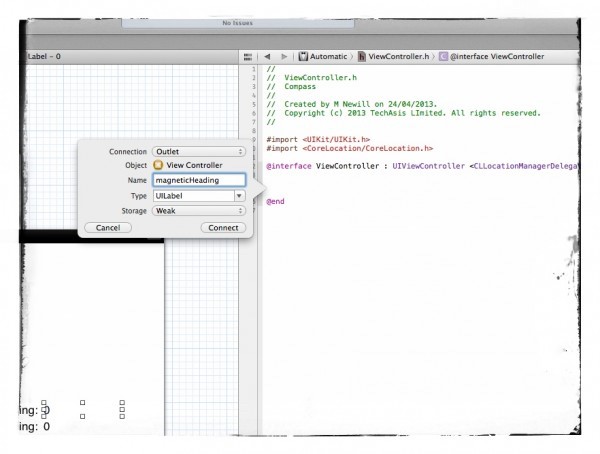
We now need to wire up our UILabels so that we can set the text property of them to display information on the screen. To do that, CTRL+Drag from a UILabel to the header file and put the mouse somewhere between the @interface and @end lines. The following popup will appear as seen in the screenshot below:

You can provide whatever name you want for the UILabel @properties. For the first, I chose magneticHeading followed by trueHeading, latLabel, lonLabel for the remaining labels.
When all items are connected, we just need to one more property to the header file:
@property (strong, nonatomic) CLLocationManager *locationManager;
We need to add the CLLocationManager so that we can enable and disable heading. Also, if using true north, we need to activate location services on the device because the variation between magnetic and true vary depending on where you are on the globe.
Next, we need to move to the implementation of the View Controller so that we can set the needed services going. For this example we are going to use the viewDidLoad method to start the services going. After the line [super viewDidLoad]; add the following lines:
self.locationManager = [[CLLocationManager alloc] init];
self.locationManager.delegate = self;
[self.locationManager startUpdatingHeading];
[self.locationManager startUpdatingLocation];
On line 1, we alloc/init the locationManager which is a CLLocationManager. On line 2, we set the delegate to self. On line 3, we issue a startUpdatingHeading so that the device begins monitoring changes to the heading. Finally, on line 4, we enable the location updates by calling startUpdatingLocation. This last line causes a prompt to appear when you load the app for the first time to confirm if location services can be used. Agree to it if you want to get the true north numbers.
The app is now monitoring for location updates as well as heading updates. To make use of the heading updates we need to use the following method from the CLLocationManagerDelegate protocol: locationManager:didUpdateHeading:. Each time the heading changes this method will be called.
So, lets add the method to our code below the viewDidLoad method:
-(void)locationManager:(CLLocationManager *)manager didUpdateHeading:(CLHeading *)newHeading {
    self.magneticHeading.text = [NSString stringWithFormat:@"%f", newHeading.magneticHeading];
    self.trueHeading.text = [NSString stringWithFormat:@"%f", newHeading.trueHeading];
    self.lonLabel.text = [NSString stringWithFormat:@"%f", self.locationManager.location.coordinate.longitude];
    self.latLabel.text = [NSString stringWithFormat:@"%f", self.locationManager.location.coordinate.latitude];
}
The method above is also used to update the text property of each of the UILables. Each time the method is run, the newHeading CLHeading contains the latest details of the direction the device is heading. Looking at the CLHeading documentation we can see a few properties available which include the magneticHeading and trueHeading which is exactly what we need.
Line 2 of the above code uses a class method of NSString called stringWithFormat to convert the magneticHeading data of newHeading in to an NSString which can then be assigned to the magneticHeading.text property. The other UILabels work the same way although for the lonLanel and latLabel, we access location coordinate from the CLLocationManager rather than just a CLLocation (which is OK to do).
The result is a simple app that when you turn around so the mag or true north is zero, it should mean you are facing north.
Although this app wont be worthy of any type of submission to the app store, the aim of it was to simply show you how to use the compass information within your app. To make it sleeker, you could add some images that represent a compass or somehow tie it in to a map so when you rotate, the map also rotates.
Carolyn Guertin says
This will only work on iPhone obviously. Is there a way to create this functionality for both iPhone and Android in a single app?
Matthew says
Not that I am aware of. You would need to develop 2 separate apps. Unity 3D might create apps for both, but that is more for gaming type stuff I believe.
Mark Lassoff says
Definitely– Use PhoneGap to wrap an HTML5 application.
berkay says
It gives me use of undeclared identifier locationManager’ error. Even though I declared locationManager in ViewController.h and used #import ViewController.h in ViewController.m Can you help me with this weird error?
berkay says
Ok it worked now. I placed in a wrong line.