Update: April 2025. I wrote a new tutorial called How to use Core Location with SwiftUI that works with the latest Swift/SwiftUI.
iOS developers get access to a number of frameworks to help them develop apps. One of the frameworks I like to use is Core Location, often joined with MapKit. The tutorial today will focus on just the Core Location framework and later in the series, we’ll add MapKit to the project so that you can mark your location on a map.
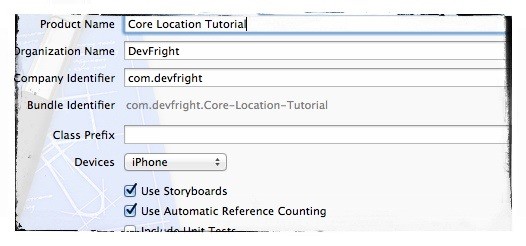
For the project, I’ll be developing for iOS 6 using Storyboards as well as ARC. So lets get going:
Creating the Project
First, lets create a new project by opening Xcode and clicking File > New > Project. I often opt for an empty application, but in this instance I’ll choose a Single View Application because this is all we need to demonstrate a way of working with Core Location.

On the next screen you need to choose somewhere to save the project. I’ll leave that to you to figure out. Also, you can choose if you want to use source control or not. That is your choice. I haven’t bothered with this smaller app.

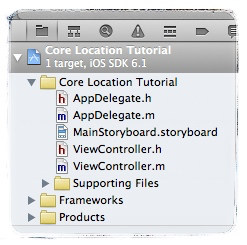
Now that the project has been created, you’ll see several files in the Project Navigator.
In the Core Location Tutorial group, we have the AppDelegate.h and implementation files. Also we have a storyboard and ViewController.h/.m. The reason these were created was because we selected a Single View Application when creating the project. Had we selected Empty Application, we would need to add these ourselves and comment out a few lines of code in the AppDelegate.m file.
Adding the CoreLocation Framework
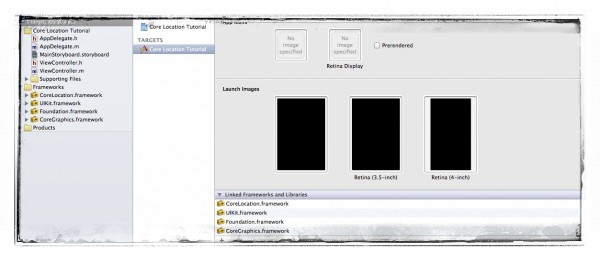
The next step to working with Core Location is to add CoreLocation.framework to the project. To do this, click on the project at the top of the Project Navigator and make sure Summary is selected in the tabs across the top. Scroll down past the iPhone deployment section and you should see three frameworks linked which are there by default. Click the + button and search for CoreLocation. Select and add CoreLocation.framework to the project.
The framework should now appear at the top of the Project Navigator. I personally drag it down to the Frameworks group to keep it with all other frameworks in the project. When this is done, your project should look somewhat like what we have below:

What We need to Work with Core Location
At the moment, we have simply added the framework. There are several steps that need to be taken to get your app working with Core Location.
First, we need to create an instance of CLLocationManager through an ivar or property and then alloc/init it.
Second, we need to configure the CLLocationManager by setting the required accuracy as well as calling the method: startUpdatingLocation.
UPDATE: As of iOS 8, there is an extra step needed to get location working.
The extra step needs to be run “if” the device is running iOS 8. If the device is running iOS 7 or lower then calling this method would crash. So, to avoid that happening you can check if the locationManager responds to a selector called “requestAlwaysAuthorization”. This can be done as follows:
if ([self.locationManager respondsToSelector:@selector(requestAlwaysAuthorization)]) {
        [self.locationManager requestAlwaysAuthorization];
}
If your iOS application doesn’t require location in the background (many apps do not) then you can call [self.locationManager requestWhenInUseAuthorization];
Also, you need to also add a key to the app plist file as follows (depending on which authorisation type you are requesting). This goes in to app-name-info.plist often found in Supporting Files.
NSLocationAlwaysUsageDescription
or
NSLocationWhenInUseUsageDescription
You can add some text to the value field that will show under the default location request alert when permission is requested to use location.
Third, configure the view to conform to the CLLocationManagerDelegate and set the ViewController as the delegate so that updates to location can be received.
Lets break these down one by one.
Importing CoreLocation and Creating an Instance of CLLocationManager
Now that the project is created and the framework is added, we can now start to put the code together to get the app working. For this initial tutorial, I’m going to add the CoreLocation code to ViewController.h/.m and work direct from there. In a later part, we’ll look at moving the CoreLocations out and putting them in to a wrapper class or business object so that we can more easily work with CoreLocation from different views rather than repeating the same code over and over. Although the latter way would work and we can have multiple instances, it isn’t the best practice to do so because each instance could potentially be fighting over the location data and each providing slightly different configurations.
You first need to #import the CoreLocation header file. We need to put this in our ViewController.h as we will also be setting up ViewController.h to be the CLLocationManagerDelegate which we declare in the header. Your .h file should now look like this:
#import <UIKit/UIKit.h>
#import <CoreLocation/CoreLocation.h>

@interface ViewController : UIViewController

@property (strong, nonatomic) CLLocationManager *locationManager;

@end
On line 2, we add an #import with angled brackets <>. When importing frameworks we use the angled brackets. When importing the header of another class, we use speech marks ” ” instead.
On line 6 we added a property for CLLocationManager and called it locationManager.
Moving over to the implementation file, we now need to alloc/init the CLLocationManager object. We do this with the following code:
- (void)viewDidLoad
{
    [super viewDidLoad];
    self.locationManager = [[CLLocationManager alloc] init];
}
I decided for this basic app to just use the viewDidLoad method to alloc/init the CLLocationManager. The new line has been added to line 4. The reason we use self.locationManager is because locationManager is a property. We could use _locationManager, but generally we only use the instance variable in the init methods so that if there’s a custom setter, we don’t bypass it and potentially miss out on some bounds checking.
Configuring CLLocationManager
Moving on, we now need to configure the CLLocationManager by setting some properties. The first one we will use here is the desiredAccuracy property. There are currently six options for this property which I have listed below:
kCLLocationAccuracyBestForNavigation
kCLLocationAccuracyBest
kCLLocationAccuracyNearestTenMeters
kCLLocationAccuracyHundredMeters
kCLLocationAccuracyKilometer
kCLLocationAccuracyThreeKilometers
At the top of the list we have the most accurate location which uses the most battery power. Moving down the list, we get less accurate with each step and with that, we also use less power. Apple recommends that you use the best fit for your application. ie… if you just need to know which part of the US you are in then use the bottom of the list. If you need to know your precise coordinates then use the kCLLocationAccuracyBest option. If you want to build a navigation app, use the one right at the top which also incorporates other sensors to detect movement.
For this app, I just want to find out roughly where I am, so I’ll choose the HundredMeters option. Rather than posting two separate parts of code I’ll also include the code that tells it to start updating the location of the device.
- (void)viewDidLoad
{
    [super viewDidLoad];
    self.locationManager = [[CLLocationManager alloc] init];
    self.locationManager.desiredAccuracy = kCLLocationAccuracyHundredMeters;
    // Code to check if the app can respond to the new selector found in iOS 8. If so, request it.
    if([self.locationManager respondsToSelector:@selector(requestAlwaysAuthorization)]) {
        [self.locationManager requestAlwaysAuthorization];
        // Or [self.locationManager requestWhenInUseAuthorization];
    }
    [self.locationManager startUpdatingLocation];
}
I personally prefer to use dot notation where possible. Line 5 is where we set the desiredAccuracy property. We access that through self.locationManager.desiredAccuracy and then after the assignment operator we specify the option (I chose HundredMeters).
The line after that I sent the startUpdatingLocation to self.locationManager. This tells the location functions to start working.
Setting up the CLLocationManagerDelegate
As the app stands now, it is collecting location information. You could technically access this information through the location property of the locationManager. The information stored in the location property is the last retrieved location which may or may not be accurate. Rather than just accessing the location through a property, we can use the CLLocationManagerDelegate and be told when there is an update and then do something with that information.
There are several different items in the delegate which include location updates, heading updates and region updates. These notify the ViewController (or object) when something has changed, such as when your heading changes or when you enter a specified region. For this tutorial we will look at the basic location updates.
To do that, we need to add the CLLocationManagerDelegate to the header file which makes a bunch of methods available to accomplish this.
@interface ViewController : UIViewController
Over in the implementation file we need to choose a method which will respond. We’ll opt for this one below:
- (void)locationManager:(CLLocationManager *)manager didUpdateLocations:(NSArray *)locations
Each time the location receives an update, this method is triggered. To make use of it, we need to add the method in to our ViewController.m file as follows (I added it just below the viewDidLoad method).
-(void)locationManager:(CLLocationManager *)manager didUpdateLocations:(NSArray *)locations {

}
The updated location information is found in the locations NSArray. The NSArray could contain several locations as objects within, but generally there’s just the one assuming they arrived in good timing (according to the documentation, the can occasionally collect up). The NSArray contains CLLocation objects which means we need to create a CLLocation object to retrieve the information and store it within. Lets add another property to our header as follows:
@property (strong, nonatomic) CLLocation *location;
Next, lets alloc/init the CLLocation in the implementation. We can add this at the bottom of the viewDidLoad method. We might as well set the delegate here as well as we need to register this particular view as the delegate to receive the updates.
self.locationManager.delegate = self;
self.location = [[CLLocation alloc] init];
This allows us to get the contents of the locations NSArray and store the last object in the CLLocation property so that we can access the location information.
Back in the -(void)locationManager:(CLLocationManager *)manager didUpdateLocations:(NSArray *)locations method, we now need to get one of the CLLocation objects from the locations array and we can then NSLog some of the properties of CLLocation to show where we are or what our altitude is etc… This is done as follows:
-(void)locationManager:(CLLocationManager *)manager didUpdateLocations:(NSArray *)locations {
    self.location = locations.lastObject;
    NSLog(@"%@", self.location.description);
}
On line 2 we are getting the lastObject from the locations NSArray and storing it in the CLLocation property (self.location).
On line 3 we are using NSLog to print to the console the description of the self.location data. The description is a method that combines of all data stored in self.location in to a string of text.
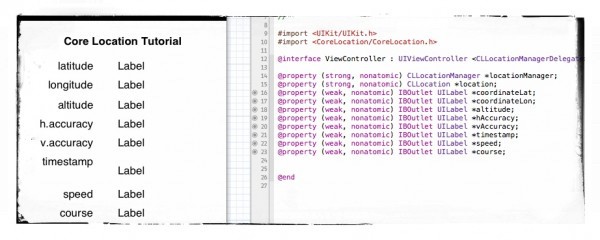
To make this more useful, lets edit the storyboard and add a few labels to store the specific data inside.
Create your storyboard similar to this one below and create and connect up outlets for each of the labels.

The timestamp label looks to be a bit skew. I made it this way so that the contents can wrap on to 2 lines due to the length of the timestamp.
Implementing the code can be done as follows:
-(void)locationManager:(CLLocationManager *)manager didUpdateLocations:(NSArray *)locations {
    self.location = locations.lastObject;
    self.coordinateLat.text = [NSString stringWithFormat:@"%f", self.location.coordinate.latitude];
    self.coordinateLon.text = [NSString stringWithFormat:@"%f", self.location.coordinate.longitude];
    self.altitude.text = [NSString stringWithFormat:@"%f", self.location.altitude];
    self.hAccuracy.text = [NSString stringWithFormat:@"%f", self.location.horizontalAccuracy];
    self.vAccuracy.text = [NSString stringWithFormat:@"%f", self.location.verticalAccuracy];
    self.timestamp.text = [NSString stringWithFormat:@"%@", self.location.timestamp];
    self.speed.text = [NSString stringWithFormat:@"%f", self.location.speed];
    self.course.text = [NSString stringWithFormat:@"%f", self.location.course];
}
Because each UILabels text property requires an NSString, I decided to go with the class method of NSString called stringWithFormat that can convert the data in to an NSString.
Conclusion and What Next
This tutorial was designed to work with the absolute basics of the CoreLocation framework. I simply wanted to show you how to access the location features of your iPhone or 3G enabled iPad and display that information on the screen as a bunch of numbers.
To tidy the app up and make it more useful there are several things that need to be taken care of.
Right now there is no error checking. We need to implement the error methods so that if something goes wrong, we can handle it the right way.
We also do not check to see if the connected iOS device is compatible. This should be a standard check so that you know how to handle devices that cannot provide location.
We do not check if the user disagreed to using location services. Should the user decline, we haven’t handled what happens and how to prompt the user with instructions to switch back on.
We have also implemented the code in to the ViewController. This isn’t the best way. My preferred method is to put the CoreLocation services somewhere else in a central location so that if we have several views, each can access as needed.
Also, looking at a bunch of numbers can be quite boring. In part 2, we’ll add the error checking and move the CLLocationManager and other location based services to another class. In part 3, we’ll add a map so you can visualise your location rather than just trusting the numbers are correct.
Subscribe to keep up with this series by clicking here (for RSS), or entering your details in the top right sidebar.
Will Squire says
Awesome and up to date tutorial! Hard to find
Craig Hewitt says
great tutorial. indeed hard to find one so detailed and up to date.
Usman Ahmad says
cool, awesome, simple, what else
Narasimha says
Really amazing..very nice tutorial. I need to find users near by my location in my application can you suggest me any tutorial like this?
Matthew says
I can look in to that and certainly create a tutorial for this in the near future.
Jillian O. says
This is perfect, thank you!
Akash Gupta says
This tutorial needs to be updated for iOS 8.
Matthew says
Updated :)
Indrajeet says
Sir, could you please tell me where is part 2 & part 3 tutorial?
Matthew says
This tutorial needs updating for iOS 10, so the focus will be bringing it up to iOS 10 specs, and then part 2 and 3 will be included.