You have probably seen a number of times an app that shows the progress of a download. Today, we’ll look at one way how this is accomplished. In this tutorial I’ll show you how to create a progress bar that fills up as more data is downloaded. The data we’ll download will be an image downloaded from the internet.
iOS Progress Bar Tutorial
Lets begin by loading up Xcode and creating a Single View Application.
Call the project “Progress Bar” and leave the rest of the options as default. You can choose iPad or iPhone for this project although we’ll create it for the iPhone in this tutorial. When you get to the option on the next page asking if you want a GIT repository, you can either select or deselect it.
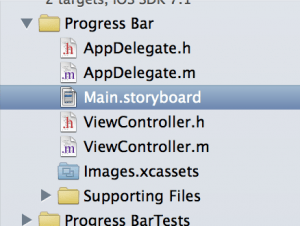
 When the project is ready to go, load up the storyboard by clicking on Main.storyboard in the navigation pane to the left. When the storyboard loads up, you will see just a single view that is currently empty. We need to add a few objects to it which will include a progress bar and an image view. All this simple app will do is load up a pre-defined URL and as the page loads, it will show the progress of the page load and when done, it will show the item on screen.
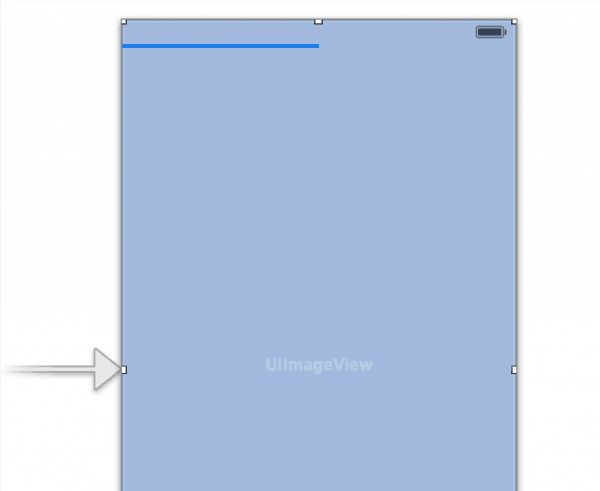
First, lets drag out a UIProgressView to the view. We will position this near the top of the view. I made it full width and changed the style to Bar in the inspector on the right side of the screen. The style isn’t too important here as we’ll just be showing how it functions in this app.
Next, drag out a UIImageView and fill the rest of the screen with it as seen below. Fill the whole screen with the image view and then in the document outline, drag the UIProgressView below the image view. This will put the progress bar on top of the image so that you can see it.

Next we need to connect up the progress bar and the image view to the ViewController class. The easiest way to do this is to switch to the assistant editor by clicking on the middle icon at the top right of the screen. With the storyboard on the left, you can then select ViewController.h on the right (see the file selector at the top of the right hand editor pane).
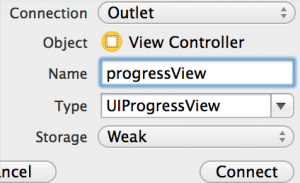
 Next, CTRL+drag from the UIProgressView object to between the @interface and @end line in the header. Call this progressView with the default options as seen to the left.
Do the same for the image view and call it imageView, leaving all options default.
In your header file, you’ll now have the following lines with both properties having a small grey dot to the left of them which indicates they are connected as IBOutlets to the storyboard.
#import

@interface ViewController : UIViewController

@property (weak, nonatomic) IBOutlet UIProgressView *progressView;
@property (weak, nonatomic) IBOutlet UIImageView *imageView;

@end
Now that we have our basics set up, we can start with the main code to pull all of this together. To make it work, we’ll be using the NSURLConnectionDataDelegate. Although the NSURLConnectionDownloadDelegate has some nice methods that would help here, unfortunately that delegate protocol is designed for Newsstand apps. Instead, we need to use a few works arounds to get some of the same functionality. Luckily, it is relatively easy to get the status bar going.
Using the NSURLConnectionDataDelegate Protocol
Switch back to the standard editor and then select ViewController.h. We need to let this class know that we will conform to the NSURLConnectionDataDelegate by adding it to the @interface line in angled brackets. Change the @interface line to show the following:
@interface ViewController : UIViewController
Now switch to ViewController.m and at this point, we’ll begin adding the code. The NSURLConnectionDataDelegate doesn’t have any required methods. All are optional. What we require for this tutorial are the following:
connection:didReceiveResponse:
connection:didReceiveData:
connectionDidFinishLoading:
The first, connection:didReceiveResponse:, is used to get a response from the url request that we will create. The information provided by this method includes an estimated download size in a property called expectedContentLength. We’ll use this to estimate the progress of the download.
The connection:didReceiveData: delegate method is called multiple times through the download as it grabs data in chunks. We store that NSData in chunks by concatenating it to the last chunk received.
Finally, when the last chunk has been downloaded the connectionDidFinishLoading: delegate method is called to inform us that the download is complete. At this point we can action the data that we joined/concatenated together during the download and then act on it as needed.
It sounds complicated, but isn’t too bad as most is just boiler plate code.
We will be putting some of the code in viewDidLoad to kick the page loading off and then the rest of the action will be performed when the delegate methods are called.
Lets start by creating the NSURLRequest. We do that with the following code:
NSURLRequest *urlRequest = [NSURLRequest requestWithURL:[NSURL URLWithString:@"https://www.devfright.com/wp-content/uploads/2014/05/iPhone4Wallpaper.jpg"]
                                                cachePolicy:NSURLRequestReloadIgnoringLocalCacheData
                                            timeoutInterval:60.0];
The above is really a single line of code although we broke each argument in to a separate line to prevent it wrapping around the editor in Xcode.
Line 1, we call a class method of NSURLRequest called requestWithURL:cachePolicy:timeoutInterval:. We pass it a URL as an NSString. We’ll use the name of this website (devfright.com). On line 2, we set the cachePolicy. I opted for NSURLRequestReloadIgnoringLocalCacheData on this occasion although you would likely use the default of NSURLRequestUseProtocolCachePolicy. The reason I opted for a different to default was because when you run the app once, it caches the image and then you don’t see the progress bar moving again. The policy I chose ignores the cache so we can see it working each time we load the app. We then set a timeout on line 3 at 60 seconds. We assign the result to an NSURLRequest called urlRequest.
Next we will create 3 properties. As we don’t need to make these public, we can put them in the .m file by adding the following lines of code above the @implementation and below the #import lines.
@interface ViewController ()

@property (strong, nonatomic) NSURLConnection *connectionManager;
@property (strong, nonatomic) NSMutableData *downloadedMutableData;
@property (strong, nonatomic) NSURLResponse *urlResponse;

@end
Near the bottom of ViewController.m, add the following delegate methods (the ones we discussed above).
#pragma mark - Delegate Methods
-(void)connection:(NSURLConnection *)connection didReceiveResponse:(NSURLResponse *)response {

}

-(void)connection:(NSURLConnection *)connection didReceiveData:(NSData *)data {

}

-(void)connectionDidFinishLoading:(NSURLConnection *)connection {

}
On line 1, I added #pragma mark – Delegate Methods just to keep the code tidy. This line can be added anywhere in your code (out of method blocks) and lets you put a description of the code so that when you click on the method names in the jump bar at the top of the editor, you can see a breakdown of different sections of code.
The rest of the lines are the delegate methods that we implemented which are code-completed as you type in -conn…. You just select the method you need and hit enter.
Although we created the NSURLRequest above, we didn’t do anything with it. We now need to go back to viewDidLoad and add the following line of code just below the NSURLRequest line.
self.connectionManager = [[NSURLConnection alloc] initWithRequest:urlRequest delegate:self];
Here we alloc and init an NSURLConnection (called connectionManager… a property) and init it with the urlRequest we just created. We then need to let the class know that we delegate ourself to receive the updates.
Add the following to the method below:
-(void)connection:(NSURLConnection *)connection didReceiveResponse:(NSURLResponse *)response {
    NSLog(@"%lld", response.expectedContentLength);
    self.urlResponse = response;
}
Line 2 we NSLog the expectedContentLength property of the NSURLResponse. In this case, it logs to the console 90124 bytes. That is our file size. We store the NSURLResponse in the property (self.urlResponse) as we will use that in the next delegate method.
At this point, the data has now started and finished downloading. We just haven’t implemented any code to do anything with it yet.
Lets move in to our second delegate method and add the following code:
-(void)connection:(NSURLConnection *)connection didReceiveData:(NSData *)data {
    [self.downloadedMutableData appendData:data];
    self.progressView.progress = ((100.0/self.urlResponse.expectedContentLength)*self.downloadedMutableData.length)/100;
    if (self.progressView.progress == 1) {
        self.progressView.hidden = YES;
    } else {
        self.progressView.hidden = NO;
    }
    NSLog(@"%.0f%%", ((100.0/self.urlResponse.expectedContentLength)*self.downloadedMutableData.length));
}
Line 2, we appendData to our NSMutableData property.
Line 3, we set the progress property of the progressView by working out the percentage of the download. We do 100/expectedContentLength and then multiply that by the amount of data already downloaded. We then divide all of that by 100 to make the value between 0.0 and 1.0 which is what the progress property requires.
Lines 4 – 8 we are just checking to see if the progress has completed. If so, we can hide the progress bar.
I added an NSLog after this just so you can see the progress logging to the screen. The %.0f indicates zero decimal places and the %% adds a single % sign on the end so that we see a percentage logged. Kind of crude, but it does the job for just an NSLog.
The only thing we are missing here is alloc/init for the downloadedMutableData. Because we don’t want to re-alloc and init on each load, we will do this just the once in viewDidLoad by adding the following line before the NSURLRequest line:
self.downloadedMutableData = [[NSMutableData alloc] init];
If you run the app, you’ll see the progress bar now working as well as some NSLogging to the console to show the progress.
The last part of this tutorial is to display the image once we have received it all. Note that in the last method, we were receiving the downloaded data in chunks and that when complete, we had a full NSMutableData object containing the whole image data. When the download hits 100%, the final delegate method is called. In this case, that is the connectionDidFinishLoading: method.
We can now implement this as follows:
-(void)connectionDidFinishLoading:(NSURLConnection *)connection {
    NSLog(@"Finished");
    self.imageView.image = [UIImage imageWithData:self.downloadedMutableData];
}
Line 2 is just logging that the process has finishes. Line 3 we get our downloadedMutableData and use the imageWithData: class method from UIImage to get the image. We then assign that to our imageView property and the image property of that property. With just a single line of code we can show the full image at the end of the download.
If you go ahead and run the app (this also works in the simulator and also note that the image URL above is for a 3.5 inch screen). If you run this on an iPhone 5,5S,5C, it will look stretched. But, you will see the progress indicator filling up and then disappearing off screen as the image loads.
If you run this on 3G you will see it work better because on WiFi, the image downloads quite quickly and you only get a brief glimpse of the progress bar.
As always, you can download the full project here.
Code:
ViewController.h
#import

@interface ViewController : UIViewController

@property (weak, nonatomic) IBOutlet UIProgressView *progressView;
@property (weak, nonatomic) IBOutlet UIImageView *imageView;

@end
ViewController.m
#import "ViewController.h"

@interface ViewController ()

@property (strong, nonatomic) NSURLConnection *connectionManager;
@property (strong, nonatomic) NSMutableData *downloadedMutableData;
@property (strong, nonatomic) NSURLResponse *urlResponse;

@end

@implementation ViewController

- (void)viewDidLoad
{
    [super viewDidLoad];
	// Do any additional setup after loading the view, typically from a nib.
    self.downloadedMutableData = [[NSMutableData alloc] init];
    NSURLRequest *urlRequest = [NSURLRequest requestWithURL:[NSURL URLWithString:@"https://www.devfright.com/wp-content/uploads/2014/05/iPhone4Wallpaper.jpg"]
                                                cachePolicy:NSURLRequestReloadIgnoringLocalCacheData
                                            timeoutInterval:60.0];
    self.connectionManager = [[NSURLConnection alloc] initWithRequest:urlRequest delegate:self];
}

- (void)didReceiveMemoryWarning
{
    [super didReceiveMemoryWarning];
    // Dispose of any resources that can be recreated.
}

#pragma mark - Delegate Methods
-(void)connection:(NSURLConnection *)connection didReceiveResponse:(NSURLResponse *)response {
    NSLog(@"%lld", response.expectedContentLength);
    self.urlResponse = response;
}

-(void)connection:(NSURLConnection *)connection didReceiveData:(NSData *)data {
    [self.downloadedMutableData appendData:data];
    self.progressView.progress = ((100.0/self.urlResponse.expectedContentLength)*self.downloadedMutableData.length)/100;
    if (self.progressView.progress == 1) {
        self.progressView.hidden = YES;
    } else {
        self.progressView.hidden = NO;
    }
    NSLog(@"%.0f%%", ((100.0/self.urlResponse.expectedContentLength)*self.downloadedMutableData.length));
}

-(void)connectionDidFinishLoading:(NSURLConnection *)connection {
    NSLog(@"Finished");
    self.imageView.image = [UIImage imageWithData:self.downloadedMutableData];
}

@end
farnaz says
great tutorial … tnx :)
Heba says
Great thank you, but I have a question: when I tried didReceiveData called only once when complete image is downloaded, so the progress doesn’t move slowly, I use multi size of images, big like 85845 and small like 1349. So what is the problem ?
Matthew says
If I recall correctly, it depends on the server providing some information in the HTTP header. If that information isn’t available, it won’t be able to estimate the file download size and some other way would need to be used to determine file size.
Ashok says
I am new to IOS Programming. how to change icons based on percentage of download completed. so that user can get experience of downloading?
– (void)connection:(NSURLConnection *)connection didReceiveData:(NSData *)data
{
self.downloadedContentLength+=[data length];//data downloaded.
double percent = ((double)self.downloadedContentLength/self.contentLength)*100;//percentage of data downloaded
NSLog(@”PERCENT = %f”, percent);
if (percent<15) {//if percent is < 15 show image1
//show image1
}
else if (percent<30)//if percent is < 30 show image2
{
//show image2
}
}
when each time didReceiveData is hit. it should calculate percentage of data downloaded and based on that image has to be changed.
anup kanjariya says
please update this code in swift, bcoz only know swift not objective-c. Thanks a lot