When iOS 10.3 was launched it provided developers with the ability to let users change the icon in the app. In this fairly short tutorial I’ll show you how it’s done.
To begin, create a new project in Xcode. An iOS/Single View is a good place to start. Make sure you select Swift as the language. The same function can also be created with Objective-C, but this tutorial focuses on the Swift way.
setAlternateIconName Tutorial
We now need add some keys to Info.plist for the app. In particular, add the following:
<key>CFBundleIcons</key>
	<dict>
		<key>CFBundleAlternateIcons</key>
		<dict>
			<key>red</key>
			<dict>
				<key>UIPrerenderedIcon</key>
				<false/>
				<key>CFBundleIconFiles</key>
				<array>
					<string>red</string>
				</array>
			</dict>
            <key>green</key>
            <dict>
                <key>UIPrerenderedIcon</key>
                <false/>
                <key>CFBundleIconFiles</key>
                <array>
                    <string>green</string>
                </array>
            </dict>
            <key>blue</key>
            <dict>
                <key>UIPrerenderedIcon</key>
                <false/>
                <key>CFBundleIconFiles</key>
                <array>
                    <string>blue</string>
                </array>
            </dict>
		</dict>
		<key>CFBundlePrimaryIcon</key>
		<dict>
			<key>CFBundleIconFiles</key>
			<array>
				<string></string>
			</array>
			<key>UIPrerenderedIcon</key>
			<false/>
		</dict>
		<key>UINewsstandIcon</key>
		<dict>
			<key>CFBundleIconFiles</key>
			<array>
				<string></string>
			</array>
			<key>UINewsstandBindingType</key>
			<string>UINewsstandBindingTypeMagazine</string>
			<key>UINewsstandBindingEdge</key>
			<string>UINewsstandBindingEdgeLeft</string>
		</dict>
	</dict>
The information you need to populate this can be found on the Apple website, but I have included what you need for this tutorial in the above code.
To add this, right click on Info.plist, Open As, Source Code. You can paste it at this point:

A brief overview of what this is.
Line 1: We create the required CFBundleIcons key. In here, we have a dictionary which contains the CFBundleAlternateIcons key (seen on line 3), and the CFBundlePrimaryIcon key (line 33). When you add the CFBundleIcons key it automatically adds line 33 and line 42. Feel free to delete the UINewsStandIcon section if desired. Within the CFBundleAlternateIcons key we specify all of the alternative icons we want available. These are stored under the name of the icon, so in this case I want the option to be red (line 5), and then I specify CFBundleIconFiles within an array with the item also called “red”. I repeat this for each icon I want. You can see that we also have a green, and a blue.
You now need to create the icons. They need to be @2x and @3x sizes based on the @1x size of 60 pixels. To help speed things up, feel free to download a zip file containing the 6 files you need from here.
 Extract the files and drag/drop them in to your project.
From my testing, I found that you are unable to add them to an assets folder. Instead, just drag them direct in to the structure of your project as seen in the screenshot to the left. If you used your own icons, make sure you follow the correct naming convention such as the name you specified in the plist file, as well as the @2x and @3x appended to the end of the name.
iOS will determine which file to use automatically based on it being a 5.5 inch screen or not.
The View
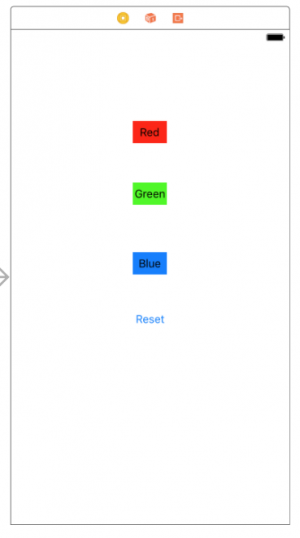
 We now need to put some buttons on the view so we can make this work. As you can see, the view is very simple. Just drag out some UIButtons, change the background colour and text to match the icons (not mandatory, but it just made sense to have a red button make the icon red… call it whatever you like).
 Open up the assistant editor (middle button showing to the left, found at the top right of Xcode) and put the storyboard on the left and ViewController.swift on the right. You now need to CTRL+drag from the top button to ViewController.swift. You can drag to just below the closing curly brace on didReceiveMemoryWarning, but not after the final closing curly brace for the class.
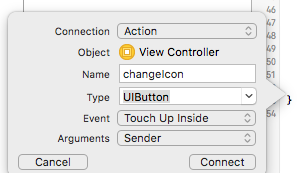
 Set the options as seen to the left making sure the connection is set to Action and the type is set to UIButton. Click Connect.
Rather than create an IBAction for each button on the view, we will drag from the small circle (around line 24 where the line numbers are listed) and then drag to the three remaining buttons.
Finally, we need a way to identify which button is being pressed. To do this we will use the tag property. To do that, select the red button and open up the Attributes Inspector (if not open already) in the right sidebar (the 4th icon from the left). The tag should have a default value of 0. Leave that as it is for red. Select the green button next and change the tag to a 1, then 2 for blue, and then just put a random number in for reset (something like 10).
Navigate to ViewController.swift now and add the following:
@IBAction func iconSelected(_ sender: UIButton) {
        if UIApplication.shared.supportsAlternateIcons {
            switch sender.tag {
            case 0:
                UIApplication.shared.setAlternateIconName("red", completionHandler: nil)
            case 1:
                UIApplication.shared.setAlternateIconName("green", completionHandler: nil)
            case 2:
                UIApplication.shared.setAlternateIconName("blue", completionHandler: nil)
            default:
                UIApplication.shared.setAlternateIconName(nil)
            }
        }
    }
On line 2 we are checking that the device has the ability to switch to an alternative icon. If so, we proceed to the switch statement which is based on the tag. We then have each case, leaving a default at the end to set it to nil. We use this for the reset button.
In each case we call setAlternativeIconName and specify which icon we want to use by name, i.e. red for the red icon and so on.
Note that setAlternativeIconName also has a completion handler which provides an error. We won’t use it for this tutorial, but please do implement it if you use this for a real app.
Testing the App
With the code in place, you have everything you need to test. Go ahead and run the app. When you tap on a button it should pop up a message to inform you that the icon for the app has changed. If you close out the app, it should be whatever option you selected.
You can download the project here.
Leave a Reply
You must be logged in to post a comment.