Apple has gone the extra mile to make sure the user is explicitly granting your app permission to use the iPhone location services. There are just a few simple steps to go through to get your app setup correctly.
First, add two keys to your info-plist. These are case sensitive and do not appear as a standard entry that you can select. Add both keys so you later have the option of calling either one. Make sure everything is spelled correctly and has the correct “camel case”, otherwise the request for authorization will be ignored.
NSLocationWhenInUseUsageDescription
NSLocationAlwaysUsageDescription
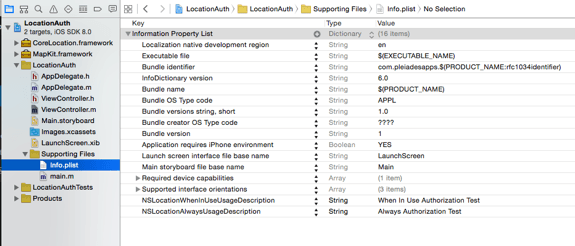
You have the option of adding a description which will appear in an alert when the user is prompted to allow location services. However, leaving the description empty has no effect on the implementation.
In the Implementation file, the location manager needs to be allocated and initialized. Then we call the type of authorization we want the user to approve. This will be shown in the example.
What’s important here is that once the type of authorization is set by the user, the only way to change it is to go to the “Settings” app of the iPhone.
If the user does not allow location services, you must later explicitly check for this and then direct the user to the “Settings” app to change it. Additionally, if the user is prompted to allow location services only when the app is in use, and they agree, that setting is locked in and cannot be changed from within the app. The user must make changes from the iPhone “Settings” app.
If “Location Services” is turned off globally under the “Privacy” setting of the “Settings” menu, the user will be prompted to turn on location services if your request for authorization is correctly implemented.
To illustrate the implementation process, we’ll make a quick sample project.
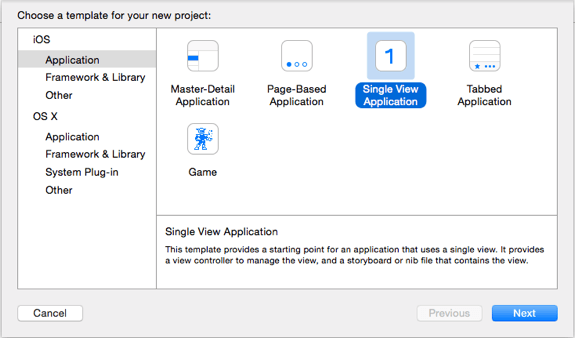
Create a new project, single view application, objective-c, iPhone.
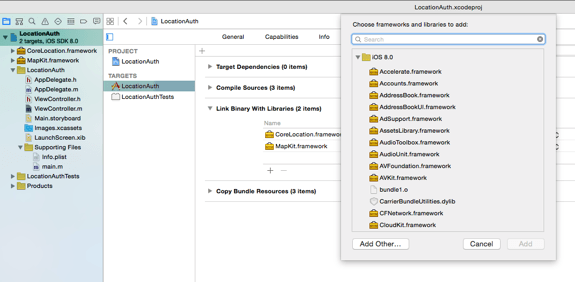
Add the Core Location Framework to your app. Select your project. Click on “Build Phases”. Click on the + button in “Link Binary with Libraries”. At minimum, you need either MapKit or Core Location.
In the ViewController.h file, import the frameworks that were added to the project and add the CLLocationManagerDelegate protocol.
#import <UIKit/UIKit.h>
#import <MapKit/MapKit.h>
#import <CoreLocation/CoreLocation.h>

@interface ViewController : UIViewController<CLLocationManagerDelegate>

@end
To see what’s going on with the authorization status, add a label, text field, and a button to the View Controller in Storyboard.
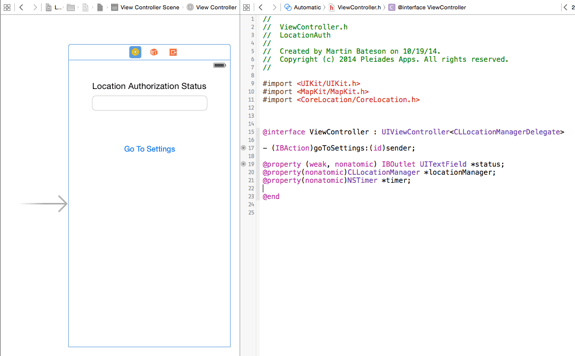
In the .h file add the following code and make your connections. Create a property for the CLLocationManager and name it locationManager. I’ve added a timer to run a refresh method which will check the status of authorization. The button action will be named “goToSettings” and the text field will be named “status”.
#import <UIKit/UIKit.h>
#import <MapKit/MapKit.h>
#import <CoreLocation/CoreLocation.h>

@interface ViewController : UIViewController<CLLocationManagerDelegate>

- (IBAction)goToSettings:(id)sender;

@property (weak, nonatomic) IBOutlet UITextField *status;
@property(nonatomic)CLLocationManager *locationManager;
@property(nonatomic)NSTimer *timer;

@end
The timer will fire a method which we’ll create to check the authorization status and update the text field when the status has changed.
There are six authorization status attributes we can monitor:
kCLAuthorizationStatusNotDetermined User has not been asked to authorize location monitoring.
kCLAuthorizationStatusRestricted User has “Location Services” turned off in “Settings”.
kCLAuthorizationStatusDenied User tapped “NO” or turned off in “Settings”.
kCLAuthorizationStatusAuthorized applies to iOS7 and below.
kCLAuthorizationStatusAuthorizedAlways User authorized background use.
kCLAuthorizationStatusAuthorizedWhenInUse User authorized use only while app is in foreground.
We will monitor these and send a string to the text field depending on the status.
In the implementation file add the following code in the viewDidLoad method. Here we are initializing the Location Manager and requesting “WhenInUse” authorization. “Request Always” is commented out, but it doesn’t really make a difference. The first called request is recognized and the other request is ignored. If “requestAlwaysAuthorization” was not commented out, it would still get ignored because the code runs from the top down, and the second request simply gets bypassed.
#import "ViewController.h"

@interface ViewController ()

@end

@implementation ViewController

- (void)viewDidLoad {

[super viewDidLoad];

// Do any additional setup after loading the view, typically from a nib.

_locationManager =[[CLLocationManager alloc]init];

// Use either one of these authorizations **The top one gets called first and the other gets ignored

[self.locationManager requestWhenInUseAuthorization];

//[self.locationManager requestAlwaysAuthorization];

[self.locationManager startUpdatingLocation];

}
Now let’s create the method to monitor the authorization status. Add the following method anywhere in the .m file.
-(void)checkStatus{

CLAuthorizationStatus status = [CLLocationManager authorizationStatus];

if (status==kCLAuthorizationStatusNotDetermined) {
_status.text = @"Not Determined";
}

if (status==kCLAuthorizationStatusDenied) {
_status.text = @"Denied";
}

if (status==kCLAuthorizationStatusRestricted) {
_status.text = @"Restricted";
}

if (status==kCLAuthorizationStatusAuthorizedAlways) {
_status.text = @"Always Allowed";
}

if (status==kCLAuthorizationStatusAuthorizedWhenInUse) {
_status.text = @"When In Use Allowed";
  }

}
Now add the timer to the viewDidLoad method calling the “checkStatus” method we just created. Every second we’ll check the authorization status and update the text field label.
self.timer = [NSTimer scheduledTimerWithTimeInterval:1.0
                                                  target:self
                                                selector:@selector(checkStatus)
                                                userInfo:nil repeats:YES];
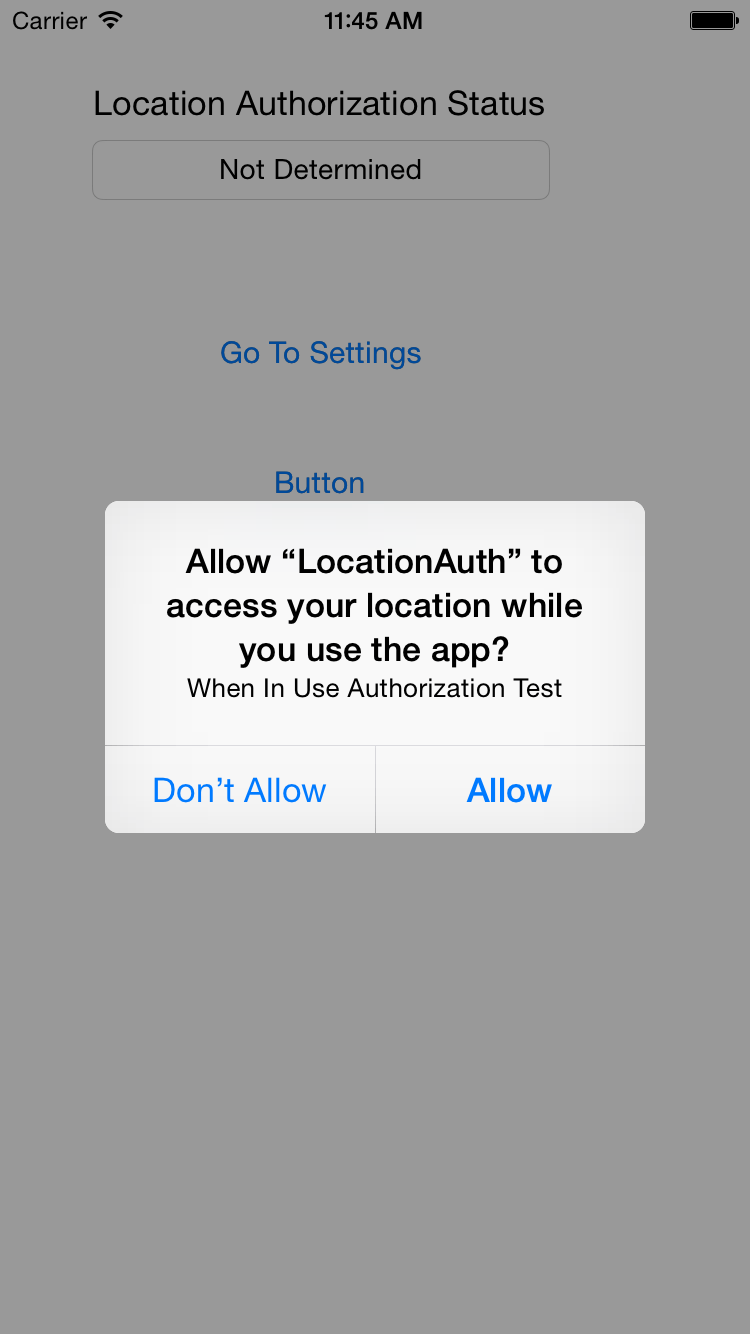
Build and Run the app. At this point you should be prompted with an alert asking you to allow location services when the app is in use.
Our text field will indicate “Not determined”. If we click on “Allow” the status will change to “When In Use Allowed”. If “Don’t Allow” is touched our text field will indicate “Denied”.
At this point you have successfully set up permission for your app to monitor the users location.
We have not yet added code to our button action to take the user to the “Settings” app. In the button action method add the following code;
 - (IBAction)goToSettings:(id)sender {
    NSURL *settingsURL = [NSURL URLWithString:UIApplicationOpenSettingsURLString];
    [[UIApplication sharedApplication]openURL:settingsURL];
}
By touching this button you can now get to the “Settings” app from your app, and change the permissions.
If there was a case in which you wanted to monitor the authorization status and prompt the user to make a change, you could do so in the following way.
To illustrate this, add another button to our view controller, name it “changeAuth”, and add the following method in the .m file.
-(void)requestAlwaysAuth{

CLAuthorizationStatus status = [CLLocationManager authorizationStatus];

if (status==kCLAuthorizationStatusAuthorizedWhenInUse || status == kCLAuthorizationStatusDenied) {

NSString*title;

title=(status == kCLAuthorizationStatusDenied) ? @"Location Services Are Off" : @"Background use is not enabled";

NSString *message = @"Go to settings";

UIAlertView *alert = [[UIAlertView alloc]initWithTitle:title message:message delegate:self cancelButtonTitle:@"Cancel" otherButtonTitles:@"Settings", nil];

[alert show];

}else if (status==kCLAuthorizationStatusNotDetermined)

{[self.locationManager requestAlwaysAuthorization];}

}
This method is checking to see if the authorization status is “Denied”, or set to “WhenInUse”. If either is detected, we present the user with an alert. If the user taps “Settings” in our alert box then we create another method to handle that touch and take the user to the “Settings” app…. with the following code:
-(void)alertView:(UIAlertView *)alertView clickedButtonAtIndex:(NSInteger)buttonIndex{

if (buttonIndex == 1) {

NSURL *settingsURL = [NSURL URLWithString:UIApplicationOpenSettingsURLString];

[[UIApplication sharedApplication]openURL:settingsURL];

}
For the button action which we placed in the view controller, call the method “requestAlwaysAuth”.
- (IBAction)changAuth:(id)sender{
    NSLog(@"Trying to change to ALWAYS authorization");
    [self requestAlwaysAuth];

}
When we launched this app we set the permissions to allow user location detection only when the app is being used. By calling this method we can check to see if permissions have been granted or prompt the user to change the “whenInUse” setting to monitor user location while the app is in the background.
Two other methods that will come in handy when incorporating a map are:
-(void)locationManager:(CLLocationManager *)manager didChangeAuthorizationStatus:(CLAuthorizationStatus)status{
    NSLog(@"%d AUTH STATUS",status);
    if (status==3) {
        [self.mapView setShowsUserLocation:YES];
        NSLog(@"Showing User Location");
    }
}
And
-(void)mapViewWillStartLocatingUser:(MKMapView *)mapView{
    NSLog(@"checking status");
    CLAuthorizationStatus status = [CLLocationManager authorizationStatus];
    if (status == kCLAuthorizationStatusAuthorizedWhenInUse) {
        NSLog(@"authorized when in use");
       //optional do something code here
    }
    else if (status == kCLAuthorizationStatusDenied){
        NSLog(@"denied...  prompt user to go to settings");
        //optional do something code here
    }else if (status == kCLAuthorizationStatusAuthorizedAlways){
        NSLog(@"authorized always");
       //optional do something code here
    }
}
I hope this tutorial has helped to de-mystify the location permissions settings.
You can download the project here. Cheers!
Craig says
It would be great if you could update this for swift code?
ryan says
Really helpful!