iOS 7 has given app developers the ability to add directions to their apps thanks to a new class in the Map Kit Framework called MKDirections. In this tutorial we will take a look at this class and create a simple app that lets you search for an address and calculate the distance as well as receive route-based directions from your current location. This tutorial will work on either an iOS device or on the simulator.
The MKDirections Class
The MKDirections class is relatively small and just has 4 methods and 1 property. The property is called calculating and shows you if direction calculation is currently in progress. The instance methods are as follows:
Initializing a Directions Object
initWithRequest:
Getting the Directions
calculateDirectionsWithCompletionHandler:
calculateETAWithCompletionHandler:
cancel
The initWithRequest: method is used first and accepts an MKDirectionsRequest as an argument. This is used to provide start and end points of the route. As well as specifying start and end points the MKDirectionsRequest also can be configured to set the transportType (through a property) as well as request alternate routes and finally specify travel dates to get a more accurate ETA. An example of specifying travel dates would be the Apple servers recognising you are travelling in rush hour traffic and then providing alternative routes that are less congested.
When you have initialised the object, the next step is to make the request for directions. This is done with either the calculateDirectionsWithCompletionHandler method or calculateETAWithCompletionHandler method.
The latter of the two methods (calculateETAWithCompletionHandler:) is the quicker of the two methods to call and if you only need estimates of travel time then use this rather than the full directions method.
The MKRoute Class
When a route has been calculated you are provided an NSArray by the completion handler. This NSArray contains MKRoute objects (one for each route). Looking in to those you get route geometry in the form of polyline (an MKPolyline object) as well as steps which is the list of directions provided to get you from A to B. Other properties included in this class are name, advisoryNotices, distance, expectedTravelTime and transportType. Some of those branch off in to other objects.
As can be seen, MKDirections is quite an extensive and useful class. Rather than having to switch to Apple Maps like you did previously, you can now put the directions in your map as well as provide ETA and other information without the user having to leave your app.
MKDirections Tutorial
In this tutorial we are going to create an app that shows a map in the view and allows you search for an address. When searched, an annotation (pin) will drop. Directions will then be calculated as well as other information about the trip. We’ll also have the ability to look at the directions as well as put an overlay on the map.
Lets begin by creating a single view application for the iPhone.
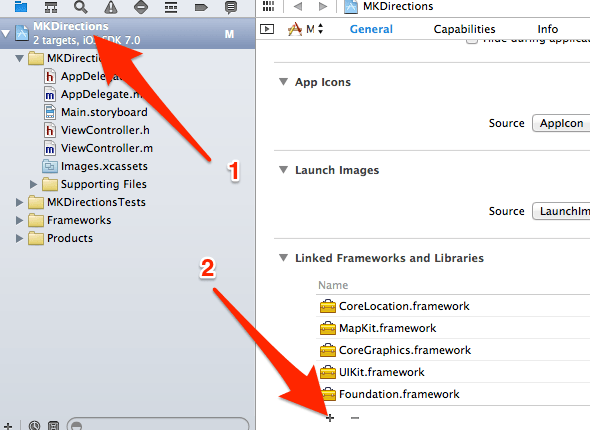
Add the Core Location and Map Kit Frameworks to the project as pictured above.
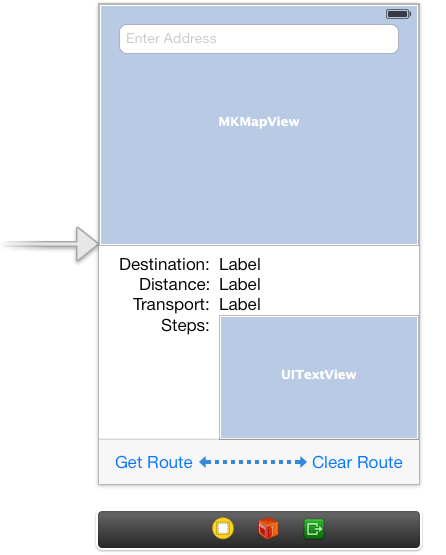
Next, lets add a UIToolbar to the bottom of the view. We next need to add an MKMapView to fill the top half of the screen. Add the labels and UITextView as well as the buttons on the toolbar.
 Now activate the assistant editor (centre icon at the top right of the screen) and CTRL+drag from the MKMapView to the ViewController.h file. Call this mapView. At this point, we can also import the two frameworks that are needed for this project.
Your ViewController.h should now contain the following:
#import
#import
#import

@interface ViewController : UIViewController

@property (weak, nonatomic) IBOutlet MKMapView *mapView;

@end
Now that we have a basic view to work with, lets start creating the code that will allow the app to work.
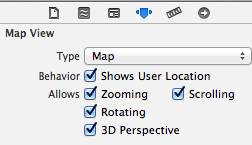 We’ll tackle the current location first and use that to set the setSource property in the MKDirectionsRequest. Rather than use the CLLocation property in Core Location, we’ll use the MKUserLocation class and access the location property within that. Lets first enable the “shows user location” behaviour on the MKMapView. We’ll do that in the inspector (see image to the left). To access that, load up the storyboard and then click the MKMapView and select the attributes inspector link and then check the check box.
We could store the user location found at self.mapView.userLocation.location, but instead, we’ll just use that code when we make the request and call it rather than store and then call it.
Now that we have a start point for our journey (our current location), we are now going to create the end point. To do this I thought it would work well to have a search box and then search by typing in an address and then doing a forward geocode. I wrote about this in the CLGeocode tutorial a couple of months ago.
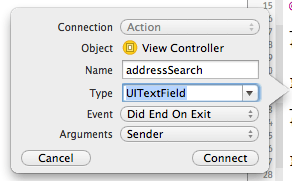 Lets begin by overlaying a UITextField at the top of the screen (on top of the map). We then need to CTRL+drag from the UITextField to ViewController.m file. When prompted, select the “editing did end” option and also change id to UITextField and then hit connect.
We now need to add the code to do a forward-geocode, that is… take the address you entered and convert it to some coordinates.
- (IBAction)addressSearch:(UITextField *)sender {
    CLGeocoder *geocoder = [[CLGeocoder alloc] init];
    [geocoder geocodeAddressString:sender.text completionHandler:^(NSArray *placemarks, NSError *error) {
        if (error) {
            NSLog(@"%@", error);
        } else {
            thePlacemark = [placemarks lastObject];
            float spanX = 1.00725;
            float spanY = 1.00725;
            MKCoordinateRegion region;
            region.center.latitude = thePlacemark.location.coordinate.latitude;
            region.center.longitude = thePlacemark.location.coordinate.longitude;
            region.span = MKCoordinateSpanMake(spanX, spanY);
            [self.mapView setRegion:region animated:YES];
            [self addAnnotation:thePlacemark];
        }
    }];
}
On line 2 we alloc/init the CLGeocoder object.
We then call the geocodeAddressString method and provide it with the text of the sender (the text you you will type in to the search box).
Next we check for errors and if no errors, we assign the lastObject from the placemarks array provided by the completion handler to thePlacemark (line 7) which is a CLPlacemark instance variable created at the top of the code. Next we set a span for X and Y and then create an MKCoordinateRegion. We finally zoom to that region.
To make it clear where we are navigating to, I added a call to the addAnnotation custom method and provided the placemark with it.
We now need to declare the CLPlacemark to get rid of any errors. Add the following just below @implementation ViewController in the implementation:
CLPlacemark *thePlacemark;
Lets now create the addAnnotation: method.
- (void)addAnnotation:(CLPlacemark *)placemark {
    MKPointAnnotation *point = [[MKPointAnnotation alloc] init];
    point.coordinate = CLLocationCoordinate2DMake(placemark.location.coordinate.latitude, placemark.location.coordinate.longitude);
    point.title = [placemark.addressDictionary objectForKey:@"Street"];
    point.subtitle = [placemark.addressDictionary objectForKey:@"City"];
    [self.mapView addAnnotation:point];
}
To show the annotation at the coordinate provided by the forward-geocode, we first alloc/init an MKPointAnnotation. We then set the coordinate from placemark.location.coordinate.latitude (longitude as well) so that the annotation lands on the correct location.
What we do next is access the addressDictionary property of placemark and from that, we pull out the Street key and City key which provides some details when you tap on the pin. We assign these to point.title and point.subtitle.
Finally, we add the annotation to the mapView.
Tapping on the pin should reveal the address of where the pin is. Please note that if your search doesn’t provide any placemark info other than coordinates then the callout will not pop up. To prevent this we would error check but I’ll leave that to you to add if you so wish. Search for something more specific if this happens (if you opt not to error check yourself).
To get directions and other information, what we’ll do now is add a right callout that we can tap on to request the directions.
To do this, we need to add the MKMapViewDelegate protocol to the header as follows:
@interface ViewController : UIViewController
We then need to override a method from the delegate called mapView:viewForAnnotation:. I’ll briefly cover this method here, but for a better example, check out my MKPointAnnotation tutorial.
The method is fairly boilerplate other than a few tweaks.
-(MKAnnotationView *)mapView:(MKMapView *)mapView viewForAnnotation:(id)annotation {
    // If it's the user location, just return nil.
    if ([annotation isKindOfClass:[MKUserLocation class]])
        return nil;
    // Handle any custom annotations.
    if ([annotation isKindOfClass:[MKPointAnnotation class]]) {
        // Try to dequeue an existing pin view first.
        MKPinAnnotationView *pinView = (MKPinAnnotationView*)[self.mapView dequeueReusableAnnotationViewWithIdentifier:@"CustomPinAnnotationView"];
        if (!pinView)
        {
            // If an existing pin view was not available, create one.
            pinView = [[MKPinAnnotationView alloc] initWithAnnotation:annotation reuseIdentifier:@"CustomPinAnnotationView"];
            pinView.canShowCallout = YES;
        } else {
            pinView.annotation = annotation;
        }
        return pinView;
    }
    return nil;
}
Line 3 we are checking if the annotation is an MKUserLocation. If so, we don’t do anything other than return nil. This check makes the blue ball stay as it is. If we didn’t have this line then we would make changes to this AnnotationView as well.
Next, we look for an MKPointAnnotation. As we added an MKPointAnnotation to the map, this is true and the code runs on line 7 onwards.
Line 8 created an MKPinAnnotationView and looks for any annotations that can be reused (perhaps they have scrolled out of view).
Now that the annotation drops we can start looking at getting the route. We already know our current location and our destination which means we are ready to search for directions.
Before testing the current code, add the following method to viewDidLoad or the viewForAnnotation delegate method will not be called.
self.mapView.delegate = self;
Implementing MKDirections and MKDirectionsRequest
Now that our “app” is capable of searching for an address and providing an annotation that shows the found location on a map, we are now ready to get the directions. The way I have done this (quite sloppily if you ask me… but still shows what you need to know to get it working) is use a button on the toolbar and CTRL+dragged to the implementation to create an IBAction. Tapping this button will start the directions request, look for the results and then put the overlay on the map.
I called the method routeButtonPressed:. There’s quite a lot going on here which should probably be pushed in to a custom object so it can be reused elsewhere. But, for the sake of this small project we’ll just add it in the ViewController.m.
- (IBAction)routeButtonPressed:(UIBarButtonItem *)sender {
    MKDirectionsRequest *directionsRequest = [[MKDirectionsRequest alloc] init];
    MKPlacemark *placemark = [[MKPlacemark alloc] initWithPlacemark:thePlacemark];
    [directionsRequest setSource:[MKMapItem mapItemForCurrentLocation]];
    [directionsRequest setDestination:[[MKMapItem alloc] initWithPlacemark:placemark]];
    directionsRequest.transportType = MKDirectionsTransportTypeAutomobile;
    MKDirections *directions = [[MKDirections alloc] initWithRequest:directionsRequest];
    [directions calculateDirectionsWithCompletionHandler:^(MKDirectionsResponse *response, NSError *error) {
        if (error) {
            NSLog(@"Error %@", error.description);
        } else {
            routeDetails = response.routes.lastObject;
            [self.mapView addOverlay:routeDetails.polyline];
            self.destinationLabel.text = [placemark.addressDictionary objectForKey:@"Street"];
            self.distanceLabel.text = [NSString stringWithFormat:@"%0.1f Miles", routeDetails.distance/1609.344];
            self.transportLabel.text = [NSString stringWithFormat:@"%u" ,routeDetails.transportType];
            self.allSteps = @"";
            for (int i = 0; i < routeDetails.steps.count; i++) {
                MKRouteStep *step = [routeDetails.steps objectAtIndex:i];
                NSString *newStep = step.instructions;
                self.allSteps = [self.allSteps stringByAppendingString:newStep];
                self.allSteps = [self.allSteps stringByAppendingString:@"\n\n"];
                self.steps.text = self.allSteps;
            }
        }
    }];
}
Note: Don't worry about an error at the moment. It will be fixed a few steps down.
On line 2 we create an MKDirectionsRequest and alloc/init it. Remember that this is what is needed to make an MKDirections search.
On line 3 we create an MKPlaceMark and initialise it with an instance variable declared at the top of the code (the CLPlacemark).
Lines 4 and 5 we are setting the source and destination. The source is an MKMapItem and we can use the mapItemForCurrentLocation method here. For destination, we initialise with the placemark created earlier.
We then set the transport type on line 6 and on line 7 we alloc/init an MKDirections object with the directionsRequest (MKDirectionsRequest) object.
On line 8 we call the calculateDirectionsWithCompletionHandler on MKDirections and then on lines 9 - 25 we run the code to handle the MKDirectionsResponse which contains all the information we need to show a route and get routing details.
On line 12 we assign routeDetails with the last object of the response.routes property. To fix that error we need to paste in the following line just below the implementation:
MKRoute *routeDetails;
Now that we have an MKRoute object containing the route details from start to end, we can start querying the properties and displaying information on the screen.
To do that we need to step away from this section of code to the storyboard and link up all of our labels and UITextView. This is how I connected them to the header:
@property (weak, nonatomic) IBOutlet UILabel *destinationLabel;
@property (weak, nonatomic) IBOutlet UILabel *distanceLabel;
@property (weak, nonatomic) IBOutlet UILabel *transportLabel;
@property (weak, nonatomic) IBOutlet UITextView *steps;

@property (strong, nonatomic) NSString *allSteps;
We have 3 IBOutlets for a UILabel and one IBOutlet for a UITextView. I opted for a UITextView because we need to show multiple lines of text for the directions.
The NSString will be used a little later as well (to form the directions for the UITextView).
Moving on to line 13, we now need to add the route overlay to the MKMapView. We find that information in the polyline property of our routeDetails. At this point, the overlay will not be added as we need to configure the overlay in a delegate method which we will get to shortly.
On lines 14 - 16 we assign information to the labels' text properties. For the distance label on line 15 we specify 1 decimal place and add Miles on to the end. We then call in routeDetails.distance and divide that by how many meters per mile there are. For line 16, I would suggest converting that code in to a human readable format by using a switch statement. The typedef below shows you what numbers translate in to what mode of transport.
typedef enum {
   MKDirectionsTransportTypeAutomobile     = 1 << 0,
   MKDirectionsTransportTypeWalking        = 1 << 1,
   MKDirectionsTransportTypeAny            = NSUIntegerMax
} MKDirectionsTransportType;
On line 17 we are assigning an empty string to self.allSteps.
Lines 18 - 24 we iterate with a for loop and look at the route details for each step. We then pull the step instructions (such as Turn Right in 50 meters) and use the stringByAppendingString class method and assign the response back to self.allSteps. We then repeat again but add a couple of line breaks. We then add the text to the text label. This could actually be done out of the loop, but either way it isn't too expensive to do it for all the duration of the loop.
The next step is to add the delegate method that configures the overlay. We just need to implement this short method which is also fairly boilerplate for this project:
-(MKOverlayRenderer *)mapView:(MKMapView *)mapView rendererForOverlay:(id)overlay {
    MKPolylineRenderer  * routeLineRenderer = [[MKPolylineRenderer alloc] initWithPolyline:routeDetails.polyline];
    routeLineRenderer.strokeColor = [UIColor redColor];
    routeLineRenderer.lineWidth = 5;
    return routeLineRenderer;
}
We alloc/init an MKPolylineRender object and init it with the polyline property of routeDetails. We then define the strokeColor and the width of the line and then we return the MKPolylineRenderer object. This simply tells the app what type of overlay is needed and what it will look like.
The last step is to connect up the clear button IBAction and use the following code to just clear all the labels and the route:
- (IBAction)clearRoute:(UIBarButtonItem *)sender {
    self.destinationLabel.text = nil;
    self.distanceLabel.text = nil;
    self.transportLabel.text = nil;
    self.steps.text = nil;
    [self.mapView removeOverlay:routeDetails.polyline];
}
UPDATE: Location Fix
The user of the app needs to also give permission. In earlier versions of iOS, MapKit either didn't require this or took care of it. To get around this problem of not being able to get directions you need to make the following changes:
In your .plist file you need to add a new key and description. Right click and add a new row. Paste the following in the left hand side:
NSLocationWhenInUseUsageDescription
In the right hand side it will be set to a string. Here you would put a description that shows up on the screen when the device prompts the user to allow location monitoring.
Switch back to the ViewController.m file and add the following:
#import "ViewController.h"
#import <CoreLocation/CoreLocation.h>

@interface ViewController ()

@property (strong, nonatomic) CLLocationManager *locationManager;

@end

@implementation ViewController
The lines we are adding here are the import for CoreLocation as well as the CLLocationManager property.
In viewDidLoad add the following:
if (!self.locationManager) {
    self.locationManager = [[CLLocationManager alloc] init];
}
[self.locationManager requestWhenInUseAuthorization];
When you launch the app you will not be prompted to allow your current location to be accessed. By doing this you can now get directions from your current location to a selected location.
Testing the MKDirections Test App
Now that you are ready for testing, we need to make sure your device or simulator is configured correctly. As we included very little error checking, we need to make sure that our app doesn't error out.
So, when prompted you need to accept that the device can use your current location. If you see a blue dot on the map then you are ready to type in an address to search for. Search for it and then click Get Route. You should then see a red line of the route on the map along with all the direction steps as well as distance you will travel to get there.
On the simulator you might need to enable location by clicking Debug > Location > Apple and then waiting for a prompt or blue ball to appear.
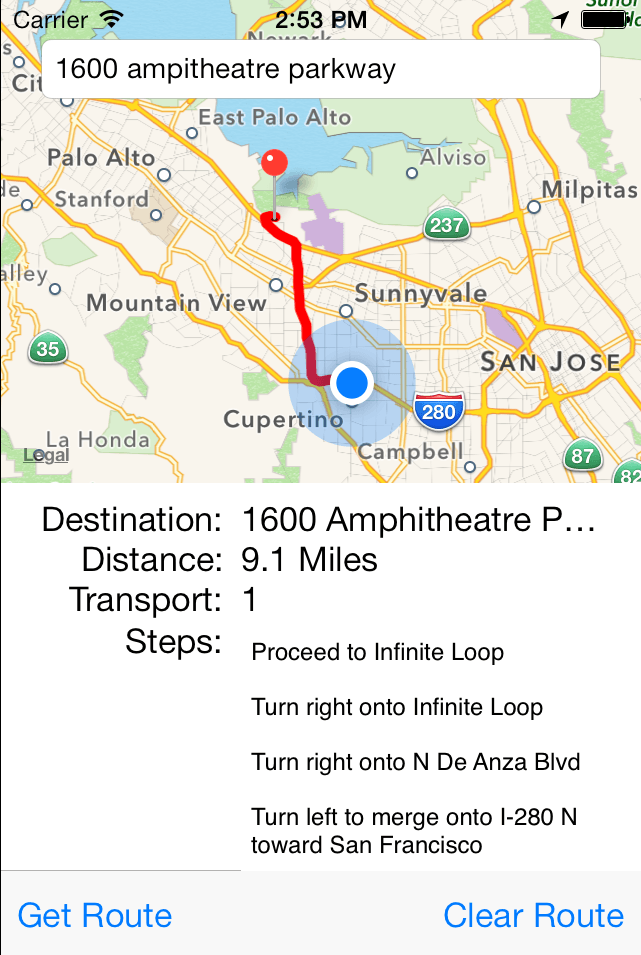
As usual, you can download the full project here and also see the code below:
ViewController.h
#import
#import
#import

@interface ViewController : UIViewController

@property (weak, nonatomic) IBOutlet MKMapView *mapView;
@property (weak, nonatomic) IBOutlet UILabel *destinationLabel;
@property (weak, nonatomic) IBOutlet UILabel *distanceLabel;
@property (weak, nonatomic) IBOutlet UILabel *transportLabel;
@property (weak, nonatomic) IBOutlet UITextView *steps;

@property (strong, nonatomic) NSString *allSteps;

@end
ViewController.m
#import "ViewController.h"
#import

@interface ViewController ()

@property (strong, nonatomic) CLLocationManager *locationManager;

@end

@implementation ViewController

CLPlacemark *thePlacemark;
MKRoute *routeDetails;

- (void)viewDidLoad
{
    [super viewDidLoad];
	// Do any additional setup after loading the view, typically from a nib.
    self.mapView.delegate = self;
    if (!self.locationManager) {
        self.locationManager = [[CLLocationManager alloc] init];
    }
    [self.locationManager requestWhenInUseAuthorization];
}

- (IBAction)routeButtonPressed:(UIBarButtonItem *)sender {
    MKDirectionsRequest *directionsRequest = [[MKDirectionsRequest alloc] init];
    MKPlacemark *placemark = [[MKPlacemark alloc] initWithPlacemark:thePlacemark];

    [directionsRequest setSource:[MKMapItem mapItemForCurrentLocation]];

    [directionsRequest setDestination:[[MKMapItem alloc] initWithPlacemark:placemark]];
    directionsRequest.transportType = MKDirectionsTransportTypeAutomobile;
    MKDirections *directions = [[MKDirections alloc] initWithRequest:directionsRequest];
    [directions calculateDirectionsWithCompletionHandler:^(MKDirectionsResponse *response, NSError *error) {
        if (error) {
            NSLog(@"Error %@", error.description);
        } else {
            routeDetails = response.routes.lastObject;
            [self.mapView addOverlay:routeDetails.polyline];
            self.destinationLabel.text = [placemark.addressDictionary objectForKey:@"Street"];
            self.distanceLabel.text = [NSString stringWithFormat:@"%0.1f Miles", routeDetails.distance/1609.344];
            self.transportLabel.text = [NSString stringWithFormat:@"%lu" ,(unsigned long)routeDetails.transportType];
            self.allSteps = @"";
            for (int i = 0; i < routeDetails.steps.count; i++) {
                MKRouteStep *step = [routeDetails.steps objectAtIndex:i];
                NSString *newStep = step.instructions;
                self.allSteps = [self.allSteps stringByAppendingString:newStep];
                self.allSteps = [self.allSteps stringByAppendingString:@"\n\n"];
                self.steps.text = self.allSteps;
            }
        }
    }];
}

- (IBAction)clearRoute:(UIBarButtonItem *)sender {
    self.destinationLabel.text = nil;
    self.distanceLabel.text = nil;
    self.transportLabel.text = nil;
    self.steps.text = nil;
    [self.mapView removeOverlay:routeDetails.polyline];
}

- (IBAction)addressSearch:(UITextField *)sender {
    CLGeocoder *geocoder = [[CLGeocoder alloc] init];
    [geocoder geocodeAddressString:sender.text completionHandler:^(NSArray *placemarks, NSError *error) {
        if (error) {
            NSLog(@"%@", error);
        } else {
            thePlacemark = [placemarks lastObject];
            float spanX = 1.00725;
            float spanY = 1.00725;
            MKCoordinateRegion region;
            region.center.latitude = thePlacemark.location.coordinate.latitude;
            region.center.longitude = thePlacemark.location.coordinate.longitude;
            region.span = MKCoordinateSpanMake(spanX, spanY);
            [self.mapView setRegion:region animated:YES];
            [self addAnnotation:thePlacemark];
        }
    }];
}

- (void)addAnnotation:(CLPlacemark *)placemark {
    MKPointAnnotation *point = [[MKPointAnnotation alloc] init];
    point.coordinate = CLLocationCoordinate2DMake(placemark.location.coordinate.latitude, placemark.location.coordinate.longitude);
    point.title = [placemark.addressDictionary objectForKey:@"Street"];
    point.subtitle = [placemark.addressDictionary objectForKey:@"City"];
    [self.mapView addAnnotation:point];
}

-(MKOverlayRenderer *)mapView:(MKMapView *)mapView rendererForOverlay:(id)overlay {
    MKPolylineRenderer  * routeLineRenderer = [[MKPolylineRenderer alloc] initWithPolyline:routeDetails.polyline];
    routeLineRenderer.strokeColor = [UIColor redColor];
    routeLineRenderer.lineWidth = 5;
    return routeLineRenderer;
}

-(MKAnnotationView *)mapView:(MKMapView *)mapView viewForAnnotation:(id)annotation {
    // If it's the user location, just return nil.
    if ([annotation isKindOfClass:[MKUserLocation class]])
        return nil;
    // Handle any custom annotations.
    if ([annotation isKindOfClass:[MKPointAnnotation class]]) {
        // Try to dequeue an existing pin view first.
        MKPinAnnotationView *pinView = (MKPinAnnotationView*)[self.mapView dequeueReusableAnnotationViewWithIdentifier:@"CustomPinAnnotationView"];
        if (!pinView)
        {
            // If an existing pin view was not available, create one.
            pinView = [[MKPinAnnotationView alloc] initWithAnnotation:annotation reuseIdentifier:@"CustomPinAnnotationView"];
            pinView.canShowCallout = YES;
        } else {
            pinView.annotation = annotation;
        }
        return pinView;
    }
    return nil;
}

- (void)didReceiveMemoryWarning
{
    [super didReceiveMemoryWarning];
    // Dispose of any resources that can be recreated.
}

@end
andres ecu says
Hello there…great tutorial.
A question.. how would it be to instead of typing the address, specify the coordinates inside the code and get the directions to that fixed point from my location??
Thanks!!
MatthewN says
You can already paste or type in coordinates and it will zoom to those coordinates and when you tap the annotation, it will look up an approximate address. So, I believe this already does what you have requested.
jass says
i want source code of this thxxx
gregir says
Thanks for sharing this walkthrough. Very helpful.
Do you happen to know how you might check if the user diverged from the directions so you could recalculate the route? Would you need to continually poll the user’s core location against conformity to the polyline, or is there a more automated way?
MatthewN says
I believe you would need to continually poll the users location and if it goes off the route, you’d need to replan the route from the current location. Navigation apps typically use the best for navigation setting. The phone should know where the user is at all times so should be able to check deviations.
tomizo20 says
Thanks for the great tutorial!
I do have one question though. If I entered a place name instead of an address in the textfield. For example, I entered “LAX” (which is the LA international airport) on the textfield and I tap Route, I cannot tap on the annotation pin to see the complete address and city name of LAX.
The question is: is it possible to get the address/city name to appear on the annotation even if I input a place name instead of an address?
MatthewN says
If you NSLog the placemark.addressdictionary property for the searches, you’ll see a difference in what information is available. When you search for an address, the Street key is provided which is used in the tutorial to show the street on the annotation. However, searching for LAX does not provide a Street key as seen below.
What you will see if that you do have other information that you could call such as “FormattedAddressLines” which does provide the address. Perhaps one way around this is to take items from that array in FormattedAddressLines.
NSLog below:
City = “Los Angeles”;
Country = “United States”;
CountryCode = US;
FormattedAddressLines = (
“Los Angeles International Airport”,
“Los Angeles, CA 90045”,
“United States”
);
State = CA;
SubAdministrativeArea = “Los Angeles”;
SubLocality = “Westchester – LAX”;
ZIP = 90045;
Sample Code to Fix It
– (void)addAnnotation:(CLPlacemark *)placemark {
MKPointAnnotation *point = [[MKPointAnnotation alloc] init];
point.coordinate = CLLocationCoordinate2DMake(placemark.location.coordinate.latitude, placemark.location.coordinate.longitude);
NSArray *annotationTitle = [placemark.addressDictionary objectForKey:@”FormattedAddressLines”];
point.title = [annotationTitle objectAtIndex:0];
point.subtitle = [annotationTitle objectAtIndex:1];
[self.mapView addAnnotation:point];
}
fbartolom says
Any idea about how to create a path passing by several waypoints, sorta what the Google API does? An alternative solution would be to draw all sections in parallel but that boils down to a very long process.
Michael Meinberg says
Did you ever find a solution that allows you to create a route passing through several waypoints in iOS maps?
I have the same requirement.
Thanks, Michael Meinberg
John Legg says
Thanks for the great tutorial I have implemented MKDirections in an app I am developing using your tutorial. If you would be so kind to answer a question. I want to use the same interface in 2 different tabs of a tab bar controller but when I try to connect MKMapView as an IBOutlet in the second tab bar VC I get errors. I tried naming it MKMapView1 but that didn’t work. Any suggestions??
Thanks, John
Matthew says
Do you have some code you post (or perhaps email it to me… [email protected]) so I can take a look?
John Legg says
Great tutorial. For those who might be looking to to remove the destination pin when clearing the route, I added the following code to the ‘clear route’ method
//remove destination pin from mapview when clearing route
NSMutableArray *locs = [[NSMutableArray alloc] init];
for (id annot in [_mapView annotations])
{
if ( [annot isKindOfClass:[ MKUserLocation class]] ) {
}
else {
[locs addObject:annot];
}
}
[_mapView removeAnnotations:locs];
locs = nil;
javeedpasha says
Thanks for the great tutorial. I have implemented a demo app map view, i’m able to display mutli routes with the help of “REQUESTALTERNATEROUTES” option. But i would like to display some text on each route itself (ex : route 1, dis : 50km etc).
How can i accomplish this tak?
And one more question can i select a particular route from multiple routes …?
Thanks Jhon.
Eduardo says
Muchas gracias por el ejemplo, me ha sido muy útil.
Gracias
Zain Ali says
Thanks for the Tutorial. I am facing 1 problem. MKOverlayRenderer method is calling when I add any annotation by typing nearby address.
Matthew says
Could you email me some sample code or is this based on my example?
andy says
hey Matthew,
Great tutorial. thanks a lot in advance. I may be asking a stupid question but i have tried a lot of tutorials but still got no answer here. My project pulls data from google map api so i will have lat, lng and place name etc data in JSON format. So my pins will be displayed all on the map when user run the app. how can i let user select a annotation and display a route from selected pin to current location?
I have some design such as put a button in the callout, for example, “Show route”
Thanks a lot for the help
create google plus account says
Oh my goodness! Incredible article dude! Many thanks, However I am experiencing troubles with
your RSS. I don’t understand the reason why I cannot join it.
Is there anybody else getting identical RSS issues? Anyone who knows
the solution will you kindly respond? Thanx!!
CaptainBenno says
You wouldn’t happen to know if MKDirections has the ability to do some sort of voice based turn by turn navigation like the actual apple maps app? I can’t seem to track down anything to rule the functionality in or out for iOS7 or iOS8…
Josue says
Hey…I Got A Problem :? “[NSMutableOrderedSet addObject:]: object cannot be nil”
Simon says
Hi thanks for the great tutorial. I am using the expectedTravelTime for display to the user. But…. as the user travels, what is the technique to continually refresh this ETA?
I can obviously poll the location and call another directions request… but this seems a little bloated… perhaps not!
Anyway – your suggestions would be much appreciated.
Matthew says
Good question. I have been looking around for different ways to solve this. It seems that this method in the MKDirections class is the way to go:
– calculateETAWithCompletionHandler:
The instructions indicate that you should send requests along your journey. It also comments if that you make a request and then another while one is still asynchronously running, then the second request will just return an error. I just get the impression from reading the details on that method that it is the correct way to repeatedly call this method. Also, using this method is quicker according to the instructions. I assume because it already knows the way you want to go an just needs to calculate how far to go.
I guess if the user goes off course, then a call to get the full directions would be applicable and that you would then use that ETA and then at intervals, poll the calculateETA and get the response from the completion handler.
Nethra says
hi,
the downloaded code is not working for me! i m using iOs 8.would be better if u post the code
akash says
Have you Enter String for LocationWhenInUseUsageDescprition ?
and Cllocationmanager importing code ?
Rohit says
I am using the same code but getting response null all the time. Please help !…
Jaap says
Hello,
I have two questions.
1 When i request for routing times between point a and b. Can I then get back live routing times. So when there is traffic jam on the route is this calculated in the routing times?
2 Can I get back prospect routing times. So when I request a routing time Thursday next week during rush hours will this be different then Thursday next week after rush hours?
I hope you can help me further.
Jaap
akash says
How Can i Add Latitude & longitude through Json URL and getting Direction on that Pinn Via Current location.
can anyone tell me?
Amol says
Great tutorial! However I am having trouble with the CLLocationManager and am not able to get the current location. Can you explain how to do this?
Matthew says
Hello Amol. I have updated the tutorial to work on the latest iOS. In a previous version of iOS Apple seems to have made changes that require us to use the CLLocationManager and request authorisation with that object. This wasn’t required in earlier versions. The new instructions are found towards the bottom of the post (search for UPDATE: on the page).