The Map Kit Framework is what you use to add a map to your application. There are a number of classes found within the framework that let you provide a rich experience for your users. Today we will look at two of the basic ones. These are MKMapView and MKMapViewDelegate. We will add more tutorials over the coming weeks from the MapKit framework and when iOS 7 launches, we’ll begin adjusting the tutorials accordingly.
MKMapView
Adding a map to your app is done through the MKMapView class. Put simply, the class allows an object to be created which provides an embeddable map interface. Dragging a map on to a View Controller on the storyboard is enough to initialise this object and display an interactive map on the screen which you can pinch and zoom as well as pan around. Adding more functions such as showing your current location, showing a different map type as well as other options can either be done through the attributes inspector or programatically.
A number of methods and properties exist within the MKMapView class. Properties include a mapType, zoomEnabled, scrollEnabled as well as a delegate property. Several other properties exist which we will cover over the course of the next few weeks as we expand the app to be more functional.
Broken down in to sections we see there are tasks that let you “Accessing Map Properties”, “Accessing the Delegate”, “Manipulating the Visible Portion of the Map”, “Accessing the Device’s Current Location”, “Annotating the Map”, “Managing Annotation Selections”, “Adding and Removing Overlays”, “Converting Map Coordinates”, “Adjusting Map Regions and Rectangles” and “Tracking the User Location”.
As you can see, the list is quite comprehensive and way more than we can cover in a single post. For that reason we will look at the first four of these and as we come to use other classes in later posts, we will look at overlays, annotations etc…
MKMapViewDelegate
Next is the MKMapViewDelegate protocol. Just like the CLLocationManagerDelegate, this protocol defines the rules on how certain updates are received. There are a number of methods found within the delegate protocol which allow you to respond to map position changes, load map data, track user location as well as manage annotation views to name a few. As we are not touching on annotations or user locations in this tutorial, today we will focus on just a small amount of these methods.
MKMapView Tutorial
As usual, lets start with a Single View Application. When done, add the MapKit.framework to the project as seen below.
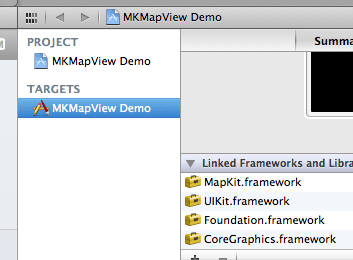
When done, go to ViewController.h and import MapKit and add the syntax for MKMapViewDelegate as below:
#import

@interface ViewController : UIViewController
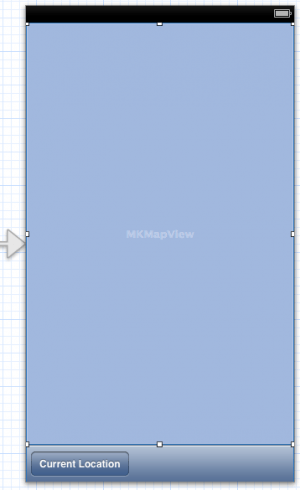 Go to the iPhone storyboard and drag a UIToolBar and MKMapView in to the view and resize to fit. I also changed the text of the UIBarButtonItem to Current Location which will be used later in this tutorial.
When you have added these to your app you should be able to run the app without errors. You will also notice that you can manipulate the map by panning and zooming. Apart from that, there isn’t anything else the tutorial app will do in its current form. Lets move to the next part of the tutorial and start implementing some of the available methods.
We have two ways we can make changes to the map. The first is by using the attributes inspector. To do that, click on the MapView and on the right sidebar of Xcode, select the attributes inspector. Here you can enable and disable certain aspects of the map such as switching off zooming or showing current location.
Instead of working with just the attributes inspector, we will do this programatically as it provides far more power and is relatively simple to do.
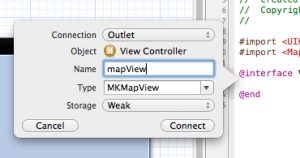 The next step is to connect up your map as an IBOutlet. To do this, CRTL+drag from the MapView to the header file.
I called my map mapView and then clicked the Connect button to set up the @property. The MKMapView is now a property that we can set and get information from.
Just a quick note before moving on… in older versions of iOS you had to @synthesize all properties. This is no longer a requirement, and an access variable is set up automatically by Xcode.
Because we dragged out an MKMapView in to the storyboard we don’t need to alloc/init it because Xcode takes care of that for us. What this means is that we can begin manipulating the map by setting @properties such as current location.
As we are looking at the first 4 sections of tasks we will try manipulating a few of the properties where possible or read information from those properties when they are readonly. The available properties are:
mapType
zoomEnabled
scrollEnabled
delegate (we will set this later).
region
centerCoordinate
visibleMapRect
showsUserLocation
userLocationVisible
userLocation
mapType Property
Lets begin by looking at the mapType property. Clicking on this in the documentation shows that we need to specify the MKMapType. Clicking on this lets us know that there are three options that are typedef’d here. These are:
MKMapTypeStandard
MKMapTypeSatellite
MKMapTypeHybrid
You can test how this works by simply adding a line of code in viewDidLoad:
self.mapView.mapType = MKMapTypeHybrid;
Running the app will now load a hybrid style map. Likewise, if you set it to MKMapTypeSatellite you will just see satellite imagery. Leaving it blank will default to a standard type map.
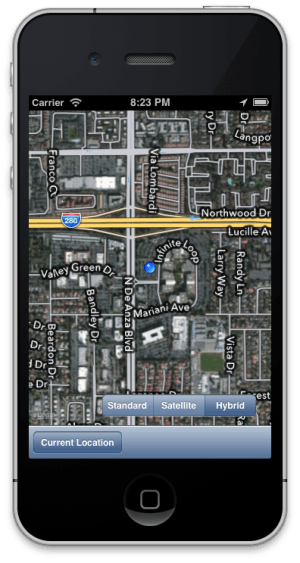
In some cases you will likely want to let the user choose the style of map. Lets have a quick look at how this can be done. What we will do is add a UISegmentedControl over the map and allow for 3 segments. We will set the style to Bar. The segments will be Standard, Satellite and Hybrid as pictured below.
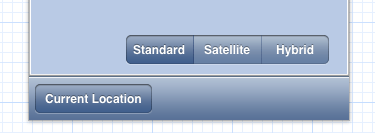
There are more cleaner ways of doing this such as creating a Modal transition with a Page Curl, but working with different View Controllers adds more to this article than what is in the scope, so we’ll address that in another tutorial.
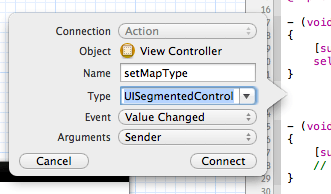 Lets go ahead and connect up the Segmented Control as an IBAction in the implementation. We do this the usual way by CTRL+dragging from the segmented control to the ViewController.m file.
By opting to use the Sender argument we can now query a property each time one of the segments is pressed. That property is selectedSegmentIndex which will either be a 0, 1 or 2 for this particular configuration.
What we do now is add some code to change the mapType property of the mapView.
- (IBAction)setMapType:(UISegmentedControl *)sender {
    switch (sender.selectedSegmentIndex) {
        case 0:
            self.mapView.mapType = MKMapTypeStandard;
            break;
        case 1:
            self.mapView.mapType = MKMapTypeSatellite;
            break;
        case 2:
            self.mapView.mapType = MKMapTypeHybrid;
            break;
        default:
            break;
    }
}
There are several ways this can be done, but I opted to use a switch statement. This particular statement checks the sender (which is a UISegmentedControl) and accesses the selectedSegmentIndex which is an integer value. If it matches zero, we set the mapView.mapType to standard. Likewise for 1 and 2 we set it to either satellite or hybrid.
Running the app now will let you switch between mapType.
zoomEnabled and scrollEnabled
I wont go in to too much detail about the zoomEnabled and scrollEndabled properties. You will have noticed in the attributes inspector that you can set these properties. Typically I would do this here rather than in code, but if you wanted to set one of these properties in code you would do this:
self.mapView.zoomEnabled = NO;
Any property you set in code will automatically override any setting in the attributes inspector. If you want to try add this line of code you can put it in the viewDidLoad method and try pinch the map.
The same also applies for scrollEnabled. You just specify that as a property on the end of self.mapView.scrollEnabled and set it to YES or NO as requited.
Accessing the Device’s Current Location
For now, I’ve skipped over the Accessing the Delegate and Manipulating the Visible Portion of the Map. I’ll get back to those after this section.
We have three properties available in this section. These are:
showsUserLocation
userLocationVisible
userLocation
If we set showsUserLocation to YES then we will be prompted to allow location information on the device. However, setting this property to YES does not mean you will see the blue ball showing your location. It simply means that “if” your location is available it will show it. Setting the property in this way will also override the attributes inspector setting.
userLocationVisible returns a BOOL value which lets you know if the current location is visible in the mapView. This is a readonly property that will be either a YES or a NO.
The userLocation property lets you access the MKUserLocation data. It is a readonly property but would let you get the title which is “Current Location” by accessing the title property as follows:
NSLog(@"%@", self.mapView.userLocation.title);
Or if you want to know your current Latitude you would access the following properties which includes accessing the location which is a CLLocation which means you can access its coordinate which is a CLLocationCoordinate2D which contains a struct with latitude and longitude. The following line of code will NSLog to the console the latitude of your location. Note that you need to have showsUserLocation enabled and the device needs to have determined your current location. Putting this in your viewDidLoad method will probably report back 0.00000 as it wont have got that information at the time of NSLogging it.
NSLog(@"%f", self.mapView.userLocation.location.coordinate.latitude);
This particular property comes in handy if you don’t want to configure a CLLocationManager object to provide that information.
Manipulating the Visible Portion of the Map
Moving on to the next section we now have 3 properties available and 4 methods which each allow you to specify regions, coordinates as well as programatically change the part of the map that is in the view.
The region property
The region property is what you get information from about the region that is currently visible on the map. It provides a centre coordinate as well as a span in both vertical and horizontal directions. You can query this property to get that information. This comes in handy when you want to perform a reverse lookup of an address. You can drag the map to a location and then when you perform the lookup you get the span and region centre and provide that for the lookup so that results are only displayed for the visible map.
As well as being able to access the region property, we can also define our own region by setting the centre coordinate of somewhere on the map and specifying the span of the map.
The syntax is fairly simple to create a region. For this part of the tutorial we’ll look at connecting up the Current Location button as an IBAction in the implementation and then add some code which makes the map zoom in to your current location. We will set a span of half a mile both vertical and horizontal. The way we calculate this is that 1 degree is equal to 69 mile. If we have a span of half a mile we can use this equation: (1/69)*0.5 which equals 0.00725.
We then use the following code to create a region:
- (IBAction)zoomToCurrentLocation:(UIBarButtonItem *)sender {
    float spanX = 0.00725;
    float spanY = 0.00725;
    MKCoordinateRegion region;
    region.center.latitude = self.mapView.userLocation.coordinate.latitude;
    region.center.longitude = self.mapView.userLocation.coordinate.longitude;
    region.span.latitudeDelta = spanX;
    region.span.longitudeDelta = spanY;
}
The sample code I provide works, but is a more drawn out process. For example, we can use a method to create a region span which would cut a line out of the code. Feel free to use those available functions to create a span (hint: region.span = MKCoordinateSpanMake(spanX, spanY);).
 We also provide coordinates by querying the current location of the device from the userLocation property. All this information is stored in the MKCoordinateRegion.
Zooming to this location on the map requires you call just one method which is setRegion:animated:.
We do this with the following line of code which is added to the end of the method where we created the region.
[self.mapView setRegion:region animated:YES];
When you run the app and click on the Current Location button, you should now zoom to a half a mile span of wherever your location is set in the simulator. In this case, I opted for Apple HQ. If you are on an iOS device then it will zoom to where you actually are now. Note the animated argument on that line of code is set to YES. We can choose NO here or we can just drop that argument off the end, but I fine that smooth transitions/animations look good on iOS.
setCenterCoordinate:animated:
If you are happy with the zoom level and just want to reposition the map to somewhere else, you can call this method and provide it with a new coordinate to move to. I wont go in to the syntax here as it is similar to the setRegion method. We still need to provide it an argument and in this case we specify a coordinate in CLLocation2D format.
setVisibleMapRect:animated:
This method is similar to the setCentreCoordinate:animated: method above but instead of setting the coordinate, you are setting the visible portion of the map to display.
Likewise, the setVisibleMapRect:edgePadding:animated: method does a similar thing except it adds some padding around the edges.
The MKMapView Delegate Property
Finally, for todays tutorial we are going to look at the MKMapView delegate property as well as delve in to some of the delegate protocol.
If our custom class is the delegate, we need to let it know that it will be receiving the updates. We do that by adding this line of code. I put it in the viewDidLoad method.
self.mapView.delegate = self;
What we are doing is letting the delegate property of mapView know that this class also is receiving updates. The reason we have self.mapView. is because mapView is also a property of self.
There isn’t anything else relating to this property that I can tell you. Needless to say, if we want to implement the methods from the delegate protocol then this line of code is mandatory.
The MKMapViewDelegate
Just like the CLLocationManagerDelegate, this protocol has a number of methods that are called when particular events happen. This could include someone moving an annotation on a map, or a users location changing.
I will just cover two of the methods today. The first is mapView:regionDidChangeAnimated: and the second is mapView:didUpdateUserLocation:. I will go in to detail about the others in the coming weeks.
mapView:regionDidChangeAnimated:
If the MKMapView changes, this method is called.
For this exercise I have added a UIButton to the top of the view in the centre. I also connected it up as an IBOutlet. For the purpose of this tutorial there will be no associated IBAction with this button. What we are going to do is make the button disappear when the map is zoomed in to the current location. If you move the map away, we will unhide the button. The idea is that you might have an app where you search for something. If searching your current location you don’t need to see the button, but if you want to scroll to somewhere else to perform the same search, the button can then appear.
In viewDidLoad add the line:
self.searchButton.hidden = YES;
In the zoomToCurrentLocation method add the following line:
self.searchButton.hidden = YES;
Add the delegate method as follows:
-(void)mapView:(MKMapView *)mapView regionDidChangeAnimated:(BOOL)animated {
    self.searchButton.hidden = NO;
}
What this is doing is revealing the search button each time the map moves away from the current location. To get it working more smoothly you will need to add a bit more logic in to the method, but in a clumsy way it shows one way of how the delegate method can be used.
Run the app now and you will see how the search here button appears and then disappears when moved to the current location.
mapView:didUpdateUserLocation:
Finally, we’ll look at how the mapView:didUpdateUserLocation method works. We add the delegate method to the code and each time the user moves, the method is called. For this example, we will move to the new location but without requiring the zoom… ie, we will use the setCenterCoordinate:animated: method from the MKMapView.
The code for doing this is as follows:
-(void)mapView:(MKMapView *)mapView didUpdateUserLocation:(MKUserLocation *)userLocation {
    [self.mapView setCenterCoordinate:userLocation.coordinate animated:YES];
}
Each time the current location moves, we can use the setCenterCoordinate:animated: method to automatically animate to the new location. To see this working in the simulator, select Debug > Location > City Bike Ride and the map will follow the user keeping the blue dot in the centre.
Conclusion
We have only scratched the surface of MKMapView and MKMapViewDelegate today. Hopefully something within this tutorial has helped you solve a particular problem. Subscribe by clicking the subscribe link at the top of the page. We aim to post tutorials daily.
Any comments, ask below.
Header File
#import
#import

@interface ViewController : UIViewController
@property (weak, nonatomic) IBOutlet MKMapView *mapView;
@property (weak, nonatomic) IBOutlet UIButton *searchButton;

@end
Implementation
#import "ViewController.h"

@interface ViewController ()

@end

@implementation ViewController

- (void)viewDidLoad
{
    [super viewDidLoad];
    self.mapView.delegate = self;
    self.mapView.mapType = MKMapTypeStandard;
    self.mapView.showsUserLocation = YES;
    self.searchButton.hidden = YES;
}

- (IBAction)setMapType:(UISegmentedControl *)sender {
    switch (sender.selectedSegmentIndex) {
        case 0:
            self.mapView.mapType = MKMapTypeStandard;
            break;
        case 1:
            self.mapView.mapType = MKMapTypeSatellite;
            break;
        case 2:
            self.mapView.mapType = MKMapTypeHybrid;
            break;
        default:
            break;
    }
}

- (IBAction)zoomToCurrentLocation:(UIBarButtonItem *)sender {
    float spanX = 0.00725;
    float spanY = 0.00725;
    MKCoordinateRegion region;
    region.center.latitude = self.mapView.userLocation.coordinate.latitude;
    region.center.longitude = self.mapView.userLocation.coordinate.longitude;
    region.span.latitudeDelta = spanX;
    region.span.longitudeDelta = spanY;
    self.searchButton.hidden = YES;
    [self.mapView setRegion:region animated:YES];
}

-(void)mapView:(MKMapView *)mapView regionDidChangeAnimated:(BOOL)animated {
    self.searchButton.hidden = NO;
}

-(void)mapView:(MKMapView *)mapView didUpdateUserLocation:(MKUserLocation *)userLocation {
    [self.mapView setCenterCoordinate:userLocation.coordinate animated:YES];
}

- (void)didReceiveMemoryWarning
{
    [super didReceiveMemoryWarning];
    // Dispose of any resources that can be recreated.
}

@end
Macuser1010010 says
Great, thanks:)
YouthMarketInsights says
For some reason the center of my mapView is not updating as the current location is updating.
YouthMarketInsights says
I put an NSLog string in the -(void)mapView:(MKMapView *)mapView didUpdateUserLocation:(MKUserLocation *)userLocation method and it isn’t being called. Any idea on why this is happening?
SASI says
set the delegate of mapview to your object.
-mapview.deleagte = self;
Matthew says
I think I saw someone else reply mentioning you should set the delegate.
Hi says
post the code
RIchard says
The current location doesnt shows everytime I press the current location. Is there an updated code for it? please help. Im using objective c too!
Matthew says
I’ll take a look on Monday and update it to work with the latest iOS and Xcode. A few things might have changed since this was written a few years ago.
richard says
thanks!