When developing an app, you might come across a need to pass some data from one view controller to the next view controller.
To demonstrate this functionality, we will create a very simple contacts application. The main view will use a UITableView to show first and last names of each individual in the custom contacts list. When tapping a name, the app will segue to a second view to show the contacts phone number and other details.
There are many ways we can solve this problem, such as using notifications or delegates to pass information around, but in this example we will pass some information from one view controller to the next view controller so that the “next” view controller knows what information to store.
What is Needed
We need the following:
- Somewhere to store the contacts
- Some way to track the contact selected
We will store the contacts in an array. We will initialise the array when the app first loads. We will do this in the AppDelegate so that any view can have access. Note: This would not be a typical place to store some contacts for a contacts app. The information would be persisted somewhere, such as CoreData. But, the main focus on this tutorial is to show how to pass data between view controllers. For this reason, we will initialise the array on load, and will access it from there.
The reason we are using an array is because it is ordered. Each item we add an item to the array has an index associated with it. When the user taps on a row on the UITableView, we can get this index. It is this index that will be passed from one view controller to the next, and then will be used by the second view controller to get the correct information needed from the array.
Preparing the Project
Start by creating a Single View Application. Next, open up AppDelegate.swift and add the last line of the following code (the contacts variable):
class AppDelegate: UIResponder, UIApplicationDelegate {

    var window: UIWindow?
    var contacts: [Dictionary<String, String>] = []
In the didFinishLaunchingWithOptions method, add the following:
// An Array of contacts with each contact being a dictionary with
firstName, lastName, and phone.
contacts.append(["firstName": "Sophie", "lastName": "Smith", "phone": "+1-232-344-1234"])
contacts.append(["firstName": "Kevin", "lastName": "Johnson", "phone": "+1-232-347-6534"])
contacts.append(["firstName": "James", "lastName": "Hill", "phone": "+1-347-234-1214"])
contacts.append(["firstName": "Matthew", "lastName": "Firth", "phone": "+1-205-629-2474"])
contacts.append(["firstName": "Roger", "lastName": "McNamara", "phone": "+1-513-459-4284"])
contacts.append(["firstName": "Sian", "lastName": "Burdon", "phone": "+1-574-652-6274"])
contacts.append(["firstName": "Alicia", "lastName": "N", "phone": "+1-948-345-3672"])
contacts.append(["firstName": "Granville", "lastName": "Jensen", "phone": "+1-746-246-3523"])
contacts.append(["firstName": "Herman", "lastName": "Piper", "phone": "+1-937-467-2637"])
contacts.append(["firstName": "Rebecca", "lastName": "Walker", "phone": "+1-831-392-7373"])
Each line of code adds a dictionary of type String:String to the array. The dictionary has a first name, last name, and phone number.
Delete ViewController.swift
Next task is to delete ViewController.swift. In Main.storyboard, also delete the ViewController so that you have a clear canvas.
Create New Classes
Create two new classes by clicking File > New > File.
Select the Cocoa Touch Class template from the iOS menu.
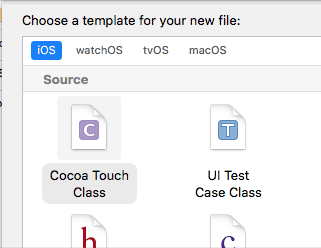
Call the first class “ContactsTableViewController” and make it a Subclass of UITableViewController.
Call the second class “ShowContactsViewController” and make it a subclass of UIViewController.
Open up Main.storyboard.
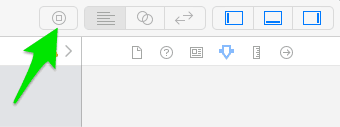
Click on the Select Library button found near the top right of Xcode.

Drag and drop the Table View Controller on to the canvas. When done, click the library button again, but instead of selecting the Table View Controller, select just the View Controller instead and drag that out on to the view.
You will now have two View Controllers. Position the UITableViewController to the left of the UIViewController.
Select the UITableViewController and on the top menu, click Editor > Embed In > Navigation Controller.
Set the Custom Class
The next task is to set the custom task of each type of ViewController to the custom classes that we created earlier.
Select the UITableViewController, and then select Identity Inspector. When in there, select the ContactsTableViewController from the dropdown as seen in the screenshot below.
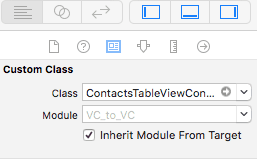
Repeat the same for the UIViewController being sure to select the correct custom class.
Adding UILabels to the Show Contact View Controller
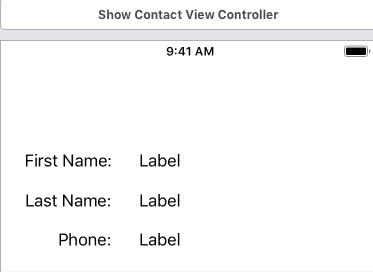
Add some labels to the view. On the left, set the text to First Name:, Last Name:, and Phone:, as seen in the screenshot to the left. On the right, you can just leave the default “Label” text in there.
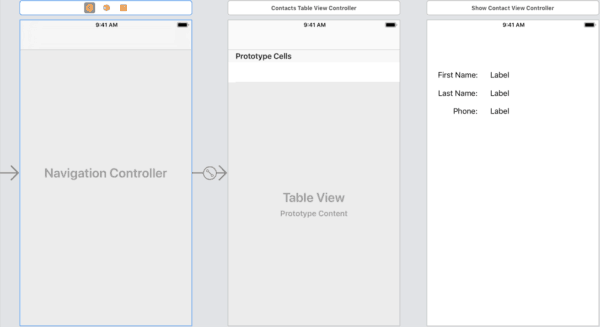
When the labels are in place your storyboard will look like the screenshot below where you have the Navigation Controller on the left which is linked to the UITableView, which is currently “not” linked to the UIViewController. We will connect up these next.
Connecting the UILabels to Code
When this is complete, the next step is to connect the right hand labels to the class so that we can set them in code.
One way to do this is by first creating the IBOutlet for each UILabel, and then connecting them up to the view.
In ShowContactViewController, add the following three lines of code just below where the class is declared on, or around, line 11.
@IBOutlet weak var firstName: UILabel!
@IBOutlet weak var lastName: UILabel!
@IBOutlet weak var phoneNumber: UILabel!
Open up the assistant editor (seen to the left as two overlapping circles).
On one side, open Main.storyboard, and on the other, open ShowContactViewController.
You will notice a small open circle on the line number of each of the IBOutlets. Click and hold and drag to each corresponding UILabel on the view, as seen below:

Creating a Segue
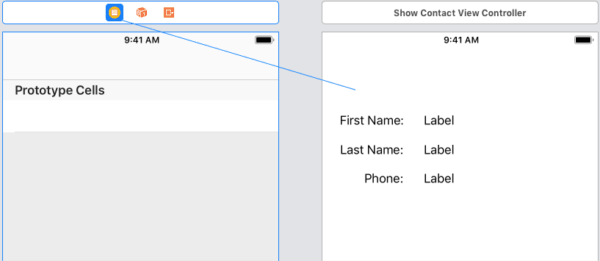
The final step on the storyboard is to create the segue from the UITableViewController to the UIViewController. To do this, hold down CTRL and then click and drag from the yellow icon at the top of the UITableViewController and drag to the UIViewController. Release the mouse button, and then select “Show” which is at the top of the menu that pops up.
Give the Segue a Name
Click the small segue icon that just appeared in-between the two view controllers.
Select the “Attributes Inspector” in the right sidebar.
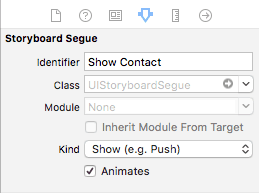
Set the identifier to “Show Contact” as seen in the screenshot.
What this part does is allows us to segue by referencing that name. Each time a cell is tapped in the table, we can tell it to segue with identifier “Show Contact”, and the segue will be performed.
The UITableViewCell
One final step on the storyboard is making sure that our cells in the UITableVIew also have an identifier.
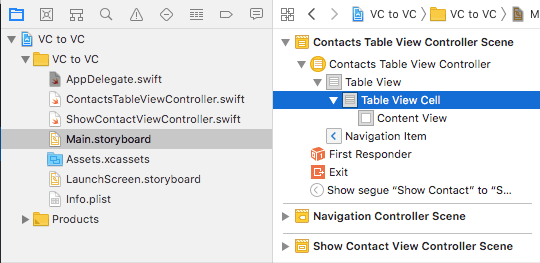
Select the Table View Cell as seen highlighted in the screenshot above.
On the right sidebar, select the attributes inspector:
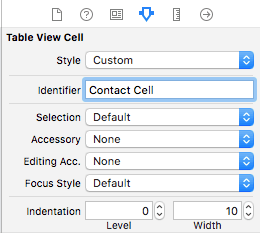
Set the identifier of the Table View Cell to “Contact Cell”.
Everything is now in place on the storyboard, so it’s time to create some code to make it all work.
The ContactsTableViewController
When you specified that ContactsTableViewController was to be UITableViewController, Xcode automatically populated the class with extra information. Normally, you will be accustomed to seeing just the viewDidLoad override. In a UITableViewController we have several methods. Some are optional, and some required. We will begin from the top:
Accessing the Contacts Array in AppDelegate
First, set up a constant to access the AppDelegate. You can put this on or around line 13 (just below the class declaration):
let appDelegate = UIApplication.shared.delegate as! AppDelegatenumberOfSections:
override func numberOfSections(in tableView: UITableView) -> Int {
    // #warning Incomplete implementation, return the number of sections
    return 1
}
This method carries a warning. It is required, but by default, it will not work. For this tutorial we can just return a 1 to satisfy the requirement here. numberOfSections refers to how many sections the table is to have. We will just have one section in our example app. A section is how the table is divided up. If you were to list music by genre, you might have a section for each genre. In that case, you would return the number of genres that you have.
numberOfRowsInSection:
override func tableView(_ tableView: UITableView, numberOfRowsInSection section: Int) -> Int {
    // #warning Incomplete implementation, return the number of rows
    return appDelegate.contacts.count
}
This is used to provide the number of rows that we have in each section. We just have one section, so we can return a number. In this example, we return the contacts.count which is from the AppDelegate constant we created earlier. If there are 10 items in the array, a 10 will be returned.
cellForRowAt:
override func tableView(_ tableView: UITableView, cellForRowAt indexPath: IndexPath) -> UITableViewCell {
    let cell = tableView.dequeueReusableCell(withIdentifier: "Contact Cell", for: indexPath)

    let firstName = appDelegate.contacts[indexPath.row]["firstName"]
    let lastName = appDelegate.contacts[indexPath.row]["lastName"]

    cell.textLabel?.text = firstName! + " " + lastName!

    return cell
}
This code is run for every cell that needs to be created, ie, the visible cells on screen.
Line 2 is where the cell is created as a constant. Notice the “withIdentifier” part where we specify “Contact Cell”. This is where we specify which cell to use.
Line 4 we declare a constant called firstName. We get the String for this from the contacts array in AppDelegate, and use indexPath.row to provide the index in the array. When we have the correct dictionary from the array, we access the “firstName” key to get the data, which contains the first name.
Line 5 is almost the same as line 4, except we repeat this for the last name.
Line 7, we concatenate the first and last names together and insert a space in-between.
We then return the cell.
didSelectRowAt:
As it is now, the project will run and will display all of the names found that we added in AppDelegate. However, without the didSelectRowAt: being implemented, we are unable to do anything other than tap and select a row.
override func tableView(_ tableView: UITableView, didSelectRowAt indexPath: IndexPath) {
    contactSelected = indexPath.row
    performSegue(withIdentifier: "Show Contact", sender: nil)
}
This method is where we perform the segue.
Line 2 requires that we define the contactSelected variable. We will add that at the to of the class, around where we declared the appDelegate constant earlier:
var contactSelected = 0What this does is allows line 2 of the previous code to store the index of the cell that was tapped on-screen.
Line 3 of the previous code is where we perform our segue. We call it by name by specifying the identifier we set up in the storyboard.
When a cell is tapped, we now have the index, and we now segue with the Show Contact segue.
prepareForSegue:
There is just one last part to allow us to pass the index from this view controller to the next view controller. This is done in the final method for this class:
override func prepare(for segue: UIStoryboardSegue, sender: Any?) {
    // Get the new view controller using segue.destination.
    // Pass the selected object to the new view controller.
    if (segue.identifier == "Show Contact") {
        let showContactViewController: ShowContactViewController = segue.destination as! ShowContactViewController
        showContactViewController.contactIndex = contactSelected
    }
}
Each time a segue is performed, the prepare method is called just prior to the segue occurring.
Line 4 is where we do a check to see if we are interested in the segue being performed. We look out here for the “Show Contact” segue, and if it evaluates to true, we then perform some work on line 5 and 6.
Line 5 we need to get an instance of the segue destination. With that destination, which is the ShowContactViewController, we can then access its public variables.
Line 6, we set the variable called contactIndex (which isn’t yet defined, so will throw an error) to the contactSelected.
We will now move to the ShowContactViewController and define that variable to get rid of the error in the ContactsTableViewController.
The ShowContactViewController
Just above, or below, the IBOutlets that you created earlier, add the following two lines:
var contactIndex = 0
let appDelegate = UIApplication.shared.delegate as! AppDelegate
Line 1 fixes the error in the table view controller as it provides the contactIndex variable that is set in that controller.
Line 2 is used to allow us to access the contacts array created in AppDelegate.
viewDidLoad:
In this method we just need to set the firstName, lastName, and phone number text property to the correct values.
firstName.text = appDelegate.contacts[contactIndex]["firstName"]
lastName.text = appDelegate.contacts[contactIndex]["lastName"]
phoneNumber.text = appDelegate.contacts[contactIndex]["phone"]
We have the correct index, called contactIndex, which can be used to access the correct dictionary in the array. With that, we can access each of the three keys for that dictionary to get the name and phone number to display on the view.
Wrapping Up
This is the end of the tutorial. The actual part of passing a variable or some data to another ViewController is quite simple, although I wanted to make it in to something useful so that you could visualise it better. If you have any questions, please comment below.
Leave a Reply
You must be logged in to post a comment.