Parse.com was a MBaaS that shut down in 2017 and became Parse Platform, which is now an open-source version with a thriving community. It is a backend framework for mobile and web applications that you can install on a server and host yourself.
I first started using Parse when it was new, I believe around 2012/2013 on a project building an iPad app for time tracking at various locations on the west coast of the USA.
Creating Your First Parse App
When parse.com was up and running, you could quickly create an account and be given the code you need to integrate with your app, but now you need to host it yourself, there’s a few more steps. We’ll look into those steps including spinning up a server at DigitalOcean to install the platform on.
Using Docker
Install Docker Desktop on your Mac if you haven’t already. We will use this to host our Parse Server instance.
Create a folder on your machine and a new file called docker-compose.yml and add the following:
version: '3.8'
services:
  mongodb:
    image: mongo:6.0
    container_name: mongodb
    volumes:
      - mongodb_data:/data/db
      - mongodb_config:/data/configdb
    ports:
      - "27017:27017"
    environment:
      - MONGO_INITDB_DATABASE=parse
    restart: unless-stopped

  parse-server:
    image: parseplatform/parse-server:latest
    container_name: parse-server
    depends_on:
      - mongodb
    ports:
      - "1337:1337"
    environment:
      - PARSE_SERVER_APPLICATION_ID=your-unique-app-id
      - PARSE_SERVER_MASTER_KEY=your-secure-master-key
      - PARSE_SERVER_DATABASE_URI=mongodb://mongodb:27017/parse
      - PARSE_SERVER_URL=http://0.0.0.0:1337/parse
      - PARSE_SERVER_PUBLIC_SERVER_URL=http://192.168.7.104:1337/parse
      - PARSE_SERVER_MASTER_KEY_IPS=0.0.0.0/0
      - PARSE_SERVER_START_LIVE_QUERY_SERVER=true
      - PARSE_SERVER_LIVE_QUERY_CLASSNAMES=ToDoItem
    volumes:
      - parse_data:/parse-server
    restart: unless-stopped

  parse-dashboard:
    image: parseplatform/parse-dashboard
    container_name: parse-dashboard
    depends_on:
      - parse-server
    ports:
      - "4040:4040"
    environment:
      - PARSE_DASHBOARD_CONFIG={"apps":[{"appId":"your-unique-app-id","masterKey":"your-secure-master-key","serverURL":"http://192.168.7.104:1337/parse","appName":"ToDo","production":false}],"users":[{"user":"admin","pass":"admin123","apps":[{"appId":"your-unique-app-id","readOnly":false}]}]}
      - PARSE_DASHBOARD_ALLOW_INSECURE_HTTP=true
    restart: unless-stopped

volumes:
  mongodb_data:
  mongodb_config:
  parse_data:
Ensure that you keep the tabs the same and copy and paste as is, except replace the IP on line 27 with your MacBooks current IP address.
docker compose up -d
When saved, run this command in the terminal and the instance will fire up. (swapping your own IP in.)
curl http://192.168.1.123:1337/parse/health
When up and running, enter this command on the terminal and you should get a response as follows:
{"status":"ok"}
If you do, then Parse Server is set up and ready to go. You can also test this in Safari on your device and you should also get the status ok response.
Using Parse as a Backend for a SwiftUI App
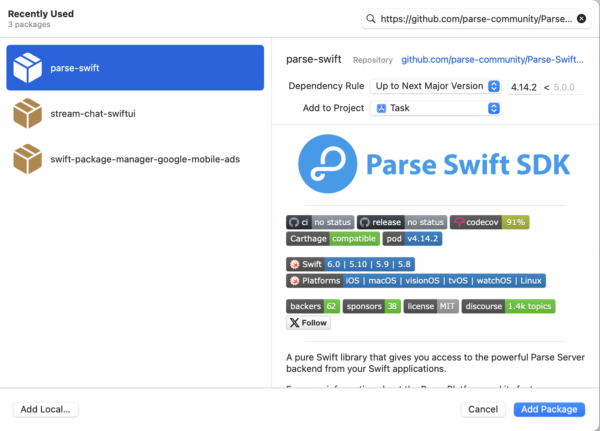
To use Parse in our iPhone app, we first need to add the ParseSwift package. With a new project created and ready, click on File > Add Package Dependencies…

Enter this URL in the top right, and you’ll see parse-swift as an option. Click Add Package to add it.
https://github.com/parse-community/Parse-Swift
To connect to Parse Server, we’re going to build the same app as we did with the SwiftData app here: How to Create a Simple To-Do List with Swipe Actions in SwiftUI Using SwiftData
import SwiftUI
import ParseSwift

@main
struct ToDoApp: App {
    init() {
        ParseSwift.initialize(
            applicationId: "your-unique-app-id",
            clientKey: "your-secure-master-key",
            serverURL: URL(string: "http://192.168.7.104:1337/parse")!
        )
    }

    var body: some Scene {
        WindowGroup {
            ContentView()
        }
    }
}
I called the app ToDo, but your struct will have whatever name you called it. Whatever it is doesn’t matter.
Where your @main is declared, add the following, changing the IP for the serverURL to match your own setup. The application ID and client key are both accurate in this example because I didn’t change them in the environment variables either in docker compose. They are exactly what the server is looking for.
Creating the Model
The first job is to create a model:
struct ToDoItem: ParseObject {
    var originalData: Data?

    init() { }

    var objectId: String?
    var createdAt: Date?
    var updatedAt: Date?
    var ACL: ParseACL?

    var task: String?
    var note: String?
    var due: Date?
    var completed: Bool = false
    var flagged: Bool = false

    var id: String { objectId ?? UUID().uuidString }

    init(task: String, note: String? = nil, due: Date? = nil) {
        self.task = task
        self.note = note
        self.due = due
    }
}
This is our model. It doesn’t look much different to any other model except it conforms to ParseObject that requires the init as seen on line 4.
Adding the ViewModel
class ToDoViewModel: ObservableObject {
    @Published var toDoItems: [ToDoItem] = []

    init() {
        fetchToDoItems()
    }

    func fetchToDoItems() {
        let query = ToDoItem.query().order([.ascending("due")])

        query.find { [weak self] result in
            DispatchQueue.main.async {
                switch result {
                case .success(let items):
                    self?.toDoItems = items
                case .failure:
                    self?.toDoItems = []
                }
            }
        }
    }

    func toggleCompletion(for itemID: String) {
        guard let index = toDoItems.firstIndex(where: { $0.id == itemID }) else { return }
        var updatedItem = toDoItems[index]
        updatedItem.completed.toggle()

        updatedItem.save { [weak self] result in
            DispatchQueue.main.async {
                if case .success = result {
                    self?.toDoItems[index] = updatedItem
                }
                // Ignore errors
            }
        }
    }

    func flagItem(for itemID: String) {
        guard let index = toDoItems.firstIndex(where: { $0.id == itemID }) else { return }
        var updatedItem = toDoItems[index]
        updatedItem.flagged.toggle()

        updatedItem.save { [weak self] result in
            DispatchQueue.main.async {
                if case .success = result {
                    self?.toDoItems[index] = updatedItem
                }
                // Ignore errors
            }
        }
    }

    func deleteItem(for itemID: String) {
        guard let index = toDoItems.firstIndex(where: { $0.id == itemID }) else { return }
        let item = toDoItems[index]

        item.delete { [weak self] result in
            DispatchQueue.main.async {
                if case .success = result {
                    self?.toDoItems.remove(at: index)
                }
                // Ignore errors
            }
        }
    }

    func addTask(task: String, note: String?, due: Date?) {
        let newItem = ToDoItem(task: task, note: note, due: due)
        newItem.save { [weak self] result in
            DispatchQueue.main.async {
                if case .success = result {
                    self?.fetchToDoItems()
                }
                // Ignore errors
            }
        }
    }
}
This is our ViewModel and is responsible for all interactions for ToDos that are stored in Parse.
We create this class as an ObservableObject so that we can use @Publish on our properties. In this case, we publish an array of ToDoItem.
Our initialiser makes a call to fetchToDoItems() so that the fetch is performed immediately.
The fetchToDoItems method starting line 8 sets up a query and orders by ascending on the due column, which you can see is a Date in the model.
We then run that query and store the result in self?.toDoItems depending on it being a success or failure. If a failure, we just pass an empty array back.
I wont go over all methods in the ViewModel because they are all very similar and just perform the usual actions, but I will explain one of them, the first which is toggleCompletion.
This beging line 23 and takes in the itemID as a String. We then get that ToDoItem from the array by getting the firstIndex. Although we could just accept the ToDoItem in as a parameter in the method, I opted for String.
When we have the item, we toggle the completed bool on line 26.
We then save it, and if we have a succesful update, it replaces the item at the index with the updated item. We don’t handle errors in this example, although if you were to use this in production, I would recommend doing so.
ToDo Views
We have our views next to handle so that we can interact with our data.
struct ContentView: View {
    @StateObject private var viewModel = ToDoViewModel()
    @State private var sheetVisible = false

    var body: some View {
        NavigationView {
            List(viewModel.toDoItems) { item in
                ToDoItemRow(
                    item: item,
                    toggleCompletion: { viewModel.toggleCompletion(for: item.id) },
                    flagItem: { viewModel.flagItem(for: item.id) },
                    deleteItem: { viewModel.deleteItem(for: item.id) }
                )
            }
            .navigationBarTitleDisplayMode(.inline)
            .navigationTitle("To-Do List")
            .toolbar {
                ToolbarItem(placement: .navigationBarTrailing) {
                    Button(action: { sheetVisible.toggle() }) {
                        Image(systemName: "plus")
                    }
                    .sheet(isPresented: $sheetVisible) {
                        CreateTaskSheet(addTask: viewModel.addTask)
                    }
                }
                ToolbarItem(placement: .navigationBarLeading) {
                    Button(action: { viewModel.fetchToDoItems() }) {
                        Image(systemName: "arrow.clockwise")
                    }
                }
            }
        }
    }
}

// MARK: - CreateTaskSheet
struct CreateTaskSheet: View {
    @Environment(\.dismiss) var dismiss
    @State private var task: String = ""
    @State private var note: String = ""
    @State private var dueDate: Date = Date()
    let addTask: (String, String?, Date?) -> Void

    var body: some View {
        NavigationView {
            Form {
                TextField("Task", text: $task)
                TextField("Note", text: $note)
                DatePicker("Due Date", selection: $dueDate, displayedComponents: .date)

                Button("Add Task") {
                    addTask(task, note, dueDate)
                    dismiss()
                }
            }
            .navigationTitle("New Task")
            .toolbar {
                ToolbarItem(placement: .cancellationAction) {
                    Button("Cancel") { dismiss() }
                }
            }
        }
    }
}

// MARK: - ToDoItemRow
struct ToDoItemRow: View {
    let item: ToDoItem
    let toggleCompletion: () -> Void
    let flagItem: () -> Void
    let deleteItem: () -> Void

    var body: some View {
        HStack {
            ToDoItemInfo(item: item)
            Spacer()
            Button(action: toggleCompletion) {
                Image(systemName: item.completed ? "checkmark.circle.fill" : "circle")
                    .resizable()
                    .frame(width: 24, height: 24)
                    .foregroundColor(item.completed ? .green : .gray)
            }
            .buttonStyle(PlainButtonStyle())
        }
        .padding(.vertical, 8)
        .swipeActions(edge: .leading) {
            Button(action: flagItem) {
                Label("Flag", systemImage: "flag")
            }
            .tint(.orange)
        }
        .swipeActions {
            Button(role: .destructive, action: deleteItem) {
                Label("Delete", systemImage: "trash")
            }
            .tint(.red)
        }
    }
}

// MARK: - ToDoItemInfo
struct ToDoItemInfo: View {
    let item: ToDoItem

    var body: some View {
        HStack {
            if item.flagged {
                Image(systemName: "flag.fill")
                    .foregroundColor(.orange)
                    .padding(.trailing, 5)
            }

            VStack(alignment: .leading, spacing: 5) {
                Text(item.task ?? "No Title")
                    .font(.system(size: 20, weight: .bold))
                    .foregroundColor(item.completed ? .gray : .primary)
                    .strikethrough(item.completed, color: .gray)

                if let note = item.note, !note.isEmpty {
                    Text(note)
                        .font(.system(size: 16, weight: .regular))
                        .foregroundColor(.gray)
                }

                if let dueDate = item.due {
                    let isOverdue = dueDate < Date()
                    Text("Due: \(dueDate.formatted(.dateTime.day().month().year().hour().minute()))")
                        .padding(4)
                        .background(isOverdue ? Color.red : Color.clear)
                        .foregroundColor(isOverdue ? .white : .primary)
                        .cornerRadius(8)
                        .font(.system(size: 12, weight: .regular))
                }
            }
        }
    }
}
Our ContentView has the ToDoViewModel() instantiated and uses the @StateObject property wrapper so that we can observe changes to the array of ToDoItem. We also have a sheetVisible bool that is used to display a sheet that allows you to create a new ToDo item.
Our body is a regular NavigationView that has a List that iterates over our viewModel.toDoItems. Each item is a ToDoItemRow where we pass in the data from the ToDoItem.
We also have a .toolbar added where we have a button on the trailing side to show a plus and provide a way to add a new ToDo item. This is also responsible for presenting the CreateTaskSheet sheet.
We also have a leading side Button view to fetch the ToDoItems from the ViewModel.
Line 37 starts the CreateTaskSheet View. It’s a simple Form that has TextField views, a DatePicker, and a button to add a new task. There are three @State property wrapped properties that are used to store the data from the form.
Our ToDoItem row on line 67 provides what each row looks like which contains a nested ToDoItemInfo view that is defined on line 102.
Overall, it’s a very simple view that has nested components to help keep the code tidy, especially because a ToDo list is a lot of rows of the same layout.
Running the App
When you run the app, you will first be prompted to allow the device to access devices on your network. You need to allow this so that API calls can be made. Once granted you can add tasks, edit tasks, complete tasks and flag them. Try swiping left or right on a task to see the options available.
The Parse Server Dashboard
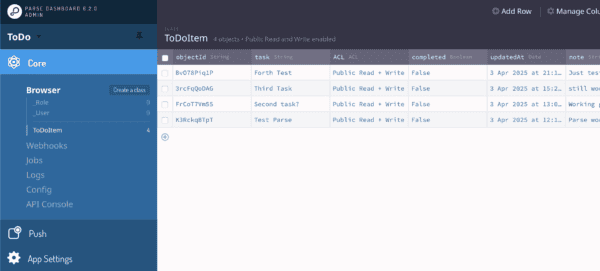
You may have noticed earlier in docker-compose.yml that the parse-dashboard was also included so that an instance of that is spun up when you run it. To access it, visit http://your-ip:4040 and use the credentials: admin/admin123 to login. You will see the Parse Server in the list. Select it, and then you can browse any ToDo items that you have added to your app.

Please do note that there is no security here in this tutorial. No Users were created, no roles were given. If you were to use this in a live setting, you would want to add the todo to a user so that each user only has access to their own ToDos.
Any questions, please do not hesitate to ask in the comments.
Leave a Reply
You must be logged in to post a comment.