In building a note-taking app for meetings, I need to synchronise notes between devices, primarily between the iPad and iPhone. I was already using SwiftData for the models, and after some research, I found that it is relatively simple syncing SwiftData with iCloud. I should say that its simple to enable, but then you might run into some errors that you need to fix with your models and the classes or structs that use those models. This tutorial will cover what you need to know to get moving quickly.
Enabling iCloud support requires that you have a developer account. It is also best to test on actual devices rather than in the simulator. Before proceeding, check that signing is set to your development team account rather than the personal account you have. Assuming you already have a project to which you need to add iCloud support, follow along. If you are starting a new project, then ensure that you select SwiftData for storage and check the “Host in CloudKit” box.
To activate iCloud, in the Target, select + Capability.
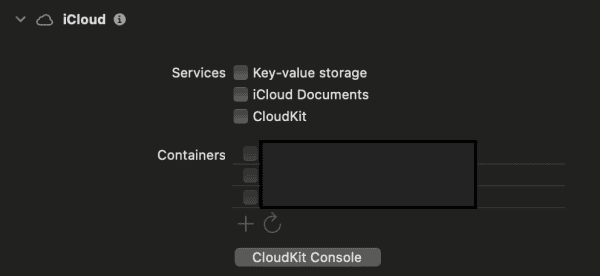
Add iCloud and you’ll see the following added.

Select CloudKit and then either select a container or add a new one with the + button.
Next, you need to add another capability. This time its “Background Modes”. Add this, then when the capability appears in the Signing and Capabilities tab then select the “Remote Notifications” checkbox.
By adding remote notifications, any changes on one device can silently notifiy your other devices that data has changed. All of the syncing is handled automatically.
In some cases, this might be all you have to do. However, in my case I got a number of errors related to the three model classes I have defined. SwiftData in iCloud is stricter in the requirements and often requires you to make adjustments. The general rules are that properties need to have a value set in the model, or be defined as optional, and that all relationships need to have an inverse. The reason for this is that we’re going from models stored locally on a single device to models stored on a server and used by multiple devices. What makes sense on just one device might not be clear on the other device that receives the new data.
@Model
final class Meeting {
    var dateInterval: DateInterval = DateInterval(start: Date(), duration: 3600)
    var title: String = "No Title"
In my Meeting model, I needed to add some default values so that it fixed that error. The other two models I have also required similar, although some properties were set to optional such as a meeting might not have notes if it hasn’t started yet. For this,
Another error you might get at runtime is the following:
CloudKit integration requires that all relationships have an inverse...
This error is found in the logs and will give a description of which relationships do not have an inverse. To fix this, your models need to specify an inverse relationship such as:
@Relationship(inverse: \MeetingNote.discussionPoint)
The @Relationship macro can also be used to define a delete rule. This declares what needs to happen when something is deleted. You might choose not to declare a delete rule, like the example above, or you can add it as follows:
@Relationship(deleteRule: .cascade, inverse: \MeetingNote.discussionPoint)
The only other task left is fixing any other errors that have been caused by swapping to use optionals in your model. When you access these, you’ll need to handle nil values.
As always, if you have questions then please leave a comment below.
Leave a Reply
You must be logged in to post a comment.