Touch ID will allow you to add a layer of privacy to your app that was previously unavailable.
By requiring the user to authenticate who they are with their fingerprint you can limit access to certain data, or the entire app.
Well make a simple demo that will present an initial view and after the user has “authenticated”, we will move to another view.
Start with a new project, single view application, Swift language, Universal target.
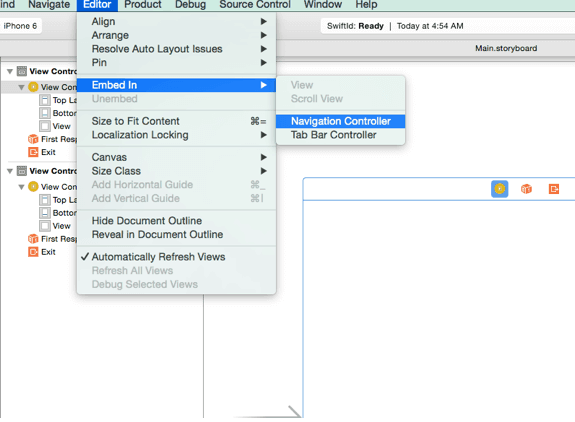
With the project open and the storyboard displayed, click on the view controller and from the EDITOR menu select EMBED IN and choose NAVIGATION CONTROLLER.
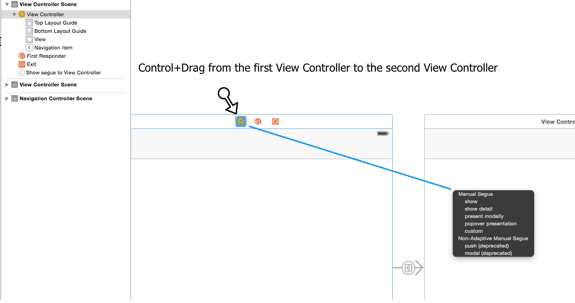
Add a label and a button to the initial view controller. Drag on an additional view controller. Add a segue from the initial view controller to the second view controller. Select “Show” as the segue type.
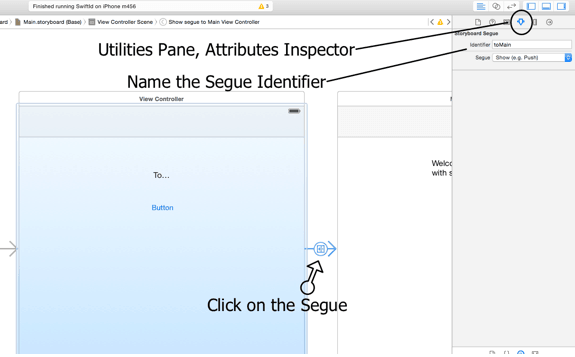
Click on the segue. From the Attributes Inspector, name the segue toMain
For touch ID to work well need the LocalAuthentication framework.
At the top of our ViewController.swift file add
import LocalAuthentication
Were also going to be using an alert view so now is a good time to add the UIAlertViewDelegate to our class file.
import UIKit
import LocalAuthentication

class ViewController: UIViewController,UIAlertViewDelegate {

    override func viewDidLoad() {
        super.viewDidLoad()
        // Do any additional setup after loading the view, typically from a nib.
    }

    override func didReceiveMemoryWarning() {
        super.didReceiveMemoryWarning()
        // Dispose of any resources that can be recreated.
    }
Open the Assistant Editor and have the Storyboard initial view controller on the left, and the ViewController.swift file on the right.
Control+drag from the button to the swift file. When the popup appears make sure ACTION is selected and name your button action myButton.
@IBAction func myButton(sender: AnyObject) {
}
The button action is where well execute the touch authentication.
Inside the curly braces of our button action we’ll create a constant for the LAContext (Local Authentication Context).
What is LAContext?
This is Apples definition¦
“Authentication contexts are used to evaluate authentication policies, allowing apps to request the user to authenticate themselves using personal information such as a fingerprint registered with Touch ID”.
We can see from the definition there is also an Authentication Policy. Next, we’ll create a constant for the LAPolicy (Local AuthenticationPolicy)
What is LAPolicy?
A Local Authentication Policy is essentially the method by which we are going to evaluate the authentication context. Presently it is the fingerprint, but I could imagine that there could be other policies such as detecting a coded chip or monitoring a sound, or the result of some other input.
This is what Apple says¦
“Policies may have requirements that must be satisfied in order to have any chance of successfully authenticating. For example, a policy that requires biometrics would require that Touch ID be enabled and have fingerprints enrolled.
The return value of this method may change over time, so you should not store this value for future use in your app. The value is guaranteed to remain consistent until your app enters the background”.
In our button action code, add a constant for the context, and a constant for the policy.
@IBAction func myButton(sender: AnyObject) {

        let authorization = LAContext()
        let authPolicy = LAPolicy.DeviceOwnerAuthenticationWithBiometrics
}
Next well need to see if the device can evaluate the policy, that is¦ does the device have Touch Id capabilities. In our button code now add an “if” statement to check if our device can evaluate the policy. When creating this if statement and calling the method “canEvaluatePolicy…..” you’ll see that it is asking for an NSErrorPointer.

On line 8 we create the variable naming it “authorizationError” and set the pointer to nil.
@IBAction func myButton(sender: AnyObject) {


        let authorization = LAContext()
        let authPolicy = LAPolicy.DeviceOwnerAuthenticationWithBiometrics // a fingerprint


        var authorizationError: NSErrorPointer = nil


        if(authorization.canEvaluatePolicy(authPolicy, error: authorizationError)){
            // if device is touch id capable do something here
}
        else{
            // add alert
            println("Not Touch ID Capable")
            // do something else here
        }
At this point if you build & run in the simulator and touch the button, you’ll get a message in the log which says “Not Touch ID Capable”. This is about as much as we can do in the simulator so from here forward you’ll need to test on a device.
Let’s add an alert for the user in case their device does not support Touch ID. Anywhere in the class file add the following:
func noTouchIDonThisDeviceAlert() {
        var noTouchAlert : UIAlertView = UIAlertView(title: "Touch ID not Available", message: "Sorry", delegate: self, cancelButtonTitle: "Okay")

        noTouchAlert.show()
    }
And then add the method to our “else” statement.
else{
            // add alert
            println("Not Touch ID Capable")
            self.noTouchIDonThisDeviceAlert()
        }
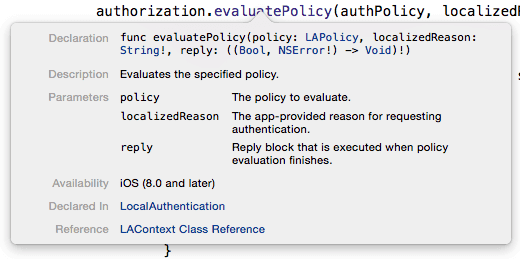
So testing on the device… if we are Touch ID capable let’s do something.. We’ve already asked if we CAN evaluate the policy. If we can, then EVALUATE it or, act on it. By calling the method evaluatePolicy.
@IBAction func myButton(sender: AnyObject) {


        let authorization = LAContext()
        let authPolicy = LAPolicy.DeviceOwnerAuthenticationWithBiometrics


        var authorizationError: NSErrorPointer = nil


        if(authorization.canEvaluatePolicy(authPolicy, error: authorizationError)){
            // if device is touch id capable do something here

            authorization.evaluatePolicy(authPolicy, localizedReason: "Touch the fingerprint sensor", reply: {(success:Bool,error:NSError?) in


                if(success){
                    self.performSegueWithIdentifier("toMain", sender: nil)
                    println("touching")
                }else {
                    println(error!.code)

                }
            })
        }
        else{
            // add alert
            println("Not Touch ID Capable")
            self.noTouchIDonThisDeviceAlert()
        }
    }
On line 14 we evaluate. There are three parameters to satisfy. The Policy, a Reason, and a Reply. The Policy is our “authPolicy”. The localizedReason is a string which displays a message to the user in a pre-defined alert. The Reply is BOOL of success or failure. If “success” then segue to our second View Controller via “toMain”. If not success, then print the error code in the log.
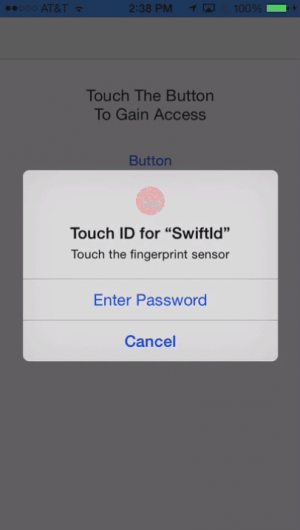
You’ll notice that if you touch “Enter Password” or “Cancel” there will be two error codes in the log. We’ll use those codes in a moment to handle touches to those buttons.
It’s interesting to note that the routine “evaluatePolicy” does not run on the main thread. If you attempt to do something after the policy is evaluated there will be a BIG delay in any code being executed. If you’re curious, build and run this code. Tap the button. The Authenticate Alert appears. When you touch the fingerprint scanner the alert goes away and after about 15 to 20 seconds we segue to the second view. SO… we have to use GCD (GrandCentralDispatch) to fix our non-responsive UI.
Use dispatch_async(dispatch_get_main_queue() to perform our actions if success is true.
Also add the error code “if” statements shown on lines 22 thru 26 and verify the touches to those buttons.
    @IBAction func myButton(sender: AnyObject) {


        let authorization = LAContext()
        let authPolicy = LAPolicy.DeviceOwnerAuthenticationWithBiometrics


        var authorizationError: NSErrorPointer = nil


        if(authorization.canEvaluatePolicy(authPolicy, error: authorizationError)){
            // if device is touch id capable do something here

            authorization.evaluatePolicy(authPolicy, localizedReason: "Touch the fingerprint sensor", reply: {(success:Bool,error:NSError?) in

                dispatch_async(dispatch_get_main_queue(),{
                if(success){
                    self.performSegueWithIdentifier("toMain", sender: nil)
                    println("touching")
                }else {
                    println(error!.code)
                    if(error!.code == -2){
                        println("user touched cancel")}
                    if(error!.code == -3){
                        println("User touched password")
                        // do something here

                    }

                }

                })
            })

        }
        else{
            // add alert
            println("Not Touch ID Capable")
            self.noTouchIDonThisDeviceAlert()
        }
    }
If you build and run, everything should be working responsively! However we need to handle the password.
So here’s a catch. To use touch id the user must have a passcode , however the Local Authentication API does not allow access to the user passcode data.
Notice that the default Alert has Enter Password and Cancel. It is literally telling us that we have to handle some kind of PASSWORD or key as opposed to the users passcode. We need to create a method to handle this when the user touches Enter Password.
One solution to this is to create an Alert with a secure text field. Once text is entered into the field we will check the entry against a hard coded string.
Create the alert…
func userPasswordRequest() {
        var passwordAlert : UIAlertView = UIAlertView(title: "Swift Touch ID", message: "Enter a password", delegate: self, cancelButtonTitle: "Cancel", otherButtonTitles: "Okay")
        passwordAlert.alertViewStyle = UIAlertViewStyle.SecureTextInput
        passwordAlert.show()
    }
In the “if” statement checking for error code == -3 add the method we just created.
if(error!.code == -3){
                        println("User touched password")
                        // do something here
                        self.userPasswordRequest()

                    }
Now create the method to test what is in the alert box… In this case I’ve stated that if “love” is entered into the textField, then perform the segue.
func alertView(alertView: UIAlertView!, clickedButtonAtIndex buttonIndex: Int) {
        if buttonIndex == 1 {
            if !alertView.textFieldAtIndex(0)!.text.isEmpty {
                if alertView.textFieldAtIndex(0)!.text == "love" {
                    self.performSegueWithIdentifier("toMain", sender: nil)
                    println("Hey it worked")
                }
                else{
                    userPasswordRequest()
                }
            }
            else{
                userPasswordRequest()
            }
        }
    }
If the text entered does not match, we keep prompting the user until they get it correct or touch “Cancel”.
You can download the project here SwiftId
Leave a Reply
You must be logged in to post a comment.