The 5S was the first iPhone that integrated a fingerprint sensor in to the home button. When configuration is complete, it allows quick access to the iPhone by checking if your fingerprint matches one that is stored. If there’s a match, you get in and if not, it denies access.
When Touch ID was introduced in iOS 7 on the iPhone 5S, it was only available for Apple apps. When iOS 8 launched, they allowed 3rd party developers to also access this feature. In todays tutorial, we’ll take a look at how to integrate touch ID in to your iPhone app. Note that since the new iPad air and new iPad mini now include a touch ID sensor, this tutorial is also compatible with those devices although I will be testing with an iPhone 6.
Requirements
This tutorial requires that you have an iPhone 5S or newer or the latest iPad air or latest iPad mini (basically any iOS device with a touch ID sensor). You also need to be running iOS 8 or newer and also be using Xcode 6. Because we will be testing on an actual device rather than a simulator, you will also need to be enrolled in the iOS developer program and have paid the $99 yearly fee.
Creating the Project
First, load up Xcode 6 and go to create a new project. To save some steps setting up a default view, select the Single View Application (in the iOS section) and click Next. Give the project a name such as Touch ID and fill in the Organisation name, Organisation Identifier and set the other options as below. Note that the general way we select an organization identifier is by spelling out a name in reverse. In the case of our app development business which is mobient.co.uk, we reverse that by putting uk.co.mobient. In the Bundle Identifier line below, the Touch-ID (project name with hyphen automatically added) gets appended to the end.
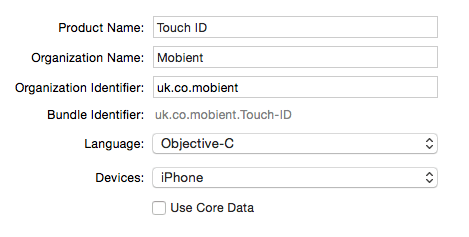
For the next step you will need to select where you want the project to be saved. I put all my projects in a Developer folder within Documents. I select the Developer folder and click Create. It is up to you if you have source control enabled or disabled at this point.
When the project loads, you will be in the General area of the project target. Where it says “Team” you need to select your developer team. I will assume that if you have a developer account that you know how to add this. If not, drop a comment below for more details.
Lets also make a few other changes. Deployment target can be set to whatever you have (or as low as 8.0 if you wish). I would also uncheck the Landscape Left/Right checkboxes and make it work in Portrait only. Lets now move on to the Storyboard.
Preparing the Storyboard
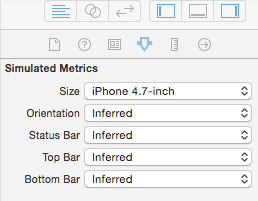 Lets now work on the Storyboard. Select Main.Storyboard from the navigation pane on the left. You will see that the View Controller is pretty much a square. This step is optional, but what you can do for storyboarding is select the view controller by clicking on the title of the view and then on the right sidebar, you want to select the 4th icon along which is the “Attributes Inspector”. Under the heading “Simulated Metrics” you can choose to set the view to a certain size. In my case, with me testing on an iPhone 6, I selected the iPhone 4.7 inch screen. Again, this is optional and you can just work with Inferred if you wish.
Drag out another View Controller and place it to the right of the main view controller. Feel free to also adjust the size of the view if you wish. We now need to connect the two views together so that a successful authentication on the first view can bring the second view in to place. To do this, we click on the first view at the top, select the view controller icon (the yellow one on the left of the 3 icons) and hold down CTRL and then drag to the second view as pictured below:
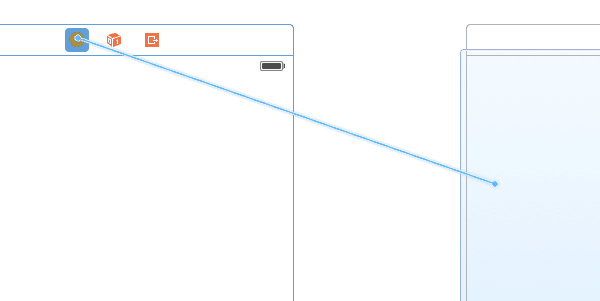
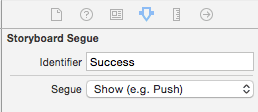 When you release the mouse button, a menu appears. Select the Show option under Manual Segue. Now click on the segue and in the Attributes Inspector on the right of the screen, you will see the Storyboard Segue section which has an Identifier and the type of Segue. Segue should be set as “Show (e.g. Push)” and for the identifier, you need to provide a name such as Success. The reason I chose the name Success is that we will be pushing to the second view if the touch ID is successful.
Before diving in to the coding part of this project, lets add a UI Label to the second view. Drag out a Label to the second view and enter some text on it. I put on mine “My Touch ID Protected Content”. I also added a Button below that so that you can tap it to go back to the authentication screen. I called mine Back. Of course, you would actually have a full app from here on forward but this tutorial is only focussing on the touch ID aspect and authorisation to enter the app.
Creating a Custom Class for Our Second View
Because we have a button to interact with, we can create a custom view controller class for the second view. To do this click CTRL+N. Under iOS > Source at the top left, select the “Cocoa Touch Class” option and click Next. The Class: text box is where we name our class for the second view controller. Call this one “AuthenticatedViewController” keeping the case as detailed. Make it a subclass of UIViewController.
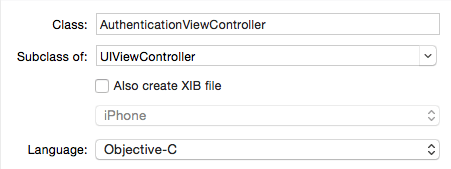
Click Next and Create.
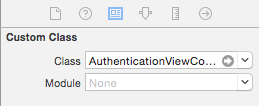 Reselect the Main.Storyboard file and then select the second view. On the right sidebar, select the 3rd option which is the Identity Inspector. Under Custom Class, set the Class to AuthenticationViewController and then click on the storyboard to ensure that option sticks.
We now have the storyboard prepared. Looking at the classes in the left sidebar, the ViewController is the class that handles the left view controller in the storyboard and the AuthenticationViewController is tied to the view controller on the right.
Setting Up the Second View
![]() Lets tackle the easy steps first and add a small bit of code that handles the back button. Select the second view in the storyboard and then select the assistant editor (the button is found at the top right of Xcode… pictured to the right).
Lets tackle the easy steps first and add a small bit of code that handles the back button. Select the second view in the storyboard and then select the assistant editor (the button is found at the top right of Xcode… pictured to the right).
On the right editor in Xcode, make sure Automatic > AuthenticationViewController.m is selected. CTRL+drag from the “Back” button to the code as pictured below:

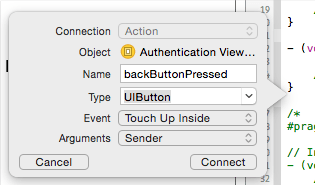 When you release the mouse button, you’ll see a small form that you need to fill in for the IBAction. This form is for the settings which are used when the button is tapped on so that the method knows how to respond. We’ll give it a name of “backButtonPressed” and set the type to UIButton. Setting that option isn’t mandatory and it could be left at id for this particular tutorial as we won’t be inspecting anything when the button is tapped.
Enter code as below for the backButtonPressed: method:
- (IBAction)backButtonPressed:(UIButton *)sender {
    [self dismissViewControllerAnimated:YES completion:nil];
}
The line of code simply dismisses the view controller. This method is called when the back button is tapped.
Integrating Touch ID
Now we get to the main part of the tutorial… integrating Touch ID with the app. As it turns out, Apple has made some fairly standard code for accessing Touch ID. The code comes from the Local Authentication Framework and is as follows:
LAContext *myContext = [[LAContext alloc] init];
NSError *authError = nil;
NSString *myLocalizedReasonString = @"Used for quick and secure access to the test app";

if ([myContext canEvaluatePolicy:LAPolicyDeviceOwnerAuthenticationWithBiometrics error:&authError]) {
    [myContext evaluatePolicy:LAPolicyDeviceOwnerAuthenticationWithBiometrics
                  localizedReason:myLocalizedReasonString
                            reply:^(BOOL success, NSError *error) {
            if (success) {
                // User authenticated successfully, take appropriate action
            } else {
                // User did not authenticate successfully, look at error and take appropriate action
            }
        }];
} else {
    // Could not evaluate policy; look at authError and present an appropriate message to user
}
Lets take a look at each line to see what it does:
Line 1: Here we create an LAContext object. The LAContext class is responsible for handling the context for the authentication. Put simply, we use an LAContext object to check if a type of authentication is available. In the case of this tutorial, we will later be checking “if” touch ID is an option.
Line 2: We need an NSError so that the LAContext can use it to return if there is an error.
Line 3: We set an NSString with a description that it put on screen to let the user know why the touch ID view has appeared on screen.
Line 5: This is where we put the LAContext constant to use by calling the canEvaluatePolicy: method and sending it an LAPolicy constant as an argument. In this case, we pass LAPolicyDeviceOwnerAuthenticationWithBiometrics. If this fails, either touch ID is not configured on a compatible device, or touch ID is not available on the device… think an iPhone 4S, 5 or 5c running the app. Also, this doesn’t take in to account a device running iOS 7, so if you plan to run finger print authentication on an app, make sure you check that you are working with a compatible device and if not, make other options available such as password on pin code to access the app.
Lines 6, 7 and 8: If the user can authenticate with biometrics we can now call the evaluatePolicy method on our LAContext object. We do this by passing the same constant over, LAPolicyDeviceOwnerAuthenticationWithBiometrics, as well as passing our reason string and then specifying a block for the response to be handled.
We will get either a YES or a NO as a result. If a YES then line 10 is where we put code for a positive response. Likewise, line 12 is where we put our failure code.
Finally on line 15, we have the ELSE statement which runs if line 5 fails the test… i.e., biometrics is not available. We can check the authError pointer to get the reason and present it to the user if needed.
Finally, to get this to not show errors, we need to import the local authentication framework in to our project:
So, lets add this code to our project. Open ViewController.m and at the top, import the local authentication framework.
#import "ViewController.h"
#import <LocalAuthentication/LocalAuthentication.h>

@interface AuthenticationViewController ()

@end
Lets go ahead and add the code from the example above in to the viewWillAppear method so that it runs when the app first loads.
-(void)viewWillAppear:(BOOL)animated {
    LAContext *myContext = [[LAContext alloc] init];
    NSError *authError = nil;
    NSString *myLocalizedReasonString = @"Touch ID Test to show Touch ID working in a custom app";

    if ([myContext canEvaluatePolicy:LAPolicyDeviceOwnerAuthenticationWithBiometrics error:&authError]) {
        [myContext evaluatePolicy:LAPolicyDeviceOwnerAuthenticationWithBiometrics
                  localizedReason:myLocalizedReasonString
                            reply:^(BOOL success, NSError *error) {
                                if (success) {
                                    dispatch_async(dispatch_get_main_queue(), ^{
                                        [self performSegueWithIdentifier:@"Success" sender:nil];
                                    });
                                } else {
                                    dispatch_async(dispatch_get_main_queue(), ^{
                                        UIAlertView *alertView = [[UIAlertView alloc] initWithTitle:@"Error"
                                                                                            message:error.description
                                                                                           delegate:self
                                                                                  cancelButtonTitle:@"OK"
                                                                                  otherButtonTitles:nil, nil];
                                        [alertView show];
                                        // Rather than show a UIAlert here, use the error to determine if you should push to a keypad for PIN entry.
                                    });
                                }
                            }];
    } else {
        dispatch_async(dispatch_get_main_queue(), ^{
            UIAlertView *alertView = [[UIAlertView alloc] initWithTitle:@"Error"
                                                                message:authError.description
                                                               delegate:self
                                                      cancelButtonTitle:@"OK"
                                                      otherButtonTitles:nil, nil];
            [alertView show];
            // Rather than show a UIAlert here, use the error to determine if you should push to a keypad for PIN entry.
        });
    }
}
The main additions here are in the success and failure parts of the app. Lets start with the success on line 10. On a first glance, you might think that the success or fail is related to the correct fingerprint being detected. You would be partly correct in that “success” is YES when the correct fingerprint is detected.
Lets look at how the non success is. This will get called differently depending on what is happening with the authentication.
1. If you hit the Enter Password button, this code gets run. Here, you would likely insert code to display a keypad so that the user can authenticate with PIN rather than fingerprint.
2. If your fingerprint is not correct, this code does not get called UNTIL 3 failures have occurred. Rather than show an error like we have done in the tutorial, you would more likely automatically fall back to the PIN code entry or some other means of authentication that doesn’t involve bio-metrics.
3. If you fail twice again with a finger print, biometrics is locked out for the account and it falls back to a default pin code screen that Apple provides. This is used to unlock biometrics for this app. When a correct password is entered, the fingerprint authentication appears again and you have 3 changes to get it right. Basically you go through the whole process again.
So the important parts are to check that biometrics are available. If not, in the last ELSE on line 26, you want to automatically fall back to PIN code or some other authentication. If biometrics is available, you want to either let them in, or let them access a custom PIN code pad to get in to your app. Also, you need to handle what happens when the user hits the cancel button. All these actions will vary app to app in some way, but try make your code run the app in a logical way which makes sense to the user.
Note that in various places in this last method we bump some of the calls on to the main queue:
dispatch_async(dispatch_get_main_queue(), ^{
    [self performSegueWithIdentifier:@"Success" sender:nil];
});
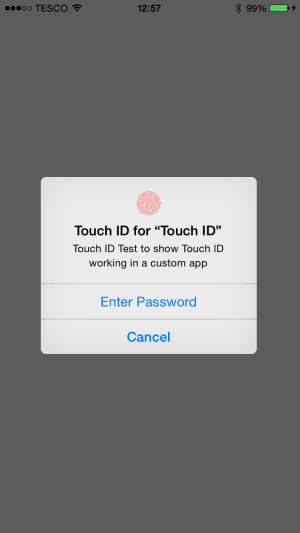 Because touch ID is running in a block on another thread when one of the success or failures is run, any code you execute will not be run on the main thread. By wrapping all code in dispatch_async(dispatch_get_main_queue(), this means the view is updated instantly. If you comment out that code and 2 lines below, you will see that loading the second view is instant, but the text doesn’t appear for another 10 – 20 seconds. Likewise, if you hit Enter Password then the alert won’t run for another 10 – 20 seconds which is not ideal.
The full project can be downloaded here. Items that you could include are a custom password entry for when Enter Password it tapped, or for when the fingerprint is wrong or for when biometrics/touch ID are not available.
Jaff says
This was very useful for me. Thank you
Kahn Tran says
thank you very very much xD
Rahul says
Thank you for an awesome tutorial.Looking forward for more tutorials from you.
iOS Dev says
Thank you!
Peter Lazarov says
I downloaded the project and run it on my iPhone, but it doesn’t show the “Enter Passcode” button. Do you know why?
Craig McDonnell says
@ Peter Lazarov, on my device the “Enter Passcode” button is only added after the first failed attempt to provide a fingerprint.
Gopi says
Hi,
I need to some changes in Touch ID pop up ,
1. Can we make Touch ID for “App Name” as Bold. 2. Can we remove “” in App Name. 3. Is reason text is optional?
Thanks in Advance.
Dhiren says
Is it possible to build the test target when we use LocalAuthentication framework? I am facing build error saying “unknown type name LAContext”. I tried to follow this link but didnt helped: http://navoshta.com/unit-tests-for-touch-id/
Rohit says
Is it possible, Different user will logged in at same device with different credentials also with different touch id bcz i can’t get id(in alphabets, digits etc). Only device’s owner can logged in via touch id.