This tutorial will focus on a Sliding Menu and implementing effects on the menu using UIKitDynamics.
UIKit Dynamics brings real world physics to objects in your app. Objects in your app like a button, an image, a table, etc. can have physics behaviors applied to them.
Used in moderation the practical application of these elements will add some polish to your app project.
UIKit Dynamics is made up of four elements;
1. A Dynamic animator
2. Dynamic behaviors(Attachment,Snap,Gravity,Collision,Push)
3. Dynamic behavior items (Allows customization of properties used in the behaviors)
4. A reference view
The Dynamic Animator groups and manages behaviors as well as the interactions on the reference view. The animator uses the reference view as the coordinate system to calculate the output of behaviors.
For every behavior we introduce to act on an object, an animator is required to manage those behaviors. For example if we have three behaviors such gravity, push, and collision acting on one object, we have to instantiate each behavior, define the parameters, and add the behavior to the animator. Well see how this is done later on.
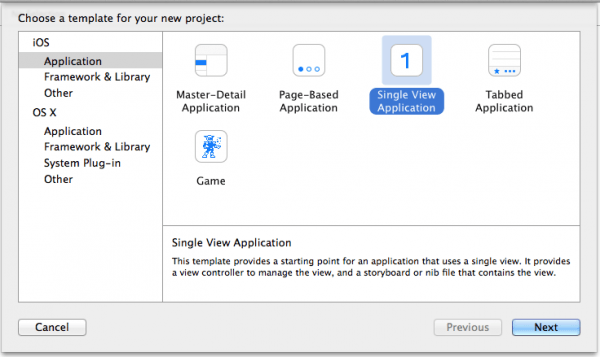
Create a new project, single view application, name it Dynamic Menu Demo, and click save. This is Xcode 6 and your screen may not look like this but that’s okay. Just chose Single View Application.
Lets put the elements well be using for the project into the storyboard.
Drag in a second view controller from the object library. We’ll use this later on to navigate to from the menu we create.
Then drag a Image View onto the first view controller and allow it to or size it to fill the entire view controller.
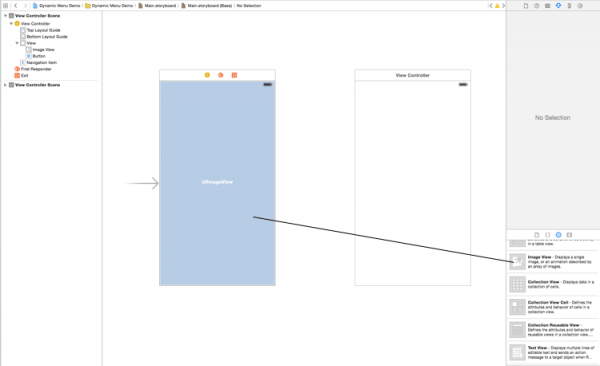
Next, drag a button onto the view. Change the name to Menu and change the font color to white. This can all be done in the attributes inspector.

Now well add some properties and make our connections.
Open the assistant editor which is the split view, so that the storyboard is on the left and the viewcontroller.h file is on the right.
Starting with our button, control+drag from the button to the .h file right under interface.
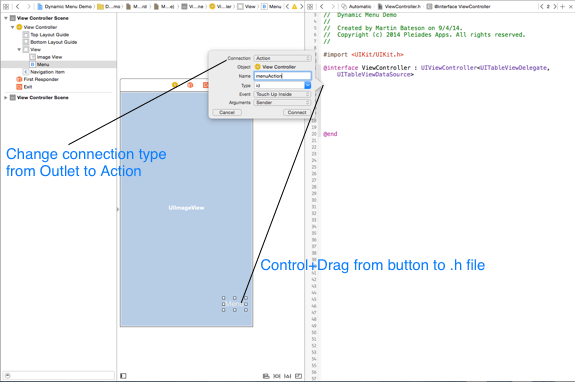
When the popup box appears select ACTION and name it menuAction.
So that we can control the appearance of the button we also need to make it an OUTLET. Control+Drag again to create the outlet, and name it menuButton.
Your .h file should look like this¦
#import

@interface ViewController : UIViewController

- (IBAction)menuAction:(id)sender;

@property (weak, nonatomic) IBOutlet UIButton *menuButton;

@end
Now lets set a property for our view. Still in the assistant editor, Control + Drag from the UIImage View on the view controller to just under the button property.
The .h file should now look like this. Name the view myView .
#import

@interface ViewController : UIViewController

- (IBAction)menuAction:(id)sender;

@property (weak, nonatomic) IBOutlet UIButton *menuButton;
@property (weak, nonatomic) IBOutlet UIImageView *myView;
@end
To begin our menu setup there are a few more things we need to add to the .h file. First well create an NSArray which will contain the names of our menu items.
Add an NSArray and name it menuItems. Additionally, the menu is going to contain a table so the delegate and data source protocols are required.
#import

@interface ViewController : UIViewController

- (IBAction)menuAction:(id)sender;

@property (weak, nonatomic) IBOutlet UIButton *menuButton;
@property (weak, nonatomic) IBOutlet UIImageView *myView;
@property (nonatomic,retain) NSArray * menuItems;

@end
Now add three more properties for our menu and two methods.
The first property is a UIView for the menu. Name it “viewForMenu”.
The second property is the UITableView. Name it “viewForTable”.
And the last property is the UIDynamicAnimator. Name it “animator”.
#import

@interface ViewController : UIViewController

- (IBAction)menuAction:(id)sender;

@property (weak, nonatomic) IBOutlet UIButton *menuButton;
@property (weak, nonatomic) IBOutlet UIImageView *myView;
@property (nonatomic,retain) NSArray * menuItems;

@property (nonatomic, strong) UIView *viewForMenu;
@property (nonatomic, strong) UITableView *viewForTable;
@property (nonatomic, strong) UIDynamicAnimator *animator;

@end
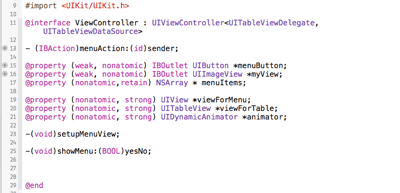 This is what it will look like in Xcode.
Next add two methods as pictured above. The first will contain the menu creation specifics, the second will contain all the fun stuff related to dynamic attributes for how the menu behaves.
Add the methods to the .h file.
-(void)setupMenuView;
-(void)showMenu:(BOOL)yesNo;
Before moving on to the implementation file lets get our image taken care of.
I use Pixelmator for image editing because¦ its what Ive always used. You can use any image editing program, whatever your comfortable with.
In your image editing program, make an image or take a photo and size it to 640X1136.
Export the image to a folder or the Desktop as a .png file and name it BG.
Back to Xcode. Open the Images.xcassets and create a new image. Name it BG. Drag your .png file from whereever you saved it, into the newly created image file.
Drag your saved .png image onto the 2x landing pad.
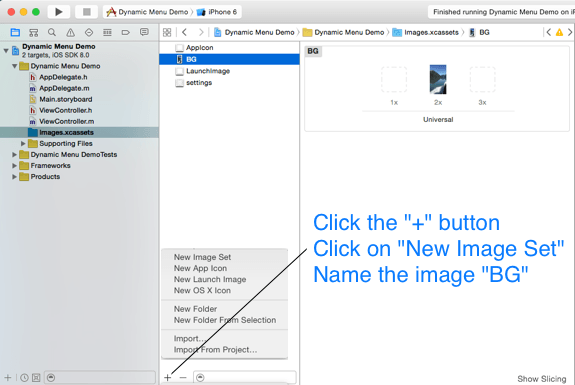
Moving on to the implementation file of the view controller.
In the implementation file under “viewDidLoad” set the UIView “myView” to the BG Image.
- (void)viewDidLoad
{
    [super viewDidLoad];
    self.myView.image = [UIImage imageNamed:@"BG"];
There will be a warning in the implementation file because we havent implemented our tableview methods yet¦ Build and run.
 You should see this in the simulator, one image and a button¦ well, depending on the image you used. I used one from a trip I took to Norway.
Close the simulator and lets add some code to our menu button.
In our view controller.m find the method we created for the menuAction button. Xcode should have added a stub for use but if not, write it in.
Tell the menu button to disappear when touched. Here we could hide the button by coding self.menuButton.hidden = YES; But I chose to animate a fade by changing the alpha to 0 over a period of time using animateWithDuration
- (IBAction)menuAction:(id)sender {

    [UIView animateWithDuration:1.0 animations:^{
        self.menuButton.alpha = 0;
    }];
}
Earlier in the .h file we added a property named menuItems and declared it was an NSArray.
In the ViewController.m in the viewDidLoad method, we are going populate the array with what will be our menu items.
In viewDidLoad we can state that the array menuItems will contain as many items as we tell it to.
self.menuItems = @[@Close Menu, @Second Menu, @next item etc¦
In this example our array will contain six items with the first being Close Menu and the second, Second View because Id like to demo how you would get to another view controller from the menu.
@implementation ViewController

- (void)viewDidLoad
{
    [super viewDidLoad];
    self.myView.image = [UIImage imageNamed:@"BG"];

    //beginning of menu creation
    self.menuItems = @[@"Close", @"Second View", @"Menu Item 3", @"Menu Item 4", @"Menu Item 5",@"Menu Item 6"];
}
In the method setUpMenuView lets begin describing our UIView container.
If the stub isn’t already in the implementation file, bring the stub over from the .h file. Copy from .h and paste into .m. Add some curly braces and we’ll begin after one small step.
(void)setUpMenu{
}
The next small step, define the width of our UIView container for the menu.
Jump back to the top of the .m file and define a value for the width the UIView will be. Define the value below #import in the .m file.
#import "ViewController.h"

#define menuWidth 170.0
This will be referred to later when we create some behaviors and its convenient to have it in one place. Changing the value here will change it every time menuWidth is called throughout this class.
Change this number as needed for your menu. Now back to our menu setup.
Inside the curly braces on the method setUpMenu, add the following code.
-(void)setupMenuView{
    self.viewForMenu = [[UIView alloc] initWithFrame:CGRectMake(-menuWidth,
                                                                177.0,
                                                                menuWidth,
                                                                290 )];

    self.viewForMenu.backgroundColor = [UIColor clearColor];
    [self.view addSubview:self.viewForMenu];
}
LINE 2 Instantiates the view and defines the size.
LINE 7 Sets the background color of the view to green.
LINE 8 Adds the newly created view as a sub view to the view.
The self.viewForMenu BackgroundColor is currently green so you can see it. When were done, this will be changed to clearColor for a much nicer effect.
The menu width¦ is just what it says. It is the defined value at the top of our code. The 177 is how far down from the top, and the 290 is the length of the menu. Change these to suit your needs.
Next well setup our table view within the view we just created which we called “viewForMenu”.
Still within the curly braces of the setUpMenuView…
Instantiate the table view property and tell it that it conforms to the size of the view, “viewForMenu”.
-(void)setupMenuView{
    self.viewForMenu = [[UIView alloc] initWithFrame:CGRectMake(-menuWidth,
                                                                177.0,
                                                                menuWidth,
                                                                290 )];

    self.viewForMenu.backgroundColor = [UIColor clearColor];
    [self.view addSubview:self.viewForMenu];

    // Setup the table view.
    self.viewForTable = [[UITableView alloc] initWithFrame:self.viewForMenu.bounds
                                                     style:UITableViewStylePlain];
    self.viewForTable.backgroundColor = [UIColor clearColor];
    self.viewForTable.separatorStyle = UITableViewCellSeparatorStyleSingleLine;
    self.viewForTable.scrollEnabled = NO;
    self.viewForTable.alpha = 1.0;

    self.viewForTable.delegate = self;
    self.viewForTable.dataSource = self;

    [self.viewForMenu addSubview:self.viewForTable];

}
Set the other viewForTable properties as shown. Declare that the viewForTable is the delegate and data source and add the subview. This completes the code for the method “setupMenuView”. The lines of code added are self explanatory. The line setting to the alpha isn’t absolutely necessary but we’ll put it there in case later we want to set the alpha to zero.
When our view loads we want this created. So back to the top of our implementation file in the viewDidLoad method, call this method. [self setUpMenuView]
- (void)viewDidLoad
{
    [super viewDidLoad];
    self.myView.image = [UIImage imageNamed:@"BG"];

    //beginning of menu creation
    self.menuItems = @[@"Close", @"Second View", @"Menu Item 3", @"Menu Item 4", @"Menu Item 5",@"Menu Item 6"];

    [self setupMenuView];
}
Now that our menu view is created add the table view methods. The table is going to fill our menu view and show the array of menu items.
These are the required methods for the TableView delegate and data source protocols.
Number of Sections, Number of Rows in Section, cell for row at index path.
Add these now as in the screen shot below.
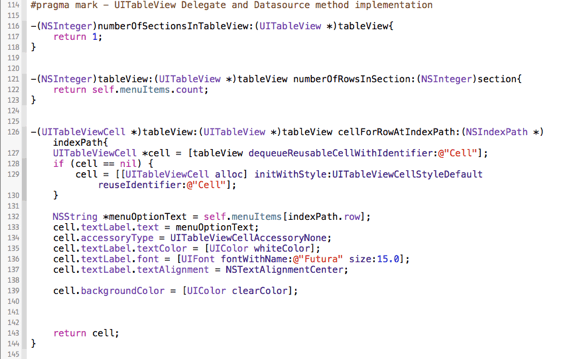
Number of sections is 1.
Number of rows is however many items are in our array.
Cell for row at index path is where we create and define what our table cell will contain and it’s format.
Finally for the fun part! Applying some physics to our menu! But first, there is just one last thing to add to the viewDidLoad method.
Instantiate the dynamic animator and tell it what its reference view is. In our case, its the whole view.
In viewDidLoad just below [self setUpMenu] add the following;
self.animator = [[UIDynamicAnimator alloc] initWithReferenceView:self.view];
- (void)viewDidLoad
{
    [super viewDidLoad];
    self.myView.image = [UIImage imageNamed:@"BG"];

    //beginning of menu creation
    self.menuItems = @[@"Close", @"Second View", @"Menu Item 3", @"Menu Item 4", @"Menu Item 5",@"Menu Item 6"];

    [self setupMenuView];

    self.animator = [[UIDynamicAnimator alloc] initWithReferenceView:self.view];

    // Do any additional setup after loading the view, typically from a nib.
}
Now lets add some UIKitDynamics behaviors to act on these objects. Find the other method we created, (showMenu(BOOL)yesNo) and add the following code.
-(void)showMenu:(BOOL)yesNo{
    [self.animator removeAllBehaviors];
    // set some values  open YES is the left value -- open NO is the right value
    // when then menu is told to open, the values on the left of
    // "yesNo" are applied to the gravity
    CGFloat gravityDirectionX = (yesNo) ? 0.3 : -1.0;

    //instantiate a behavior ******* GRAVITY *******
    //how much gravity is acting on our object and from what direction?
    UIGravityBehavior *gravityBehavior = [[UIGravityBehavior alloc] initWithItems:@[self.viewForMenu]];
    gravityBehavior.gravityDirection = CGVectorMake(gravityDirectionX, 0.0);
    //add the behavior
    [self.animator addBehavior:gravityBehavior];
}
The first behavior we’ll add to work on our object is GRAVITY. While this looks like a lot of code, it really isnt.
LINE 2 First we call a for a removal of any behaviors each time this method is called. Like hitting a “clear” button.
LINE 6 Defines the direction and the amount. With this code there are two values for the different directions effected. X is side to side. Y is up and down. Since our menu slides in from the side we are using “gravityDirectionX”
LINE 10 Instantiate the behavior and tell it to work on the menu we created.
LINE 12 Define parameters.
LINE 14 Add the behavior to the Dynamic Animator which we named animator
Now add this method to our menu button so that when the menu button is touched, this method is called.
[self showMenu:YES];
- (IBAction)menuAction:(id)sender {

    [UIView animateWithDuration:1.0 animations:^{
        self.menuButton.alpha = 0;

    }];
    [self showMenu:YES];
}
Now build and run the app. You should see that when the menu button is touched a green menu slides across the screen and disappears.
To stop the menu, it must collide with something. We’ll add a COLLISION behavior to our method by going through the same steps.
First add a float value for the boundary point. This is a point to point line which will tell the object where to stop.
-(void)showMenu:(BOOL)yesNo{
    [self.animator removeAllBehaviors];
    // set some values  open YES is the left value -- open NO is the right value
    // when then menu is told to open, the values on the left of
    // "yesNo" acts on the gravity and boundary point
    CGFloat gravityDirectionX = (yesNo) ? 0.3 : -1.0;
    CGFloat boundaryPointX = (yesNo) ? menuWidth : -menuWidth;

    //instantiate a behavior ******* GRAVITY *******
    //how much gravity is acting on our object and from what direction?
    UIGravityBehavior *gravityBehavior = [[UIGravityBehavior alloc] initWithItems:@[self.viewForMenu]];
    gravityBehavior.gravityDirection = CGVectorMake(gravityDirectionX, 0.0);
    //add the behavior
    [self.animator addBehavior:gravityBehavior];

    //instantiate a behavior ******* COLLISION *******
    //what do we collide with?
    UICollisionBehavior *collisionBehavior = [[UICollisionBehavior alloc] initWithItems:@[self.viewForMenu]];
    [collisionBehavior addBoundaryWithIdentifier:@"menuBoundary"
                                       fromPoint:CGPointMake(boundaryPointX, 580)
                                         toPoint:CGPointMake(boundaryPointX, 0)];
    [self.animator addBehavior:collisionBehavior];
}
LINE 7 Create a boundary point for the collision. Having these parameters together will make it easier to manipulate effects to get your desired result.
LINE 19 Instantiate the behavior (this time collision) and tell it to work on the menu we created.
LINE 21 Tell it where and what to collide with. In this case we’ll create a custom line as a boundary that runs from top to bottom using the “addBoundaryWithIdententifier:fromPoint:toPoint:” The width out (“X” position) boundary will be the width of our menu.
LINE 24 Add the behavior to the Dynamic Animator which we named animator.
Build and Run the app. Now the menu slides out, stops at the boundary, and it has a little bounce.
Lets give it a little more bounce by adding a behavior item. Also lets get rid of the green background. Back in our setupMenuView method change the background color to clear.
self.viewForMenu.backgroundColor = [UIColor clearColor];
Build and run again. This is looking better. The menu doesn’t have any functionality yet but we’ll get to that later.
Add a UIDynamicItemBehavior to the UIView for the menu.
-(void)showMenu:(BOOL)yesNo{
    [self.animator removeAllBehaviors];
    // set some values  open YES is the left value -- open NO is the right value
    // when then menu is told to toggle open, the values on the left of
    // "yesNo" acts on the gravity, boundry point, and bounce
    CGFloat gravityDirectionX = (yesNo) ? 0.3 : -1.0;
    CGFloat boundaryPointX = (yesNo) ? menuWidth : -menuWidth;
    CGFloat bounceAmount = (yesNo) ? .4 : .3;

    //instantiate a behavior ******* GRAVITY *******
    //how much gravity is acting on our object and from what direction?
    UIGravityBehavior *gravityBehavior = [[UIGravityBehavior alloc] initWithItems:@[self.viewForMenu]];
    gravityBehavior.gravityDirection = CGVectorMake(gravityDirectionX, 0.0);
    //add the behavior
    [self.animator addBehavior:gravityBehavior];

    //instantiate a behavior ******* COLLISION *******
    //what do we collide with?
    UICollisionBehavior *collisionBehavior = [[UICollisionBehavior alloc] initWithItems:@[self.viewForMenu]];
    [collisionBehavior addBoundaryWithIdentifier:@"menuBoundary"
                                       fromPoint:CGPointMake(boundaryPointX, 580)
                                         toPoint:CGPointMake(boundaryPointX, 0)];
    [self.animator addBehavior:collisionBehavior];

    //instantiate a behavior item ******* ELASTICITY *******
    // what is the bounce factor when it collides with the boundry?
    UIDynamicItemBehavior *menuViewBehavior = [[UIDynamicItemBehavior alloc] initWithItems:@[self.viewForMenu]];
    menuViewBehavior.elasticity = bounceAmount;
    [self.animator addBehavior:menuViewBehavior];

}
As you can see we go through the same steps. Every time a behavior is instantiated it must get added to the dynamic animator, otherwise it is never called.
Making the menu do something! Tell the selected cell what actions to take when touched. For the first item which is “Close Menu”, we will change the showMenu bool to NO,. To make the MENU button reappear we will return it’s alpha to 1.
To do this we need the TableView method, didSelectRowAtIndexPath. This translates to – what row did you touch and what do you want to have happen?.
Add the following below the other table view methods.
-(void)tableView:(UITableView *)tableView didSelectRowAtIndexPath:(NSIndexPath *)indexPath{
    [[tableView cellForRowAtIndexPath:indexPath] setSelected:NO];

    if (indexPath.row == 0) {
        [self showMenu:NO];

        [UIView animateWithDuration:1.3 animations:^{

            self.menuButton.alpha=1;
        }];


    }else if (indexPath.row == 1) {

        // code here to do something else

    }else if (indexPath.row == 2) {

        // code here to do something else

    }else if (indexPath.row == 3) {

        // code here to do something else

    }else if (indexPath.row == 4) {

        // code here to do something else

    }else if (indexPath.row == 5) {


    }

}
LINE 5 If the first row is touched, switch the showMenu bool to NO, which will retract the menu. Then return the menuButton to show itself by animating the alpha back to “1”.
BUILD AND RUN
When the menu button is touched our menu slides out with GRAVITY acting on it, it has a little extra ELASTICITY when it COLLIDES with our boundary. Pretty cool. Touching the “Close Menu” row on the table makes it slide back to the left. Notice how the menu comes out a bit slowly. This can be helped by giving the menu a PUSH to get started. If a PUSH behavior is added to our animator the initial start of the menu movement is given a shove. Play with these behaviors and experiment. You’ll come up with some pretty neat effects.
ONE last thing. I want to make the second row go to another view controller when touched. We’ll do this in two easy steps.
In the very beginning we dragged on an additional view controller. When the second row in the sliding menu is touched I want to navigate to the other view controller.
Back in the storyboard we’ll create a Segue to the other view controller and give it an identifier. Control +Drag from the yellow icon on the first view controller to the middle of the second view controller and let go. When you let go a link appears between the two controllers. That’s the SEGUE!
Click on the segue. The inspector window pops open. In the Identifier field give it a name. I will name this “to2”
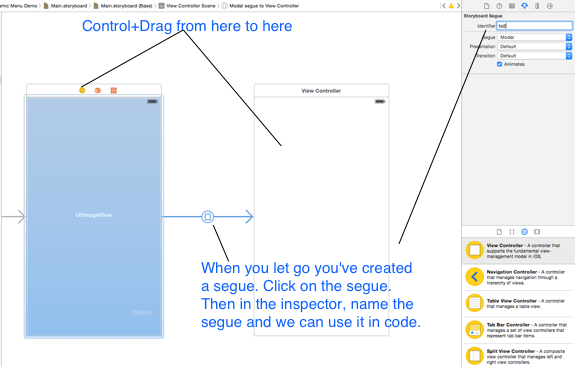
Back in the tableview method didSelectRowAtIndexPath, under our second “if” statement, add the following code:
[self performSegueWithIdentifier:@”to2″ sender:nil];
-(void)tableView:(UITableView *)tableView didSelectRowAtIndexPath:(NSIndexPath *)indexPath{
    [[tableView cellForRowAtIndexPath:indexPath] setSelected:NO];

    if (indexPath.row == 0) {
        [self showMenu:NO];

        [UIView animateWithDuration:1.3 animations:^{

            self.menuButton.alpha=1;
            self.blurView.alpha=0;

        }];


    }else if (indexPath.row == 1) {

        // code here to do something else
        [self performSegueWithIdentifier:@"to2" sender:nil];

    }else if (indexPath.row == 2) {

        // code here to do something else

    }else if (indexPath.row == 3) {

        // code here to do something else

    }else if (indexPath.row == 4) {

        // code here to do something else

    }else if (indexPath.row == 5) {


    }

}
Build and run. When the “Second View” row is touched in our menu we will navigate to the second view controller. Of course you’re stuck there because we didn’t make a way back. Add a button to the second view controller and create another segue to return.
Download the full project here. Dynamic-Menu-DemoDynamic Menu Demo
Also available on GitHub.
Muhammad Ameen Sheikh says
Very nice….really helpful. Few questions which I like to ask.
1.) The menu button is disappearing on click and the menu slides out. I do not want the menu button to disappear (done this) and I want the slide out menu to disappear on the menu button as well. So I want the menu button to do 2 things, show the slide out menu and click and make it disappear as well on click.
2.) The height of the menuView is fixed, how can it be made flexible or how can it be made 100% of screen size?
3.) I have set the elasticity to 0 but the menu still bounces, how can this be fixed, I could not find any solution for this?
4.) When the menu slides back in there is a small part of if which can still be seen. How to fix that?
Thanks again for the awesome tutorial!
Martin says
Thank you, I’ll try to answer your questions.
1) In the menuAction method comment out the alpha change and below the animation function add the following: [self.view addSubView:self.menuButton];
The menu button will now stay on top and be available for a touch. To make it toggle the menu you could add a BOOL to indicate when the menu is open or closed. When the menu open == YES then the menuAction could toggle the menu closed. When menu is closed == NO, then toggle the menu open.
2) The size of the menu is defined as 170 points at the top of the implementation file. Changing that number will change the size of the menu width. For example if you make the #define menuWidth 320.0, then the menu will be as wide as the iPhone. In the -(void)setUpMenuView method you can play with the integers that follow CGRect. Something like this would position the menu 10 points down, as wide as define menuWidth is set, and 400 points long self.viewForMenu = [[UIView alloc] initWithFrame:CGRectMake(-menuWidth,
10,
menuWidth,
400 )];
3) No bounce… probably don’t use UIKIt Dynamics. UIKit Dynamics is intended to bring a physics feel to objects. A simple view transition will work with no bounce.
4) The visible part of the menu can be changed by playing with the CGFloat value for boundryPointX. Currently the menuWidth is 170. If you make the boundryPointX settings be menuWidth : -175 it will be completely off screen.
I hope that helps!
u4fifa says
You did it !