Update: April 2025. A new version called How to Use the Slider in SwiftUI has been posted.
The UISlider is one of the default controls/objects that you can drag in to a storyboard on Xcode. The UISlider class is part of the UIKit framework. Today, we’ll have a look at how the slider works and give an example of how it might be used in one of your applications.
Look out for our next UISlider tutorial where we’ll look more in depth at the UISlider such as setting the value rather than getting the value as well as changing the sliders appearance. The second tutorial will be added to this section.
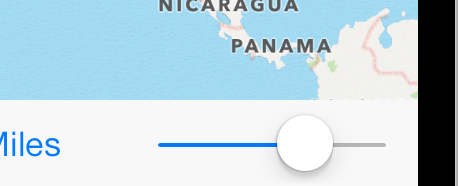
A UISlider can be used for various purposes in your application such as a slider to control volume, screen brightness, set distances and many other cases. In todays tutorial I want to create a slider that sets the default zoom distance when zooming in to your current location on a map.
UISlider Tutorial
 Lets begin by creating a Single View Application for the iPhone. Add the MapKit framework and then open up the storyboard. Drag out a toolbar at the bottom of the screen and change the UIButton text to “Zoom to 10 Miles”. We’ll use 10 miles as our default setting. Add a flexible spacer and then add a UISlider to the right of the flexible spacer. I don’t think you would typically want to put a UISlider on a toolbar, but for the sake of a simple demo we might as well do it this way.
Now add a map to fill the rest of the screen. When done, you should see something like this below:
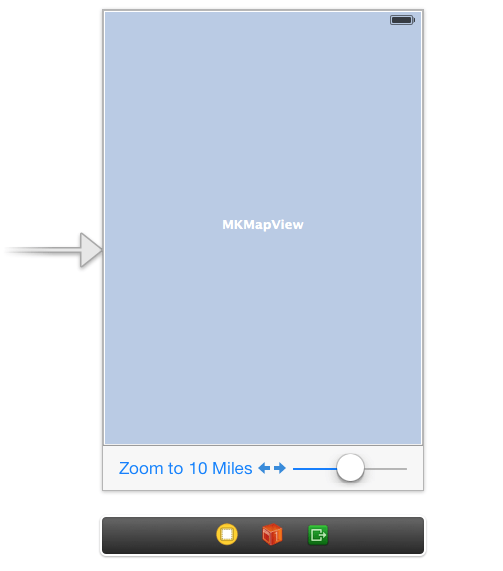
Next we need to connect up our mapView to the header and our UISlider and UIButton to the implementation. We do that by CTRL+dragging from each object in the view to the appropriate place in the ViewController.h or .m file. Also at this point, import the MapKit Framwork in to the ViewController.h file.
For the UIButton, use the following settings when CTRL+dragging:
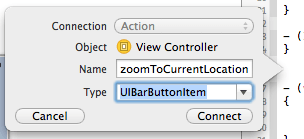
For the UISlider, use the following settings when CTRL+dragging:
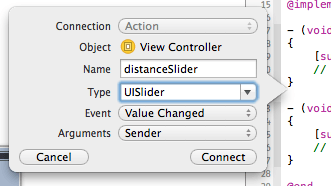
ViewController.h
#import <UIKit/UIKit.h>
#import <MapKit/MapKit.h>

@interface ViewController : UIViewController

@property (weak, nonatomic) IBOutlet MKMapView *mapView;

@end
ViewController.m
- (IBAction)distanceSlider:(UISlider *)sender {

}

- (IBAction)zoomToCurrentLocation:(UIBarButtonItem *)sender {

}
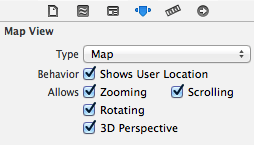 Lets now inspect the map and the UISlider in the Storyboard and set up some defaults. For the map you need to select “Shows User Location”. Rather than using the Core Location Framework, we’ll just use the current location abilities of the Map Kit Framework. Enabling this option takes away having to do some manual coding.
 Next we need to inspect the UISlider. This can be set how you want to set it, but I opted for a 0 to 10 scale with the default being at 10. My idea is that zero will zoom right in to your current location (well, perhaps within a few hundred yards) and then 1 would be a mile leading up to 10 which might be a 10 mile span.
Now lets utilise the value created by the slider and make it provide a distance for the map. To do that we need to use an MKCoordinateRegion. Add this just below the @implementation line in the implementation file.
MKCoordinateRegion region;
Next lets implement some code in the distanceSlider method that we created when we CTRL+dragged from the UISlider.
- (IBAction)distanceSlider:(UISlider *)sender {
    int theValue = sender.value;
    float theSpan = theValue * 0.0145;
    region.span = MKCoordinateSpanMake(theSpan, 0.0);
    self.theButton.title = [NSString stringWithFormat:@"Zoom to %d Miles", theValue];
}
What we do here on the second line is get the value of the sender (UISlider) and convert it to an integer and store the value in theValue.
Next we create a float called theSpan and do a cheap and cheerful calculation based on 1 degree being equal to 69 miles. We multiply theValue with 0.0145 which is 1 mile in degrees. Note that this could be an inaccurate way to calculate if providing it as the longitude delta as east to west because the closer you are to the north or south pole, the shorter the distance between each degree. So, the number we create here will be used to specify latitude delta which is the north to south distance which never changes. 1 degree always equals 69 miles.
On the next line we use the MKCoordinateSpanMake function and specify the latitude delta as theSpan but leave the longitude at 0.0. MapKit only requires one of these values to work with because the map is unlikely to be a square and therefore, the view will clip either the sides or the top of the map. We store that span created in to region.span.
Finally, we set the text of the UIBarButton title to theValue along with some text around it using the stringWithFormat class method. This means that when the slider moves, the text will change to “Zoom to 8 miles” and so on. You will notice an error at this point. This is because we forgot earlier to add an IBOutlet for the UIButton. We already have an IBAction connected but because we are modifying the button we also need to CTRL+drag to the header so that we have a property to work with.
So that the region is set when the app first loads, we also add the following line to viewDidLoad. Because we default to 10 miles, I opted to default to 10 miles in code.
region.span = MKCoordinateSpanMake(0.145, 0.0);
Now we need to start zooming to our location. We do this with the following code put in the IBAction method created for the UIBarButtonItem:
- (IBAction)zoomToCurrentLocation:(UIBarButtonItem *)sender {
    region.center.latitude = self.mapView.userLocation.coordinate.latitude;
    region.center.longitude = self.mapView.userLocation.coordinate.longitude;
    [self.mapView setRegion:region animated:YES];
}
So, to zoom to a location we need to set a few things. First we need an MKCoordinateRegion. We created this earlier. We need a span which was created in viewDidLoad as well as being updated when the slider is moved. We also need to set the centre with a latitude and longitude. We’ll get these final 2 items from the mapView object.
So, line 2 we set the region.centre.latitude with self.mapView.userLocation.coordinate.latitude. Likewise, on the next line we do the same but specify longitude.
Finally, we set the region of the mapView with setRegion and pass it the region that has been created. We set animated to YES here so that we zoom in rather than just appear at the new location.
Testing
The app can be tested in the simulator or on a device. When loading the app for the first time, make sure you allow your current location to be used. On the simulator, go to Debug > Location and set a location there. Now that you are set, slide the slider and zoom at your desired setting to the current location.
You can download the full project here.
Full Code
ViewController.h
#import <UIKit/UIKit.h>
#import <MapKit/MapKit.h>

@interface ViewController : UIViewController

@property (weak, nonatomic) IBOutlet MKMapView *mapView;
@property (weak, nonatomic) IBOutlet UIBarButtonItem *theButton;

@end
ViewController.m
#import "ViewController.h"

@interface ViewController ()

@end

@implementation ViewController

MKCoordinateRegion region;

- (void)viewDidLoad
{
    [super viewDidLoad];
	// Do any additional setup after loading the view, typically from a nib.
    region.span = MKCoordinateSpanMake(0.145, 0.0);
}

- (IBAction)distanceSlider:(UISlider *)sender {
    int theValue = sender.value;
    float theSpan = theValue * 0.0145;
    region.span = MKCoordinateSpanMake(theSpan, 0.0);
    self.theButton.title = [NSString stringWithFormat:@"Zoom to %d Miles", theValue];
}

- (IBAction)zoomToCurrentLocation:(UIBarButtonItem *)sender {
    region.center.latitude = self.mapView.userLocation.coordinate.latitude;
    region.center.longitude = self.mapView.userLocation.coordinate.longitude;
    [self.mapView setRegion:region animated:YES];
}

- (void)didReceiveMemoryWarning
{
    [super didReceiveMemoryWarning];
    // Dispose of any resources that can be recreated.
}

@end
John Legg says
Great control. Is there a way to make the map zoom level change as the value of the slider changes without touching the button?
MatthewN says
There’s a good answer here to detect when the user stoops sliding the slider:
http://stackoverflow.com/questions/9390298/iphone-how-to-detect-the-end-of-slider-drag
I would then put the code to zoom in that method so it won’t do anything until a finger leaves the screen.
mamjed says
Is there anyway I can make the native Audio slider used in the Music app? The one with the line not a dot.
Martin Bateson says
Yes there is a UI appearance property which applies to the slider.
[[UISlider appearance]setThumbImage:(UIImage *) forState:(UIControlState)];
So for example you can create an image to use for the ThumbImage (the dot) and make that image anything you want. It can be a line, a star, whatever.
Once the image is created you can put it into Images.xcassets and name it – for example “thumbLine”
UIImage *thumbImage = [UIImage imageNamed:@”thumbLine”];
Then …
[[UISlider appearance] setThumbImage:thumbImage forState:UIControlStateHighlighted];
and also
[[UISlider appearance] setThumbImage:thumbImage forState:UIControlStateNormal];