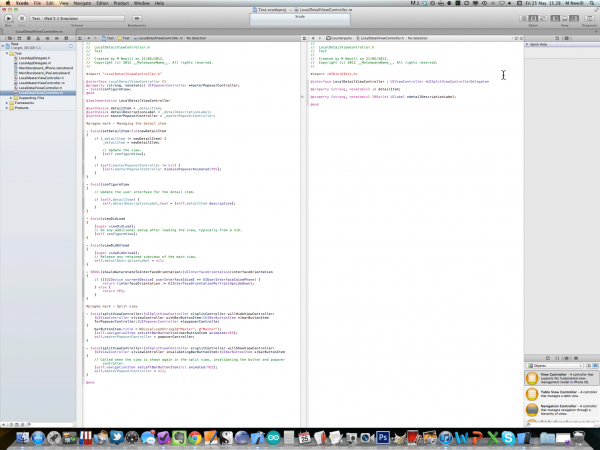
Now that the iPad is a few years old and people are using them more in day to day work, a common question asked in forums is that of being able to develop apps for the iPad on the iPad. The problem with this is that Apple has no plans that I know of to launch Xcode for the iPad. The reason for this is likely to be related to how tightly integrated the frameworks are with Mac OS X.
To develop for iOS devices while on the go typically requires that you have a MacBook running OS X along with Xcode installed. For some of us, we prefer to carry just an iPad around due to the impressive battery life, instant on and smaller form factor which all make it ideal to throw in a bag.

Using VNC or LogMeIn to Remotely Connect to a Mac
Although not the best work around, there is a way to still develop apps whilst on the move. Macs and PCs have had software available for years that allow you to remote control them. For the Mac, one popular option is VNC which comes as software that you install on your Mac and then an app for your iPhone or iPad that you remote control your Mac with. Over 3G the results are workable and to be honest, the visuals look quite stunning, especially if you can force your Mac to match the same Retina resolution on the iPad.
Another option is LogMeIn which is a little easier to configure than VNC and allows you to connect up with a free app or via a web browser.
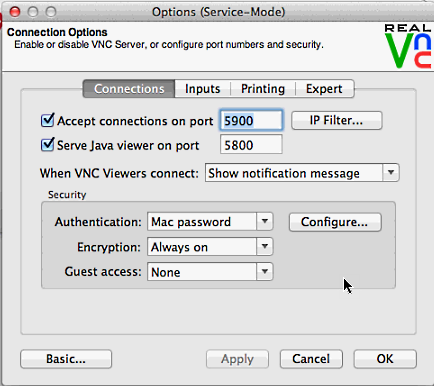
Each option obviously requires that your Mac is switched on and accessible online. It also requires that you make some changes to your router to allow the various ports on your Mac to be made public. LogMeIn makes this easier as it simply installs software on the computer and all the security is handled for you. For those who prefer VNC, there are a number of options available to fine-tune how things work. Just make sure you use Encryption which is built in to the VNC software or even better, configure a VPN tunnel to secure the connection even more (the latter is out of the scope of this article).
How Responsive is Xcode When Run Over VNC/LogMeIn?
Remote desktop style applications will always suffer with a bit of lag as all movements on the screen need to be sent over the web to the remote and then displayed on the screen. Having said that, I am pleasently surprised at how quick the LogMeIn and VNC services run either over a good 3G connection or over WiFi. I generally just edit code over VNC which means screen updates are not a huge issue. I have also found that using the storyboard in Xcode also works relatively well although some of the shortcuts are a little harder to utilise such as CTRL+drag to connect up actions/outlets etc…
Below are instructions on how to get your iPad connected up to your Mac to remote control it from within your local network or from out on the public Internet.
How to Install and Configure LogMeIn
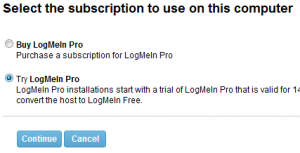
 Remember that LogMeIn is the more simple option of the two services I have mentioned. The company recently dropped the price of the iPhone/iPad app down to free. On your iPad (iPhone if you wish although I would personally find it difficult writing code on the small screen of an iPhone), go to the App Store and install LogMeIn. When done, visit the LogMeIn website and click on “Try it Free”. If you are new to the service, register. If not then log in. You can then select the necessary download file and install. Note that the service will initially set you up on a 14 day trial of the Pro version. You are free to not opt for that option after the 14 days and continue to use the service in a slightly limited way for free. If you simply need to connect then the free option is sufficient.
Log me in auto detects what computer you are running on so it’s simply a matter of selecting the free trial option as detailed in the image above and then downloading and following the onscreen instructions.
When installed you can then load up the app on your iPad and log in with the same username and password that you just registered with on the web browser on your desktop/laptop.
When logged in to the iPad version, select your computer and then select to remote control it. You’ll need to provide the Mac’s username and password (if you have one) so make sure you take a note of what that is if you don’t remember.
That’s all there is to it. I recommend LogMeIn for anybody who doesn’t want to mess around with port forwarding and setting up a service on the Mac etc…
How to Install and Configure VNC
Using VNC is a little more complicated as there’s a few things you need to take in to account. Whereas LogMeIn handles all the connectivity for you and simply broadcasts where you are from the software, VNC leaves the managment of that up to you. This means that there are several hoops to jump through to get connectivity working. These are:
- If you have a dynamic IP from your ISP then you’ll need to run a service that can track changes to that for you. DynDNS.org is one option although there’s a fee to pay for the service. What this does is transmits your current IP address from software running on your Mac or software running on your router, and sets up a domain name for you which would be in the format of yourcomputer.dyndns.org. When you configure the VNC app on the iPad to look for that URL it always has the correct IP address. There may be other ways around this depending on how long your ISP leases IP addresses for etc…
- You’ll also need to open up your firewall to allow certain ports to be forwarded. By default the VNC service will not work through a router as your home network is private and you are connecting from a public network. Port forwarding allows you to set certain traffic to be able to connect to a certain device within the network. Instructions on how to do that can be found below.
- The VNC software also costs money depending on what license you select. This is true of both the VNC app for iPad/iPhone and the computer side software you run.
For those who want a little more control, I’d suggest going for the VNC option although LogMeIn does work as well but VNC just seems to make you feel more connected to your computer at home.
Installing VNC on the iPad and Your Computer
So, you’ve decided to opt for the VNC way of connecting to your Mac. The easy part here is installing the iPad app. Simply go to the App Store and search for VNC Viewer. It currently costs $9.99 but is a universal app as well so will also install on your iPhone if you have one.
Unluckily the only version that supports Mac OS X is the Enterprise edition which can be downloded from realvnc.com. They have a trial you can download first and you can then convert to the paid version if you desire. The cost of the Enterprise Version for Mac OS X is currently $50.
Install VNC on the Mac and configure as follows:

On the iPad you just need to provide it your home networks IP address (perhaps a name through dyn.com which is discussed below) and also a local username and password on the Mac. However, you are not quite ready to connect yet unless you have already configured the port forwarding.
Configuring Port Forwarding
As your Mac is hidden on the local network away from the public internet, you need to make a few configuration changes to your firewall and allow certain ports access to your Mac. I found this works best if you configure your router to have a permanent lease so that the internal (192.168.x.x) address doesn’t change. I then suggest using portforward.com for instructions on how to configure your router correctly. A sample of how the model of router I use is found at the following website.
The full instructions for almost every type of router can be found on the portforwarding website. On the home page, select your make of router and model of router. You can then scroll down to the VNC section and click on it to get full instructions on how to configure the router to work with VNC.
Setting up DNS with dyn.com
Before I begin here, there may be free versions of this around although I didn’t find one that integrated with my router. Rather than running a program on my Mac which kept dyn.com updated with any IP address changes, I opted to configure my router to connect to dyn.com as the firmware supports dyn.com and automatic updating of my public IP. Before you purchase anything with dyn.com, log in to your home router and look around the settings to see if any kind of notification service is available. If so, use that service as the router handling it makes things a little cleaner.
After working through this section you should then be able to access your home network at either your static public IP, a dynamic IP if you don’t mind checking what it is from time to time, or via a name service like dyn.com where you are provided a name such as mymac.dyndns.com.
Connecting it All Together
Now that your DNS is all sorted and your ports are forwarded it’s time to test if it works. Internally on your home wireless network you shouldn’t have any issues. Also, if you’ve configured port forwarding correctly you should also be able to connect from outside your network. For this, you’ll need to test from another location or test with WiFi switched off if you have 3G available.
The only main problem left is that of your Mac going to sleep. Luckily there’s an option called Wake On Lan that allows the VNC app to send a signal to the network port on the Mac which in turn, wakes it up automatically. I personally find that using a wired connection to my Mac works the best although Wireless does work as well but due to interference with neighbours I stick with a wired connection.
Choosing an Optimal Resolution
I find that working remotely on a Mac works the best when the resolution matches that of the connecting device. At the moment the 27 inch iMac doesn’t support the iPad Retina resolution of 2048 by 1536 pixels. There is no option to select it although you can force it in to that mode with 3rd party software. Note that your screen at home will be blanked as it is unsupported. All I do when logging in to VNC is select that custom resolution from a dropdown and when I’m done, I switch it back to the regular 2560 x 1440 resolution.
Although it’s always easier to develop apps while on an actual Mac as you can test on a real iOS device instead of a simulator, these methods above do allow you to connect up and get some code down on the project and test it for errors etc… What works best for me is using an iPad with a bluetooth keyboard which allows for the full screen on the iPad to be used to work on rather than it being cut in half because of the virtual keyboard.
Post comments below if you have any questions or get stuck with any part of the setup.
Leave a Reply
You must be logged in to post a comment.